- Court orders operators of 14 Bay Area Subway locations to pay employees nearly $1M in wages, damages; sell or shut down their businesses US Department of Labor
- Court orders Subway franchise owners to pay workers nearly $1M – and to sell or close their stores The Associated Press
- 14 Subway sandwich shops in Bay Area owe workers back pay, judge rules San Francisco Chronicle
- Unpaid 15-year-old Subway workers were threatened when they asked for wages, feds say Sacramento Bee
- Local Subway franchisee fined $1 million, ordered to sell businesses after workplace abuses The Santa Rosa Press Democrat
- View Full Coverage on Google News
Tag Archives: Locations
Expect to see new Aldi locations across NY state, including a Staten Island store – SILive.com
- Expect to see new Aldi locations across NY state, including a Staten Island store SILive.com
- Shoppers will have more options to buy cheaper groceries as Aldi plans takeover of hundreds of beloved… The US Sun
- Could Aldi’s US Acquisitions Drive Grocery Bills Even Higher? Investopedia
- Aldi is getting bigger. Here’s why the no-frills German grocer is looking to the Southern U.S. for growth CNBC
- 0820 week in review: Aldi!, Highway 44 ‘runway,’ New Church Without Walls getting new walls and a so-so scallop season so far Citrus County Chronicle
- View Full Coverage on Google News
Star Wars Outlaws: One Planet Size Equivalent to 2-3 Zones in AC Odyssey, Locations All “Handcrafted” – MP1st
- Star Wars Outlaws: One Planet Size Equivalent to 2-3 Zones in AC Odyssey, Locations All “Handcrafted” MP1st
- Star Wars Outlaws’ Planets Will Be as Big as Two, Three Zones in Assassin’s Creed Oyssey Wccftech
- Star Wars Outlaws: Everything we know about the open world heist adventure PC Gamer
- Star Wars Outlaws sounds like it’s going to be absolutely massive The Loadout
- Star Wars: Outlaws Various Planetary Environments Are All “Handcrafted,” And Each The Size Of Multiple Assassin’s Creed Odyssey Zones PlayStation Universe
- View Full Coverage on Google News
Wagner chief offered to give Russian troop locations to Ukraine, leak says – The Washington Post
- Wagner chief offered to give Russian troop locations to Ukraine, leak says The Washington Post
- Amid feud with Putin, Wagner mercenary leader offered Ukrainians the locations of invading troops in exchange for sparing his for-hire army, leaked documents reveal Yahoo News
- Wagner Chief Offered Russian Troop Positions to Ukraine for Bakhmut – WaPo The Moscow Times
- Wagner’s Yevgeny Prigozhin Offered to Reveal Russian Positions to Ukraine, Report Says The Daily Beast
- Ukrainian serviceman dismisses Prigozhin’s tantrums as false and exaggerated Yahoo News
- View Full Coverage on Google News
Wagner head offered to reveal Russian troop locations to Ukraine – Washington Post – Reuters
- Wagner head offered to reveal Russian troop locations to Ukraine – Washington Post Reuters
- Amid feud with Putin, Wagner mercenary leader offered Ukrainians the locations of invading troops in exchange for sparing his for-hire army, leaked documents reveal Yahoo News
- Wagner chief offered to give Russian troop locations to Ukraine, leak says The Washington Post
- Wagner Chief Offered Russian Troop Positions to Ukraine for Bakhmut – WaPo The Moscow Times
- Ukrainian serviceman dismisses Prigozhin’s tantrums as false and exaggerated Yahoo News
- View Full Coverage on Google News
What ‘Yellowstone’ Locations Look Like in Real Life Versus the Show
As a native Montanan, I recently set off to see what “Yellowstone” locations look like in real life.

Jordan Parker Erb/Insider
I had put off watching “Yellowstone” long enough.
Having been born and raised in Montana, any mention I’ve made of my home state for the past five years has been met with questions along the lines of: “Is it like ‘Yellowstone?'”
In short, no. The modern-day western drama, with five seasons of blatant and unapologetic lawlessness, is a stark contrast to the sleepy state I grew up in. Centered on the Dutton family, led by patriarch John, “Yellowstone” boasts a cast that will do anything for their dynasty: the largest ranch in Montana. Think “Succession,” but with more cowboy hats.
But with the current season airing while I was home for the holidays, I figured it was time to settle in and learn about my culture. And within a few episodes, I realized there actually are a few things the TV show and the state have in common: settings.
Though some scenes are shot in Texas, Oregon, and Utah, many of the show’s locations really are scattered across Montana’s varied countryside — including the infamous Yellowstone Dutton Ranch. So I set out to see some of the locations for myself.
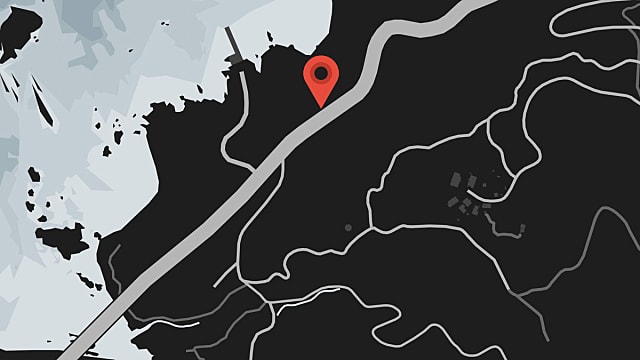
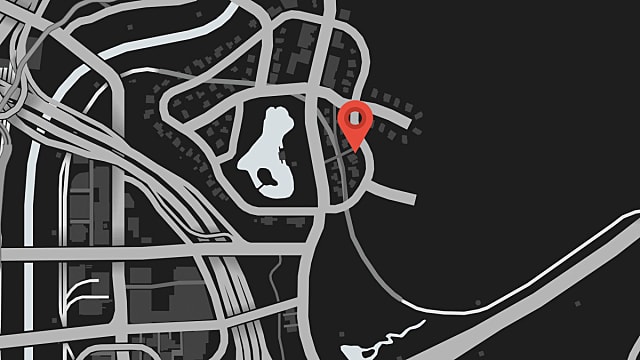
GTA 5 Online: All Snowman Locations
GTA Online players have the chance to celebrate holiday season with a new festive surprise in the form of a snowman easter egg. In order to get a rare snowman outfit players need to locate 25 snowmen all around the map.
Our guide will provide you with all snowman locations in GTA Online, including their exact spots on the map.
GTA Online Snowman Locations
Snowman Location #1
Image via Rockstar Games
The first snowman can be seen in the middle of the Duluoz Avenue at Paleto Bay.
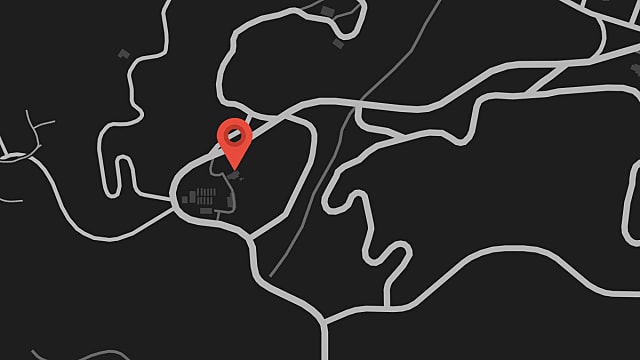
Snowman Location #2


Look for the next one south of Procopio Beach at the intersection of Great Ocean Highway.
Snowman Location #3
The next one can also be seen along the Great Ocean Highway at Chiliad Mountain State Wilderness area.
Snowman Location #4

The fourth snowman can be seen next to El Gordo Lighthouse in the eastern part of the map.
Snowman Location #5

Then, head out to the Grapeseed Main Street of the Grapeseed region for another snowman.
Snowman Location #6

For the next one travel to Sandy Shores and locate the sixth snowman at the Marina drive.
Snowman Location #7

Then, travel to Harmony at Grand Senora Desert and find the next snowman along the Joshua Road.
Snowman Location #8

At the north of RON Alternates Wind Farm you’ll find the eighth snowman along the Senora Freeway.
Snowman Location #9

This snowman can be seen at the intersection of Zancudo Road and Tongva Drive at the Tongva Valley.
Snowman Location #10
Then, move to the Great Chaparral region for the next one standing along the Bayfree Canyon Road.
Snowman Location #11

Now you need to enter the northern part of the Vinewood Hills and locate the next snowman along the Los Santos Freeway.
Snowman Location #12

The next one will take you to the Banham Canyon Drive and Buen Vino Road intersection in the western part of the map.
Snowman Location #13

Then, go a bit to the south to the Chumash beach area, and find the snowman along the Inseno Road.
Snowman Location #14
When you move to the Pacific Bluffs, look out for the other snowman along the North Rockford Drive.
Snowman Location #15

Go back to the Vinewood Hills and find this snowman along the North Sheldon Avenue.
Snowman Location #16

The next one is located very close to the last one at West Galileo Avenue.
Snowman Location #17
Move southwards to the Rockford Hills and locate this snowman at West Eclipse Boulevard.
Snowman Location #18

Move eastwards to the Alta area of Vinewood, where you can find the next snowman at the Power Street.
Snowman Location #19

The Mirror Park should be your next destination, where you can find a snowman at the Bridge Street.
Snowman Location #20
Then, move to Mirror Park Boulevard and look out for the next snowman at the Utopia Gardens.
Snowman Location #21

Vespucci Canals area has another snowman at the intersection of San Andreas Avenue and South Rockford Drive.
Snowman Location #22

Now get closer to the Vespucci Beach and locate another snowman at the Aguja Street.
Snowman Location #23

Then, head over to the Legion Square and find the next snowman at the Elgin Avenue.
Snowman Location #24

Head sothwards to the Chamberlain Hills and look out for a snowman at the Alta Street.
Snowman Location #25

Finally, travel to the El Burro Heights and locate the last snowman at the Fudge Lane.
Those are all snowman locations in GTA Online. For more GTA Online tips and tricks articles, be sure to visit our dedicated hub page.
Featured image via Rockstar Games
Several alternate locations under consideration for Browns-Bills
A massive blizzard remains in the forecast for Buffalo, and it could force Sunday’s game between the Browns and Bills out of Orchard Park.
Mary Kay Cabot of the Cleveland Plain Dealer reports that several alternate locations are under consideration for the Week 11 game, including Detroit.
That would make sense for two reasons. One, the stadium is available, since the Lions play the Giants in New Jersey. Two, the Bills play in Detroit next Thursday.
Other available NFL stadiums in the loosely general vicinity of Buffalo this weekend include Lincoln Financial Field in Philadelphia and FedEx Field in D.C. The NFL likely would prefer to not play the game in Cleveland, since that would give the Browns an unwarranted home-field advantage. (In 2005, a Giants-Saints game that was due to be played in New Orleans was shifted to Giants Stadiums, due to Hurricane Katrina.)
The looming Thanksgiving Day game for the Bills limit the league’s options, since moving the game to Monday or Tuesday would require moving the first of the league’s three Thanksgiving games.
Cabot notes that a decision likely will have to be made by Friday. By then, however, it could be too late to get the Bills out of Buffalo.
However things play out, the disruption won’t make it any easier for the Bills as they try to recover from a two-game losing streak. Especially with games to be played on Sunday and then on Thursday. Followed by a game the following Thursday in New England.
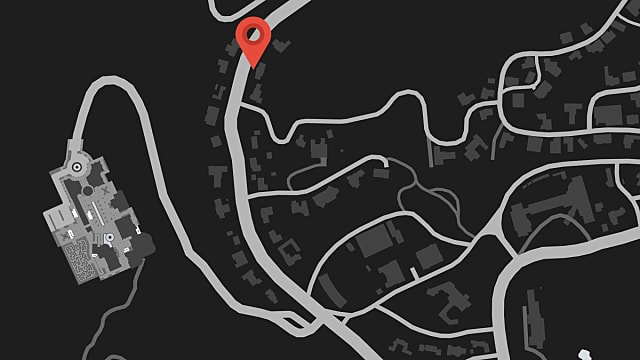
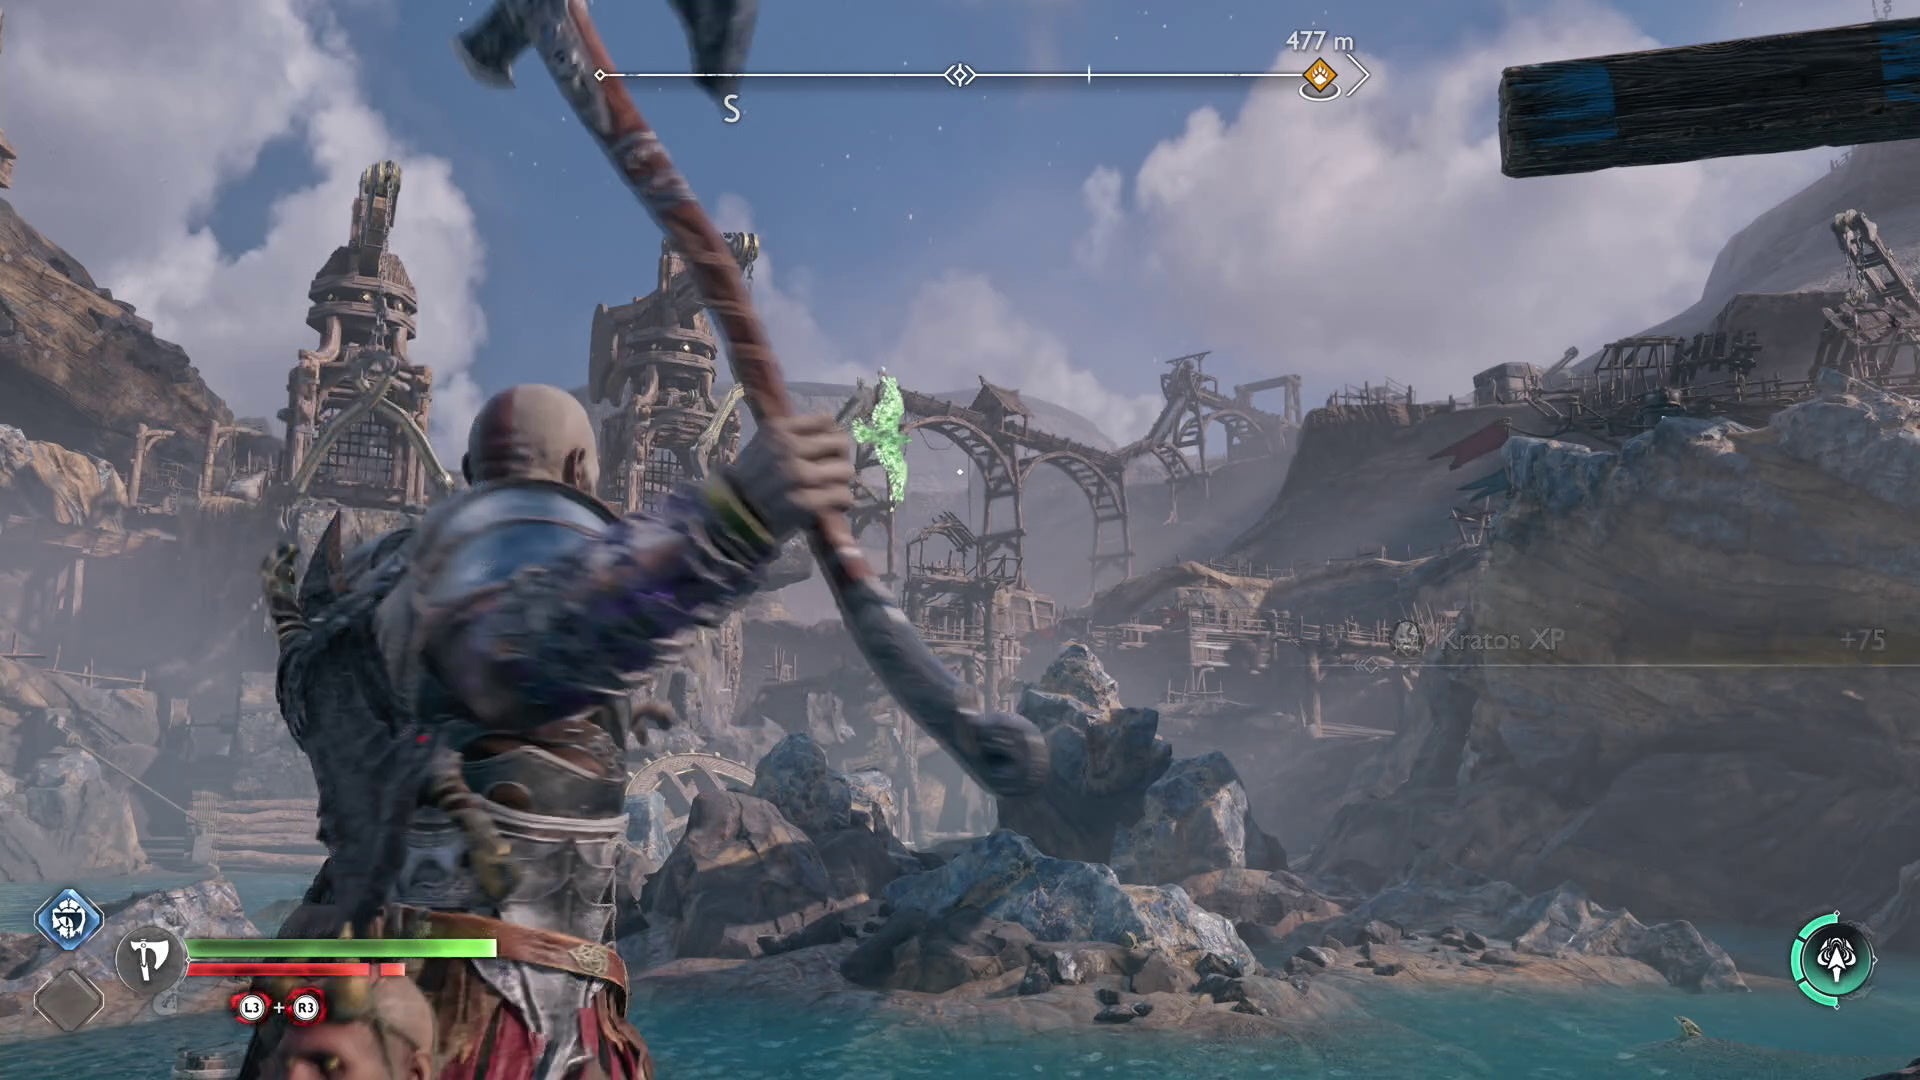
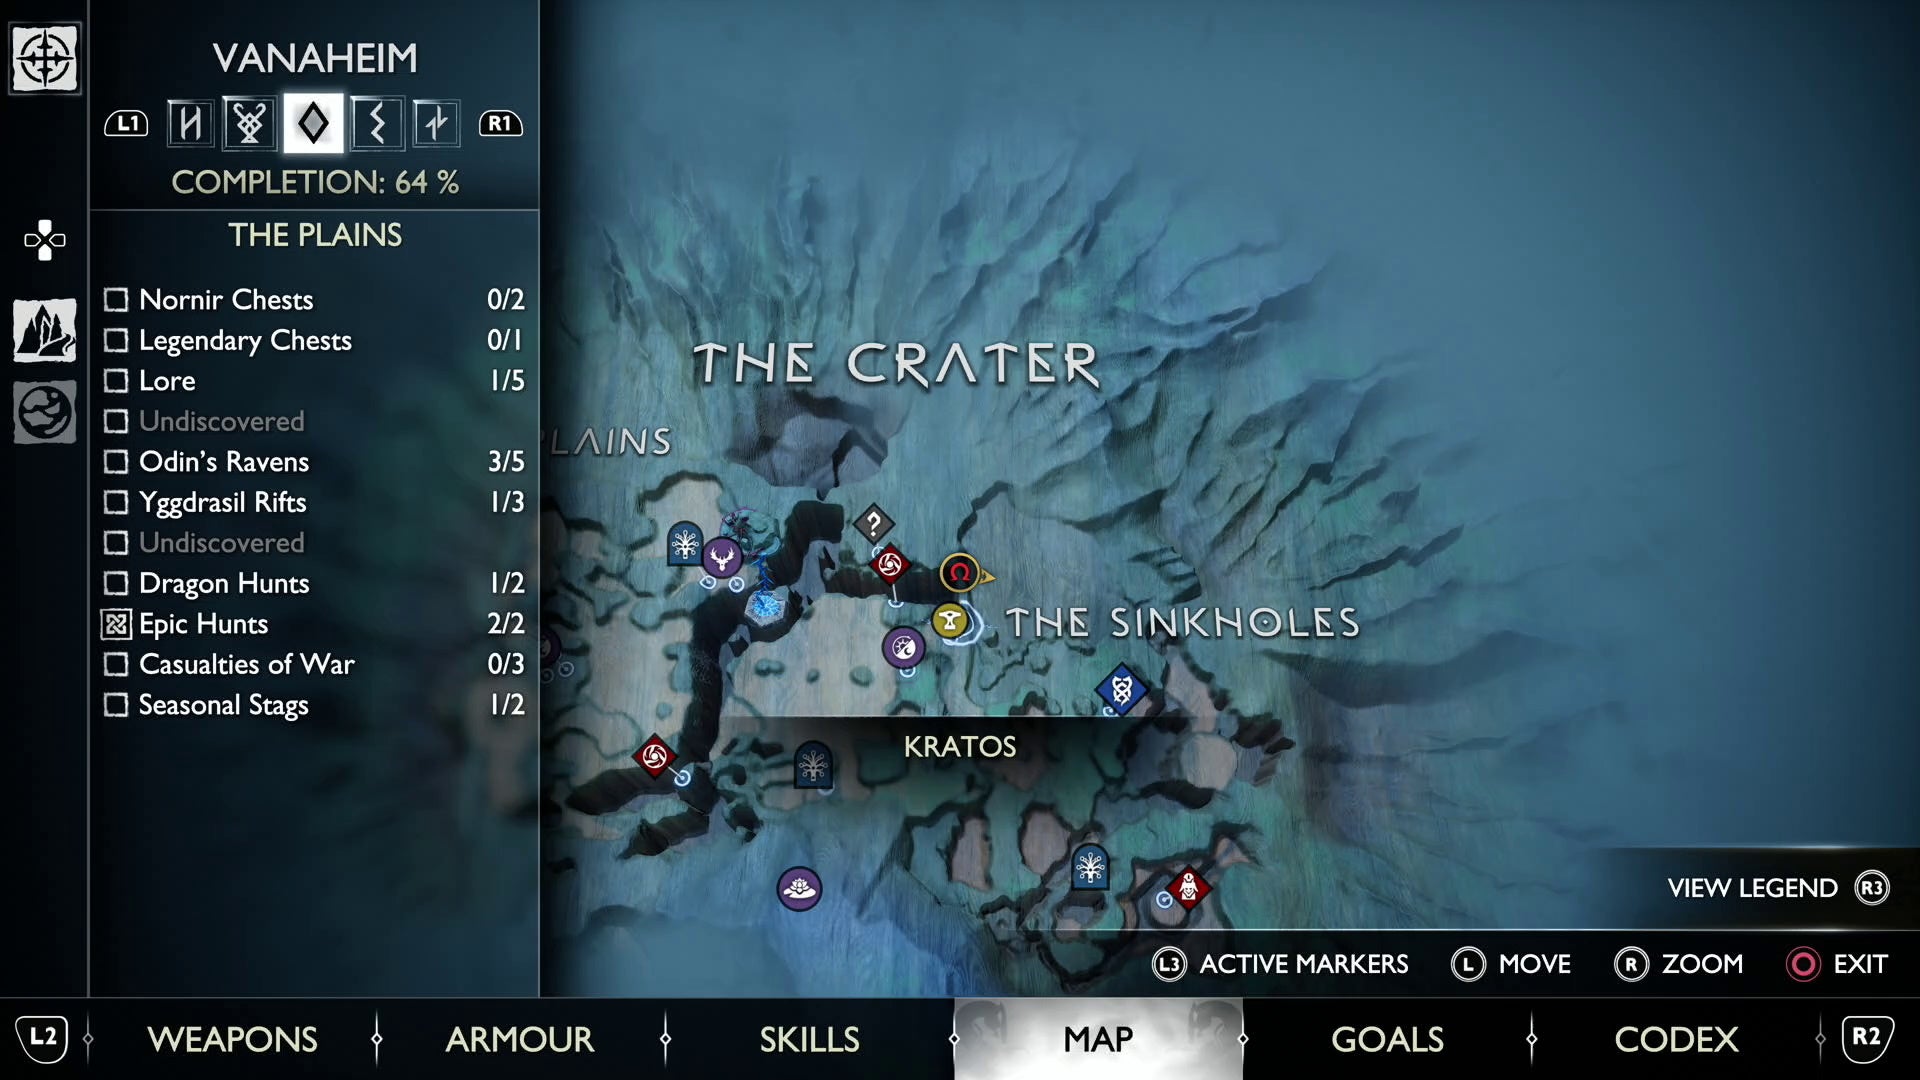
God of War Ragnarök Odin’s Ravens locations and rewards for ‘Eyes of Odin’
Odin’s Ravens are back in God of War Ragnarök, but this time you can get helpful rewards for finding them, not just XP.
You need to find 48 Ravens in total to earn all of the ‘Eyes of Odin’ Favour rewards – but to find them all, you’ll need to get some special equipment by progressing with the main story first.
It can be difficult to find some of these Ravens, even if you do have the right equipment, so we’ve got Odin’s Ravens locations in God of War Ragnarök detailed below for all Realms, including Raven locations in Svartalfheim, Alfheim, Vanaheim, Midgard, Muspelheim and Helheim.
For more help, check out our Nornir Chest locations and solutions, Muspelheim Seed locations, and best armor for early and late builds pages.
God of War Ragnarök Odin’s Ravens locations and rewards explained
There are 48 of Odin’s Ravens to find throughout the Realms in God of War Ragnarök, with a total of six rewards available from chests found in the Niflheim Realm.
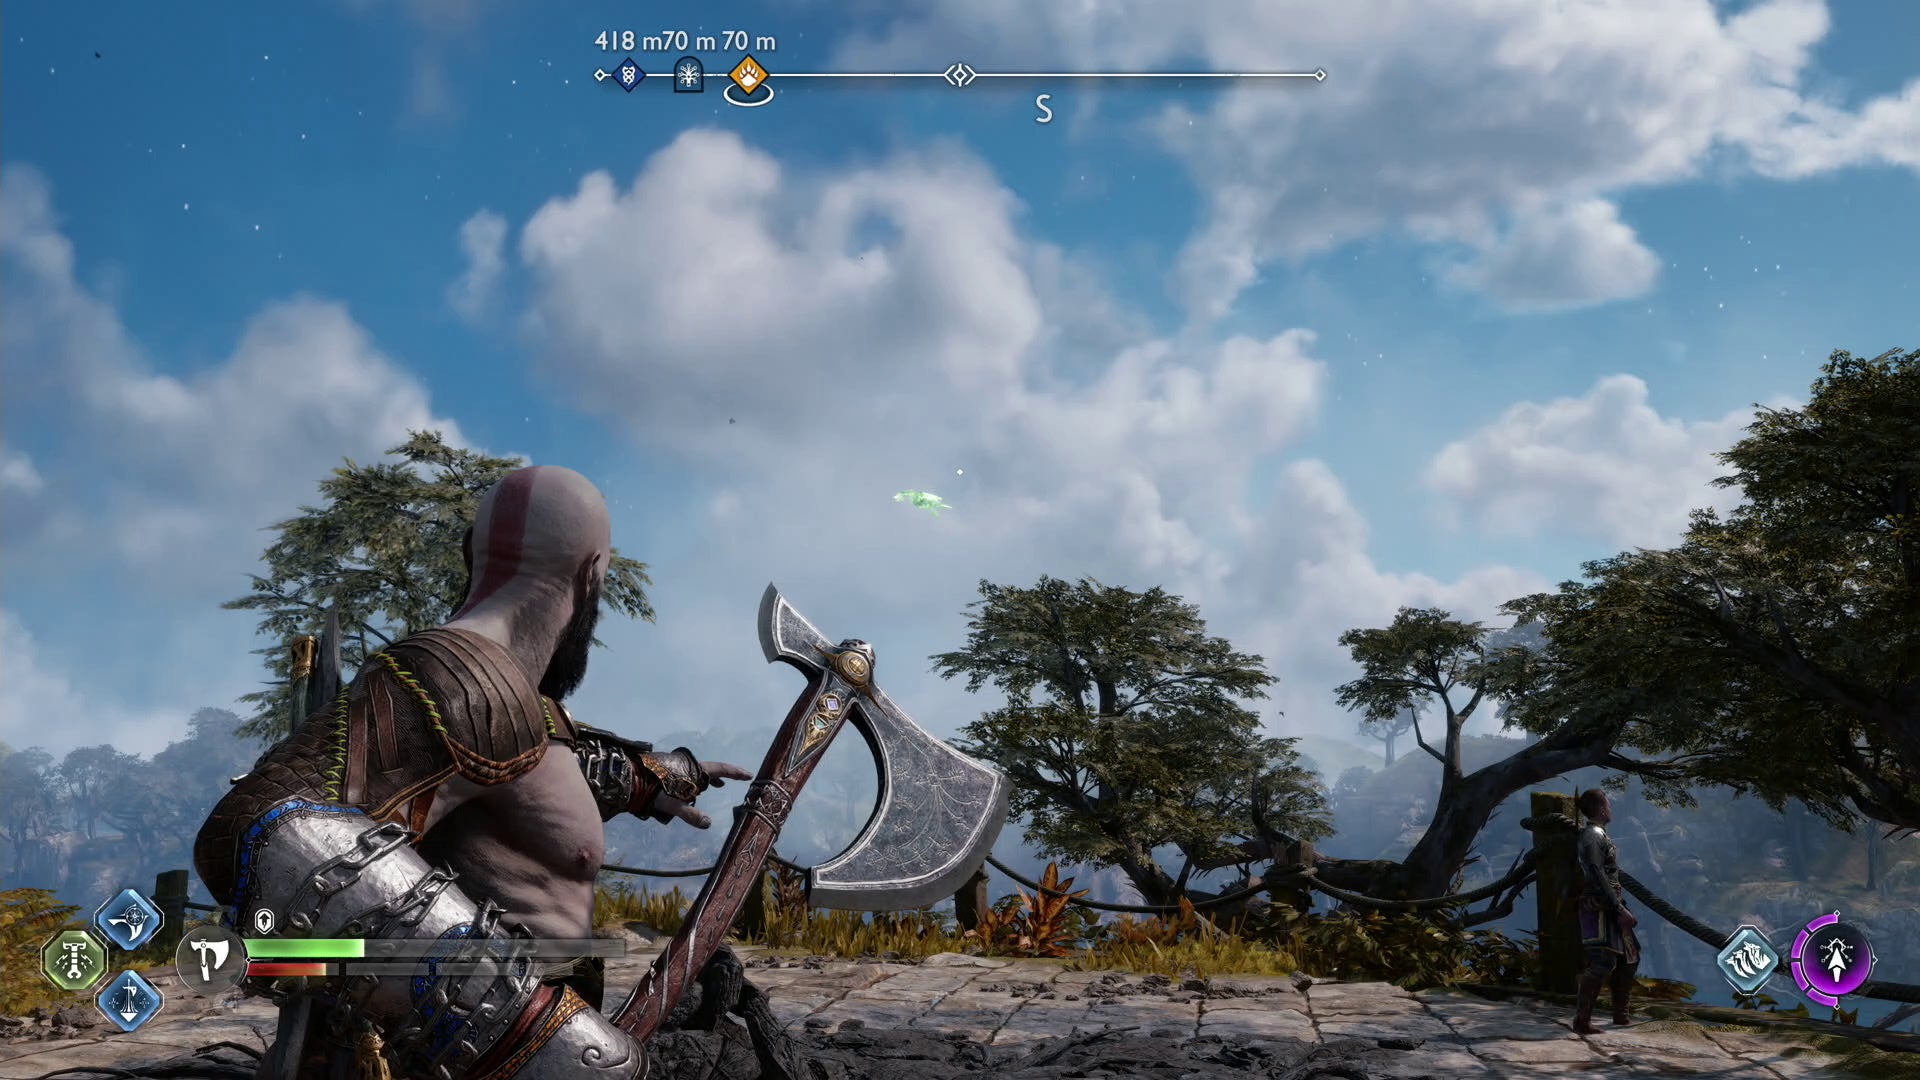
Odin’s Ravens differ from the other birds found across the Realms as they are green and translucent. This can make them easier to see at times, but when they’re flying or perched with the sky as a backdrop, the light can actually make them tougher to spot.
When you find one of Odin’s Ravens, you need to destroy it with one of your weapons (usually your Leviathan Axe) for it to count towards getting the ‘Eyes of Odin’ Favour rewards.
Once you’ve destroyed enough of them, return to the Raven Tree in Niflheim to open up the unlocked chests to get some well earned rewards and a creepy rhyming story from your Raven friends.

God of War Ragnarök ‘Eyes of Odin’ Favour rewards
The first three chests you’ll open as part of the ‘Eyes of Odin’ Favour in God of War Ragnarök contain special armour pieces, with the other three giving you a Heavy Runic Attack for each weapon.
Here’s every ‘Eyes of Odin’ reward and how to get them:
| Odin’s Ravens located | ‘The Eyes of Odin’ Reward |
|---|---|
| 6 Ravens | Girdle of Raven Tears Armour |
| 12 Ravens | Bracers of Raven Tears Armour |
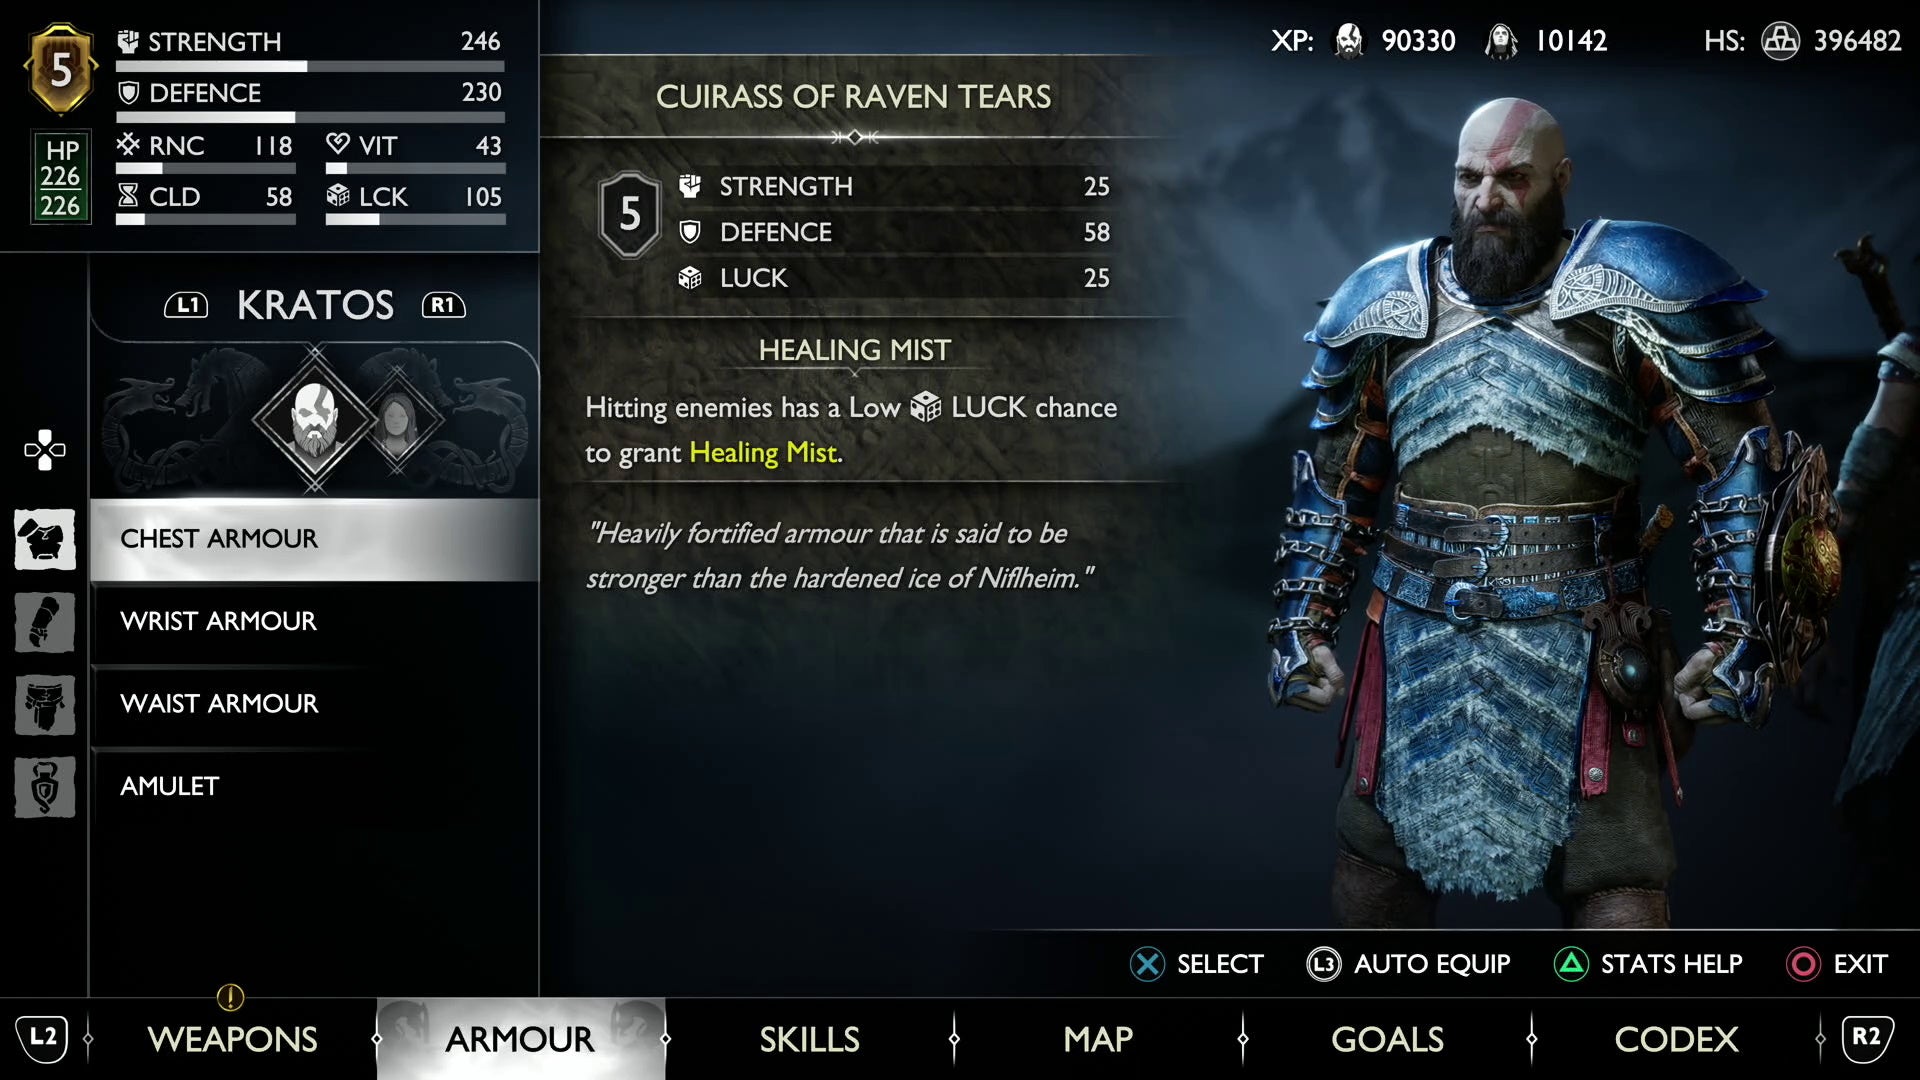
| 18 Ravens | Cuirass of Raven Tears Armour |
| 28 Ravens | Breath of Thamur Heavy Runic Attack |
| 38 Ravens | Meteoric Slam Heavy Runic Attack |
| 48 Ravens | The Finger of Ruin Heavy Runic Attack |
The Raven Tears Armour set is a particularly useful reward, as it can assist in healing Kratos, and doesn’t take too long to get, making it a great choice if you’re struggling with some of the boss and sub-boss fights in the middle and late game.
Once you open all six chests, you’ll have to defeat a boss in the training area of Niflheim, across from the shop, in order to complete the ‘Eyes of Odin’ Favour.
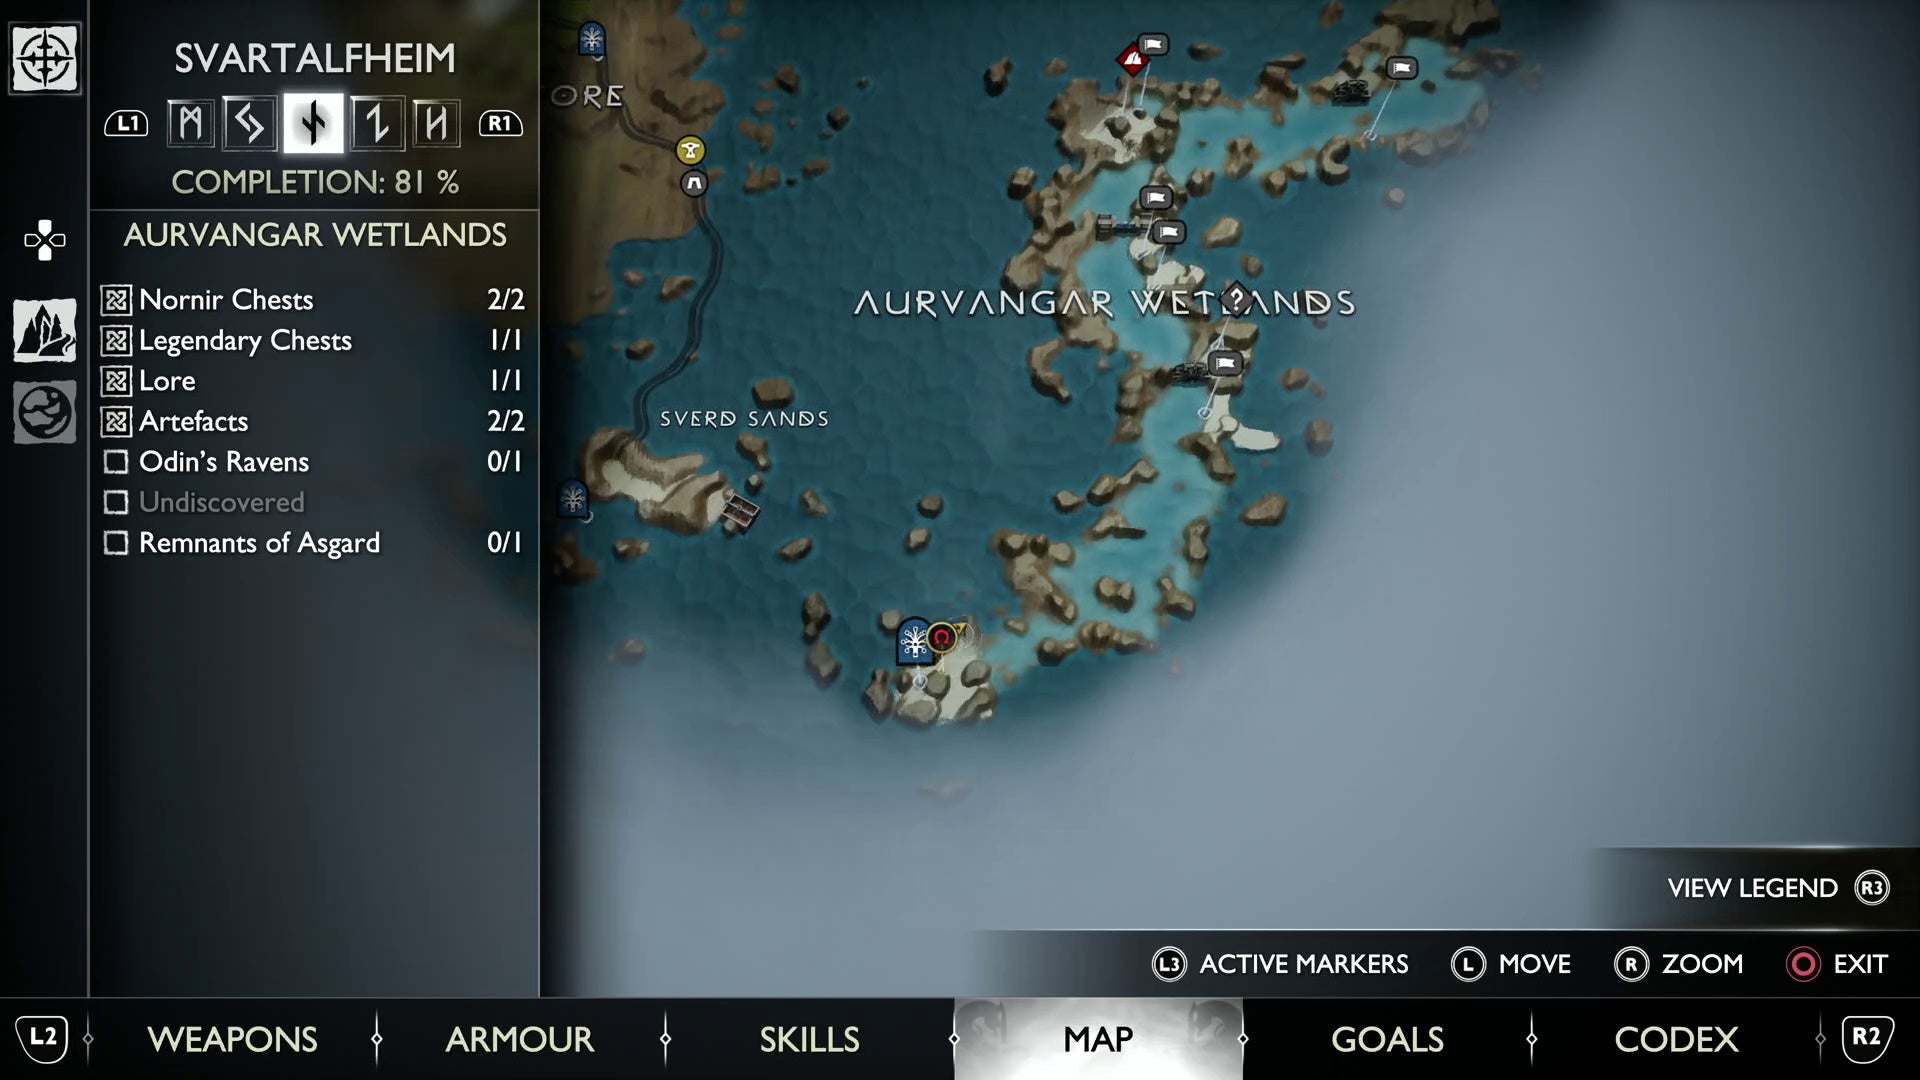
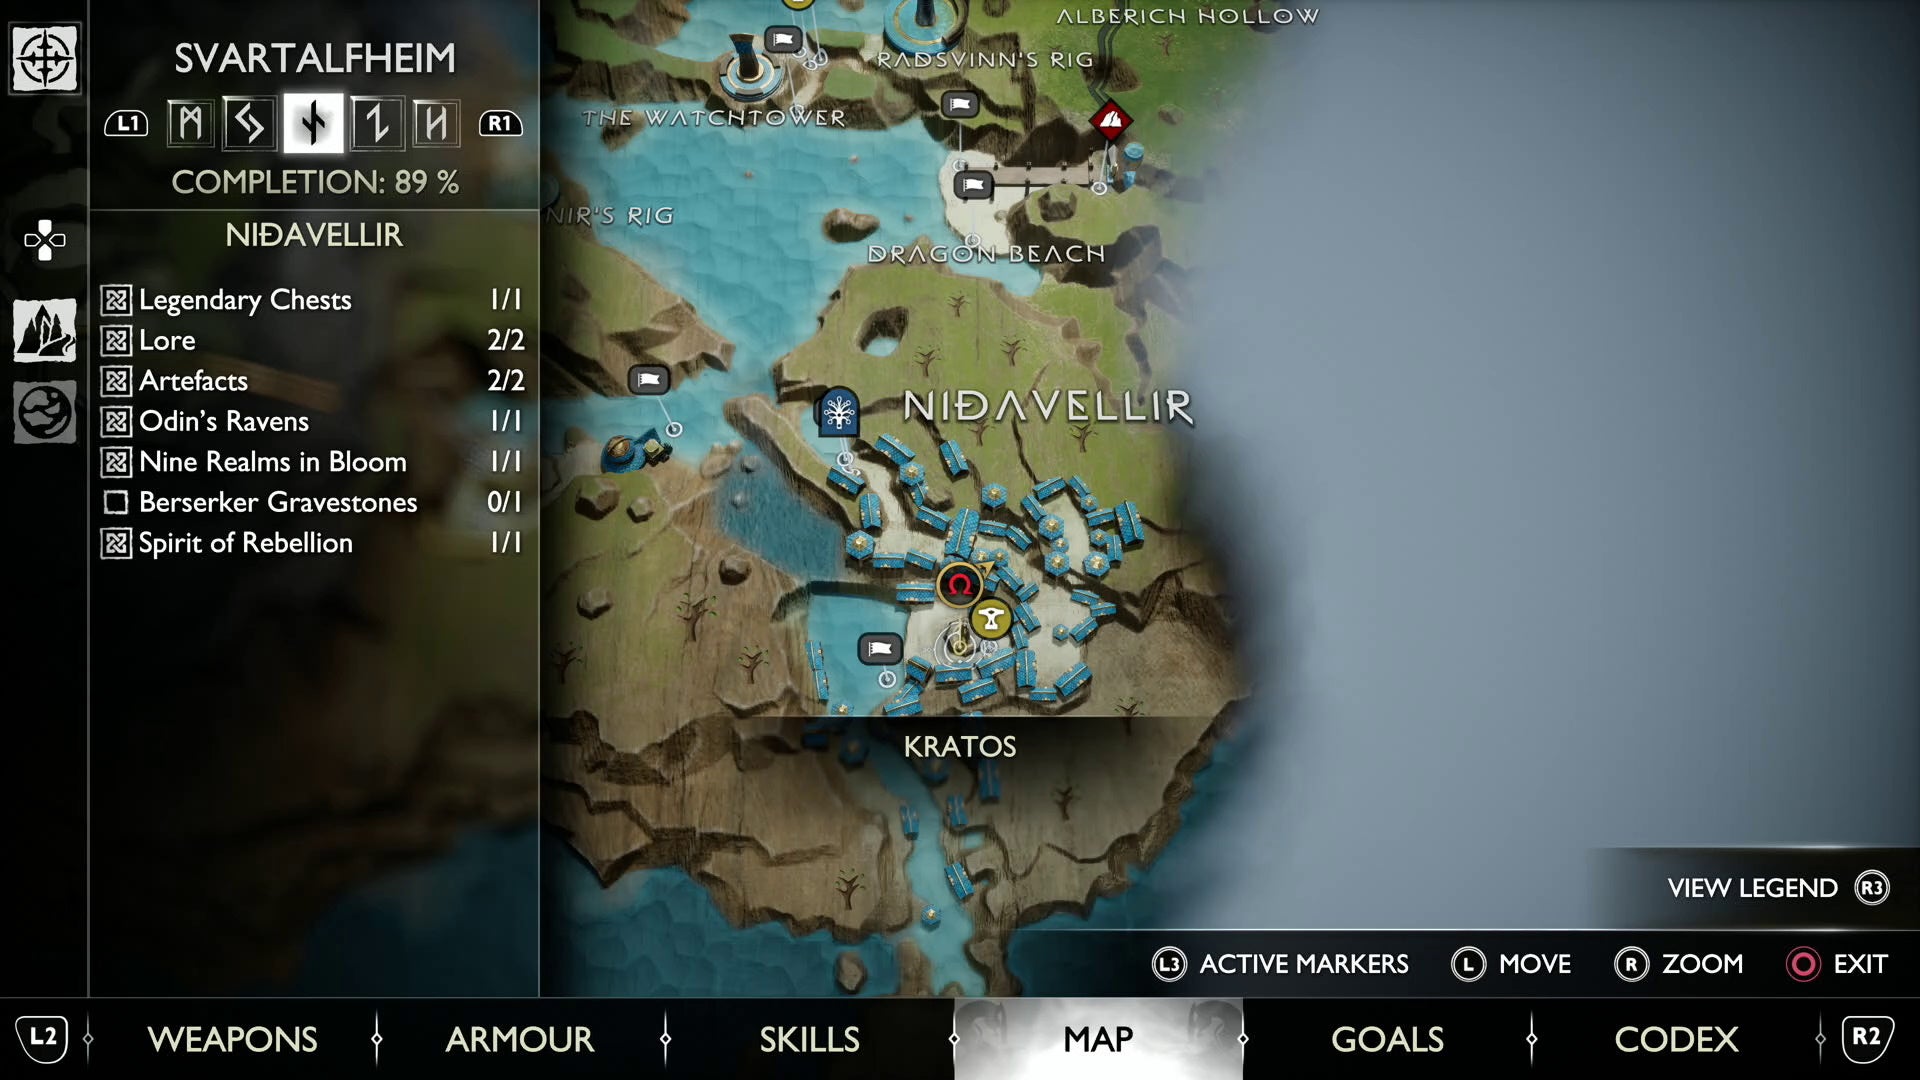
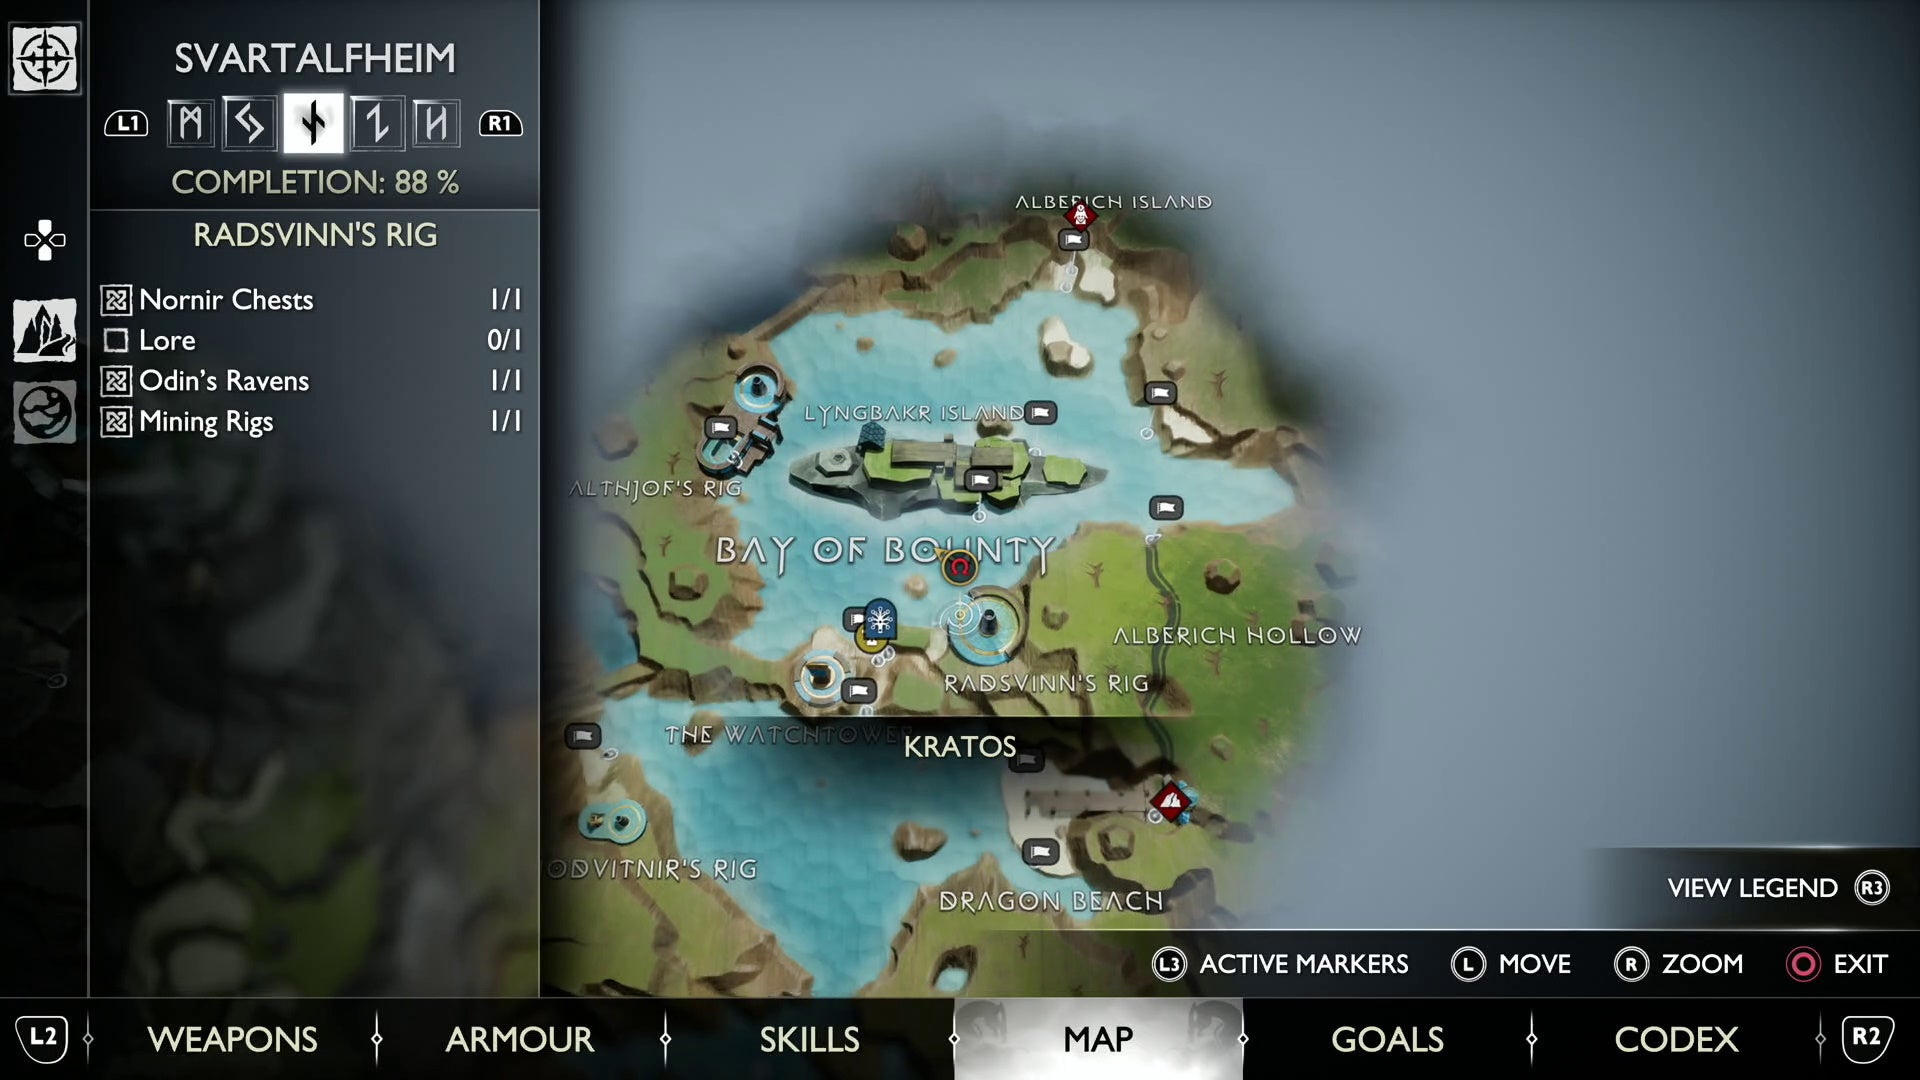
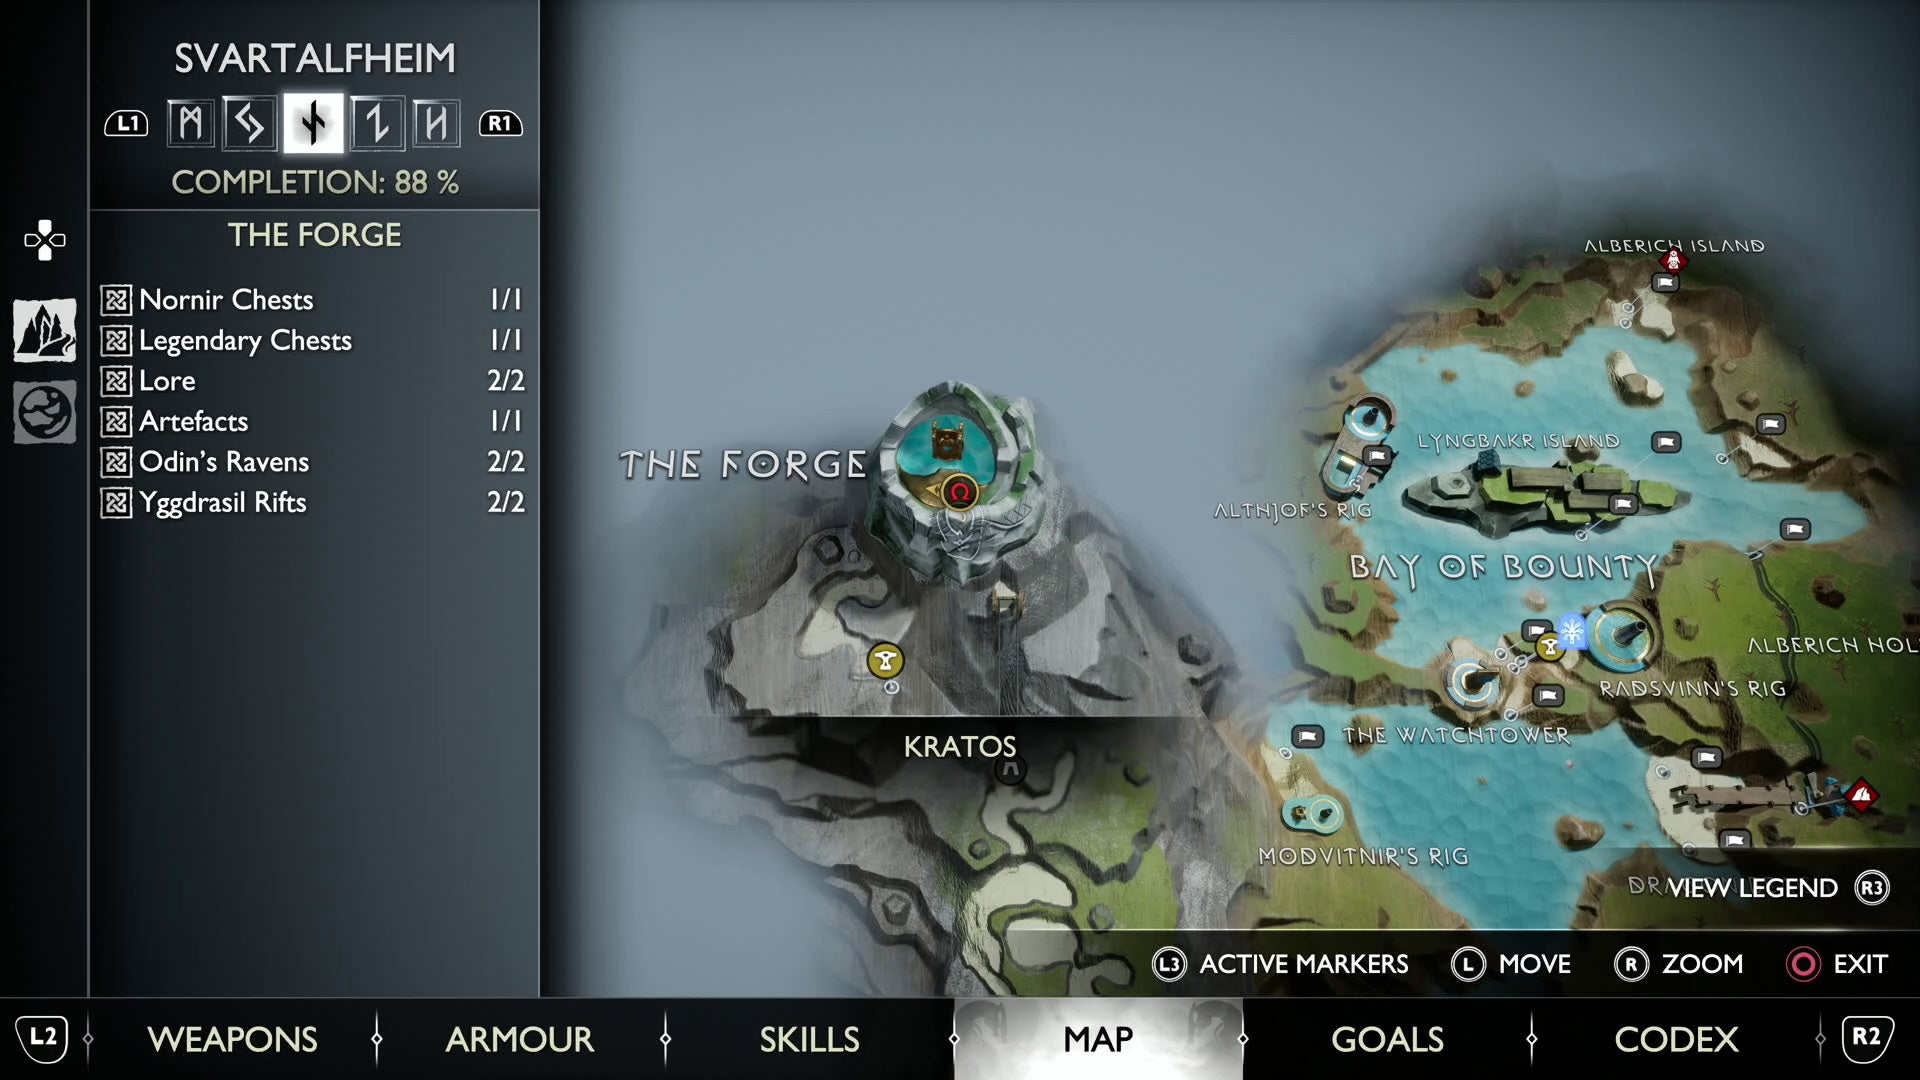
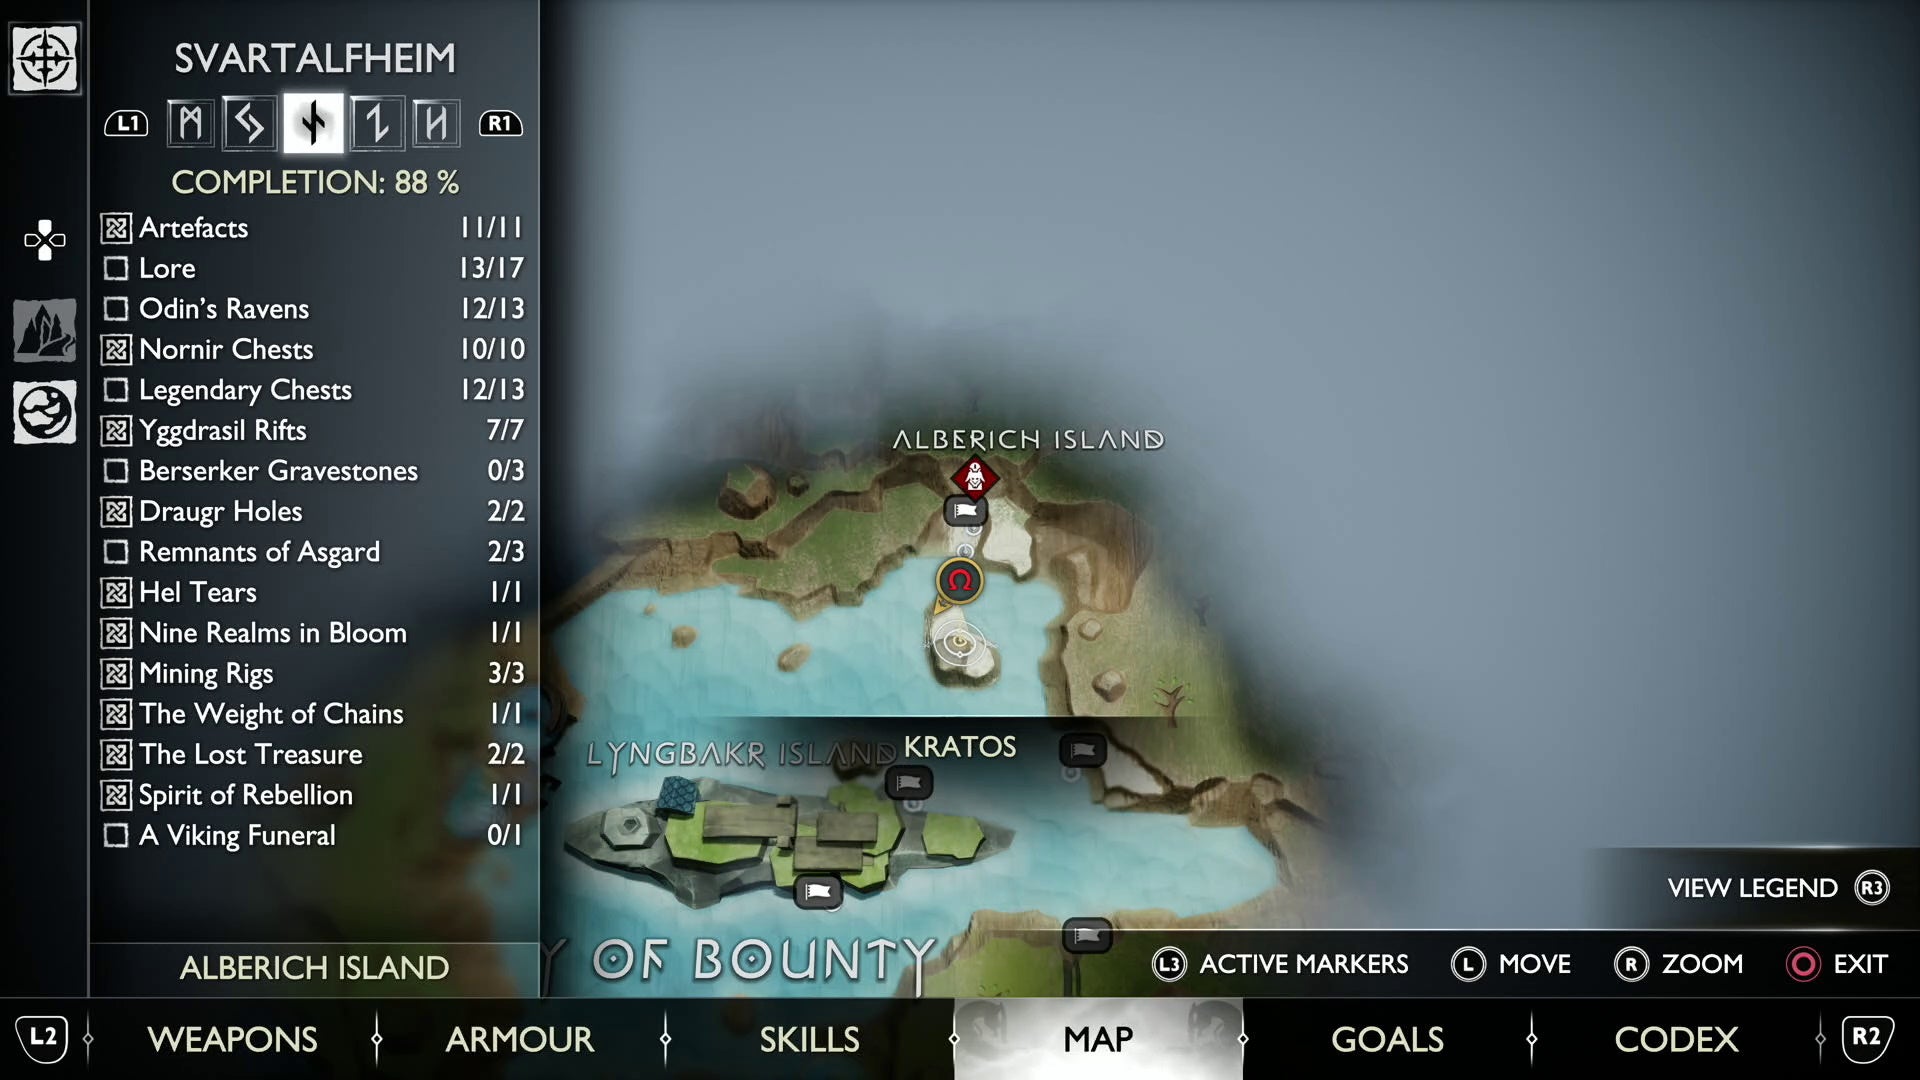
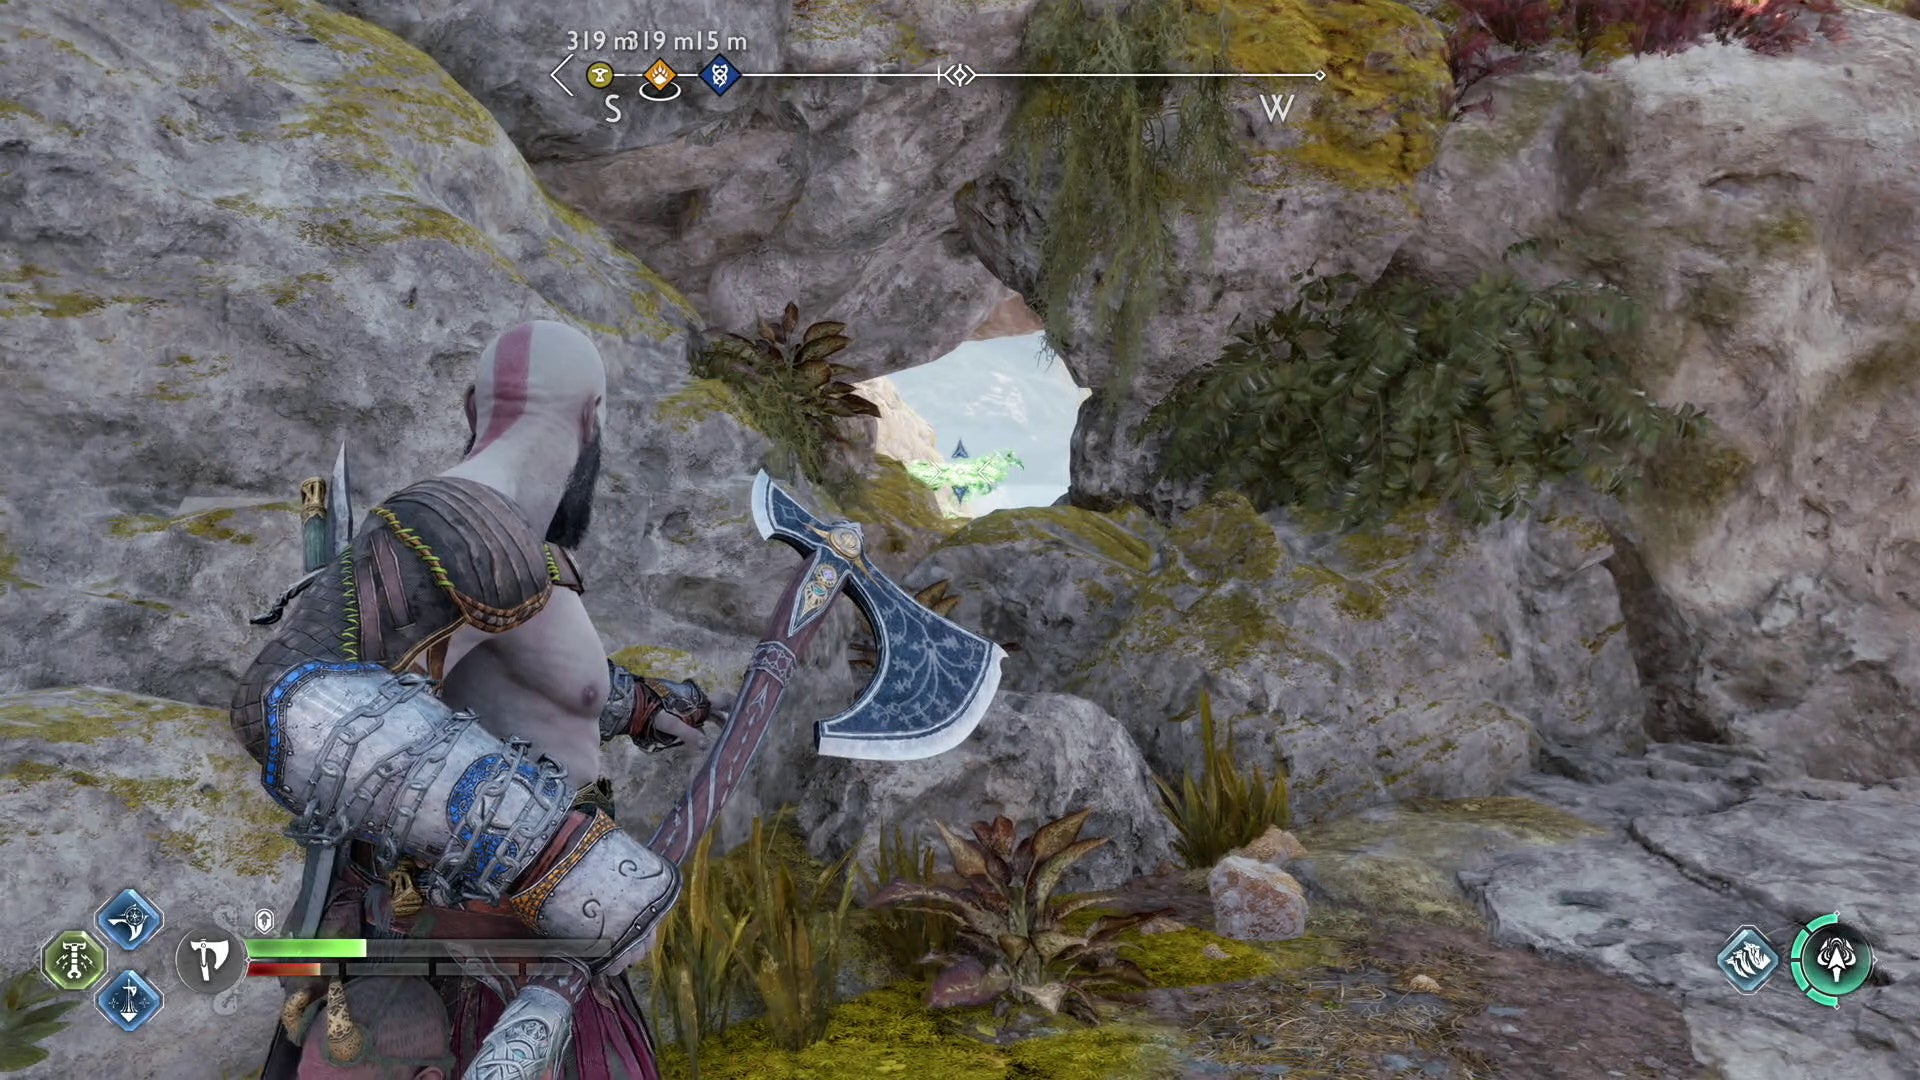
God of War Ragnarök Svartalfheim Odin’s Ravens locations explained
There are 13 of Odin’s Ravens to find in Svartalfheim, with nine available to find on your first trip to the dwarven Realm, but you’ll have to wait until you get a special tool as part of the main story before you can return and collect the remaining four.
Here’s where to find all Ravens in Svartalfheim:
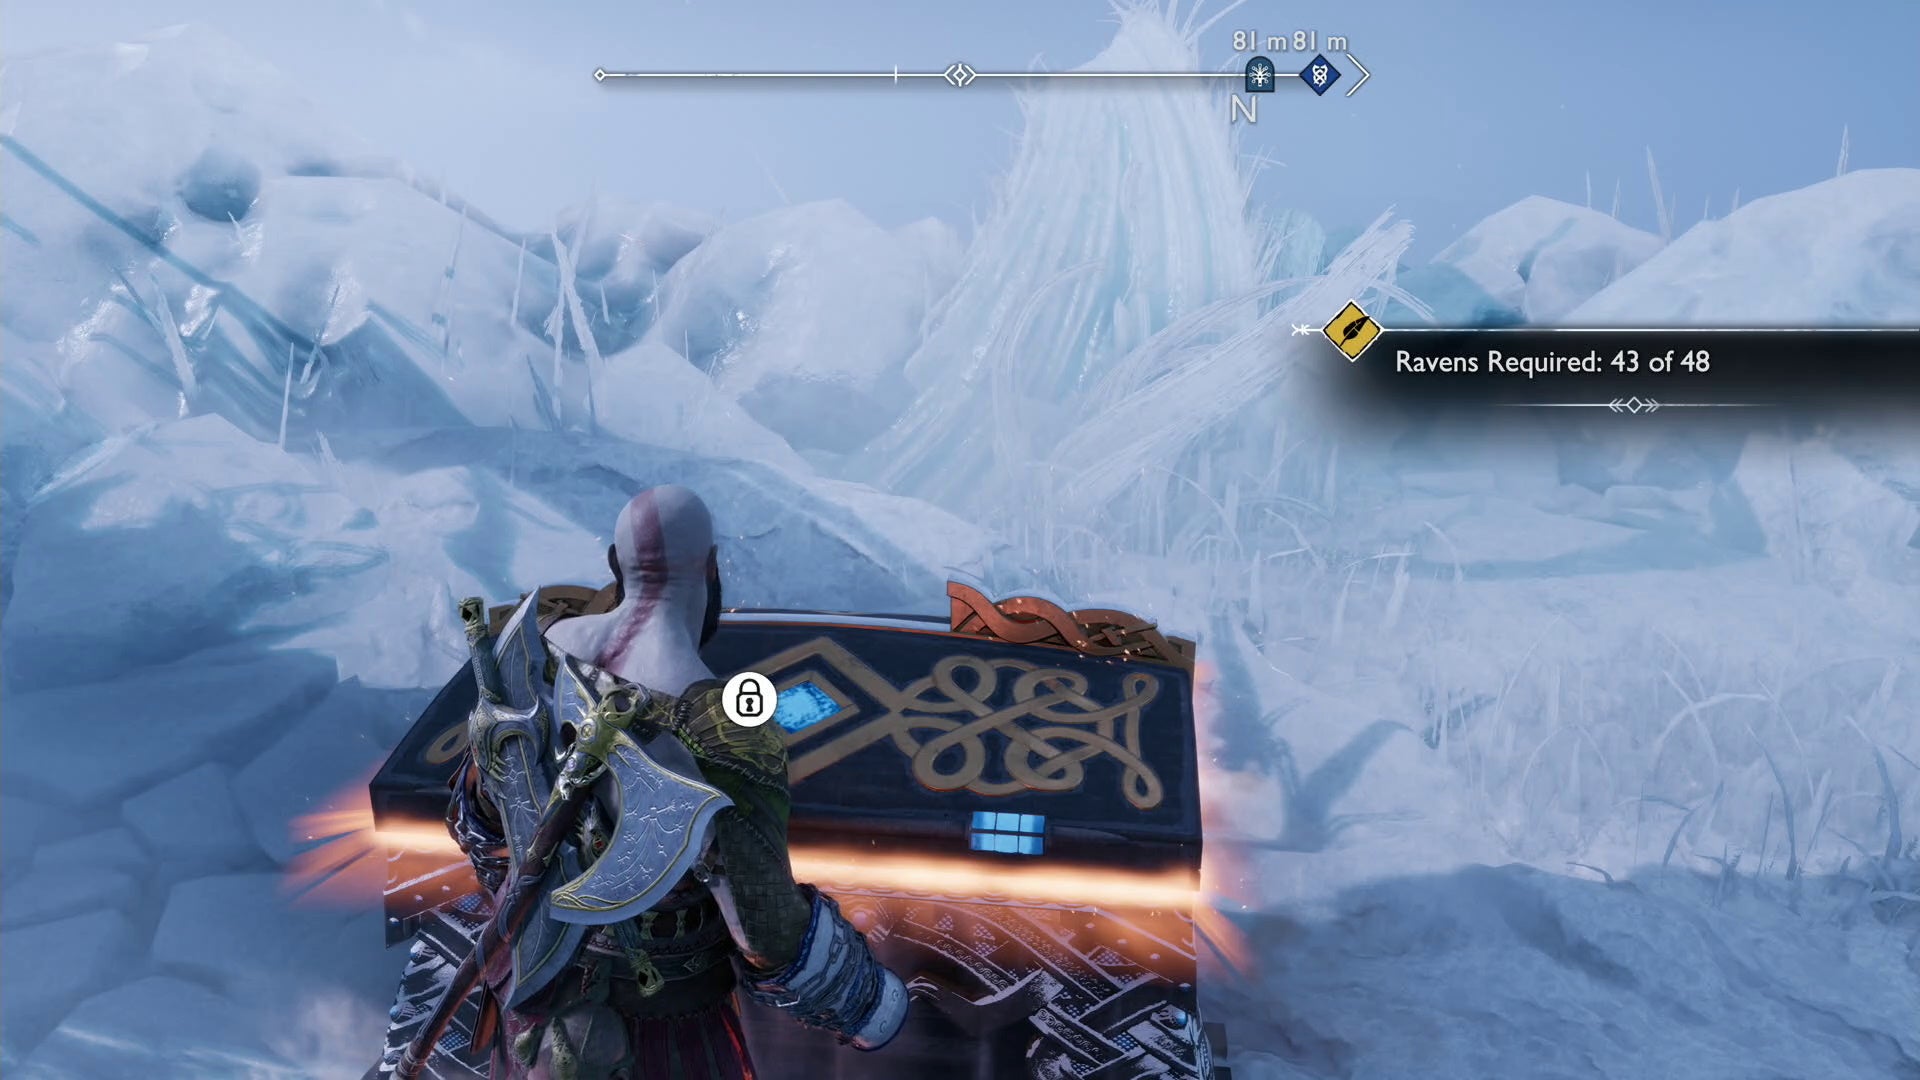
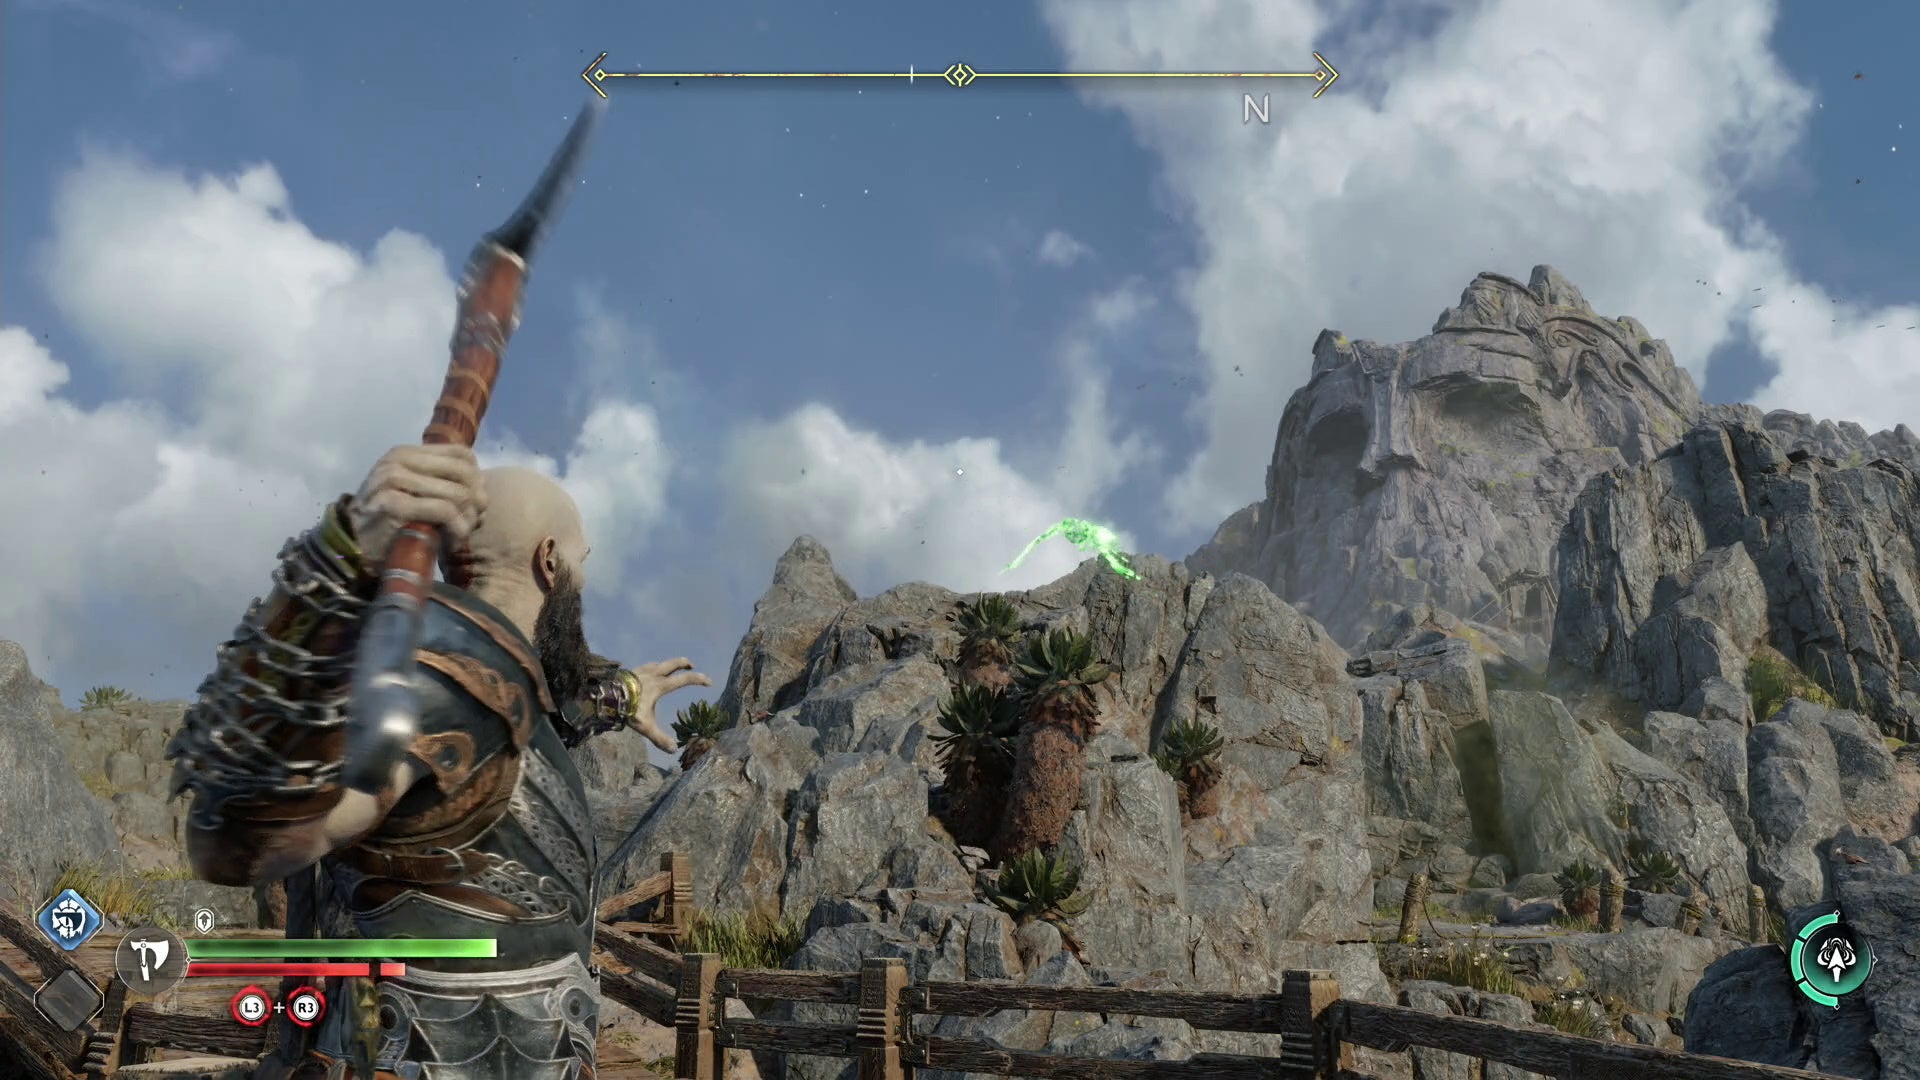
Svartalfheim Aurvangar Wetlands Raven location in God of War Ragnarök
As soon as you step out of the Aurvangar Wetlands Mystic Gate, look up and to the left to spot Odin’s Raven perched on top of the small rock formation.
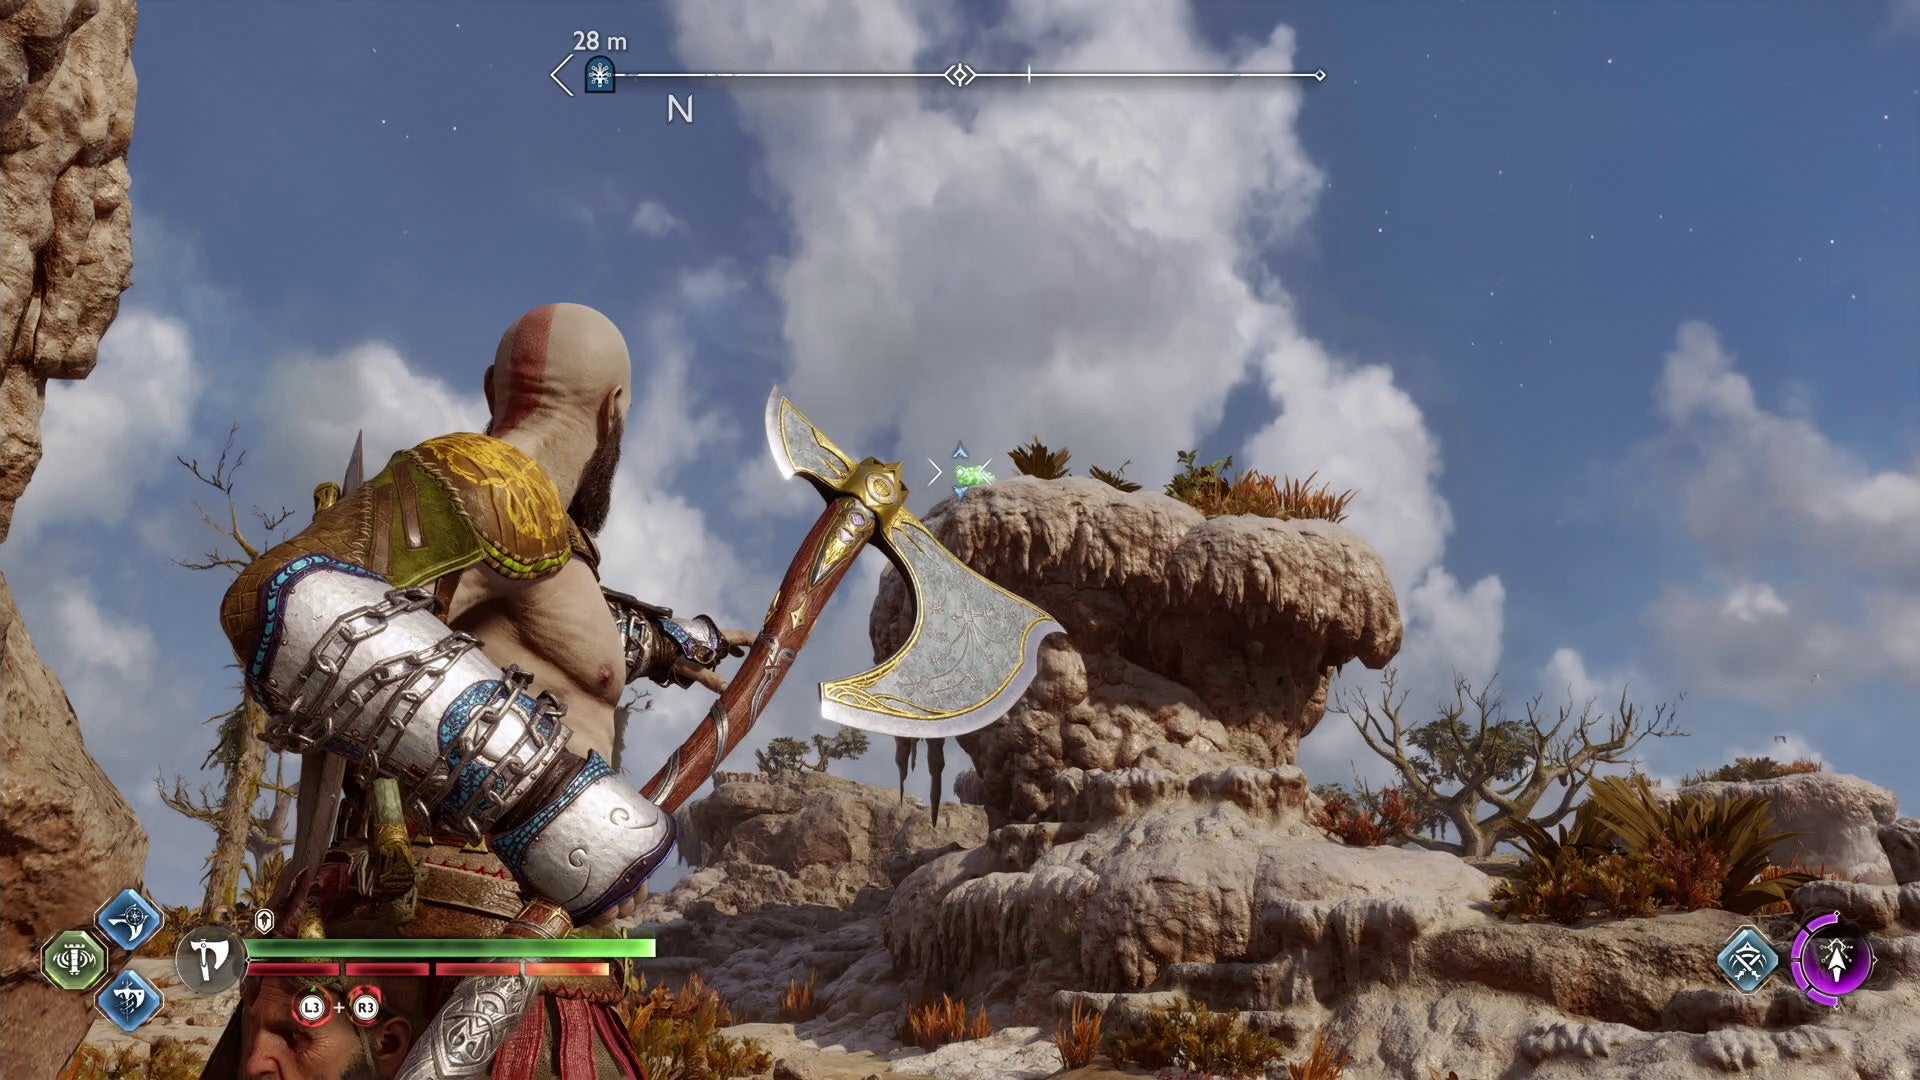
Svartalfheim Nidavellir Odin’s Raven location in God of War Ragnarök
The Nidavellir Raven is found perched on top of a building opposite the statue in the main square of Nidavellir, where Kratos and Atreus first arrived at the village in the story. You’ll have to go back through the crawlspace you unearthed by using Sonic Arrows to get back here.
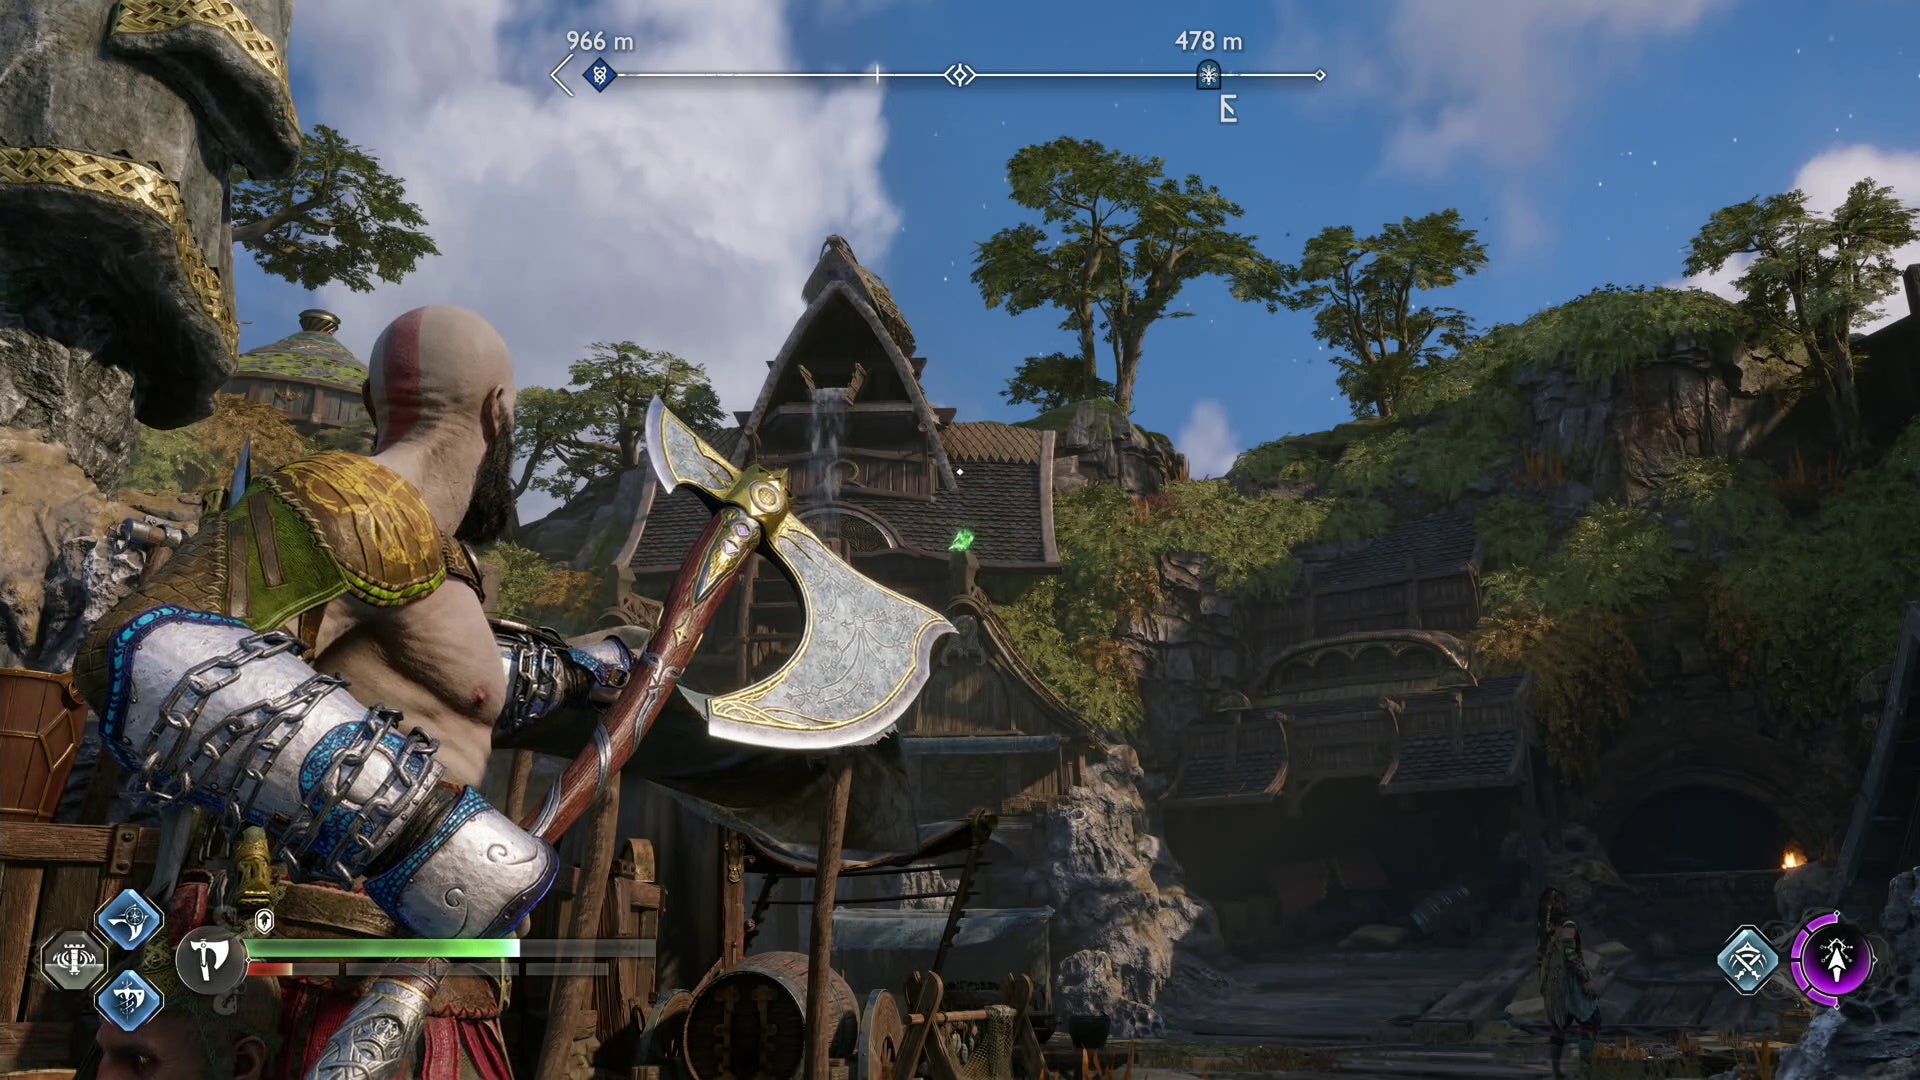
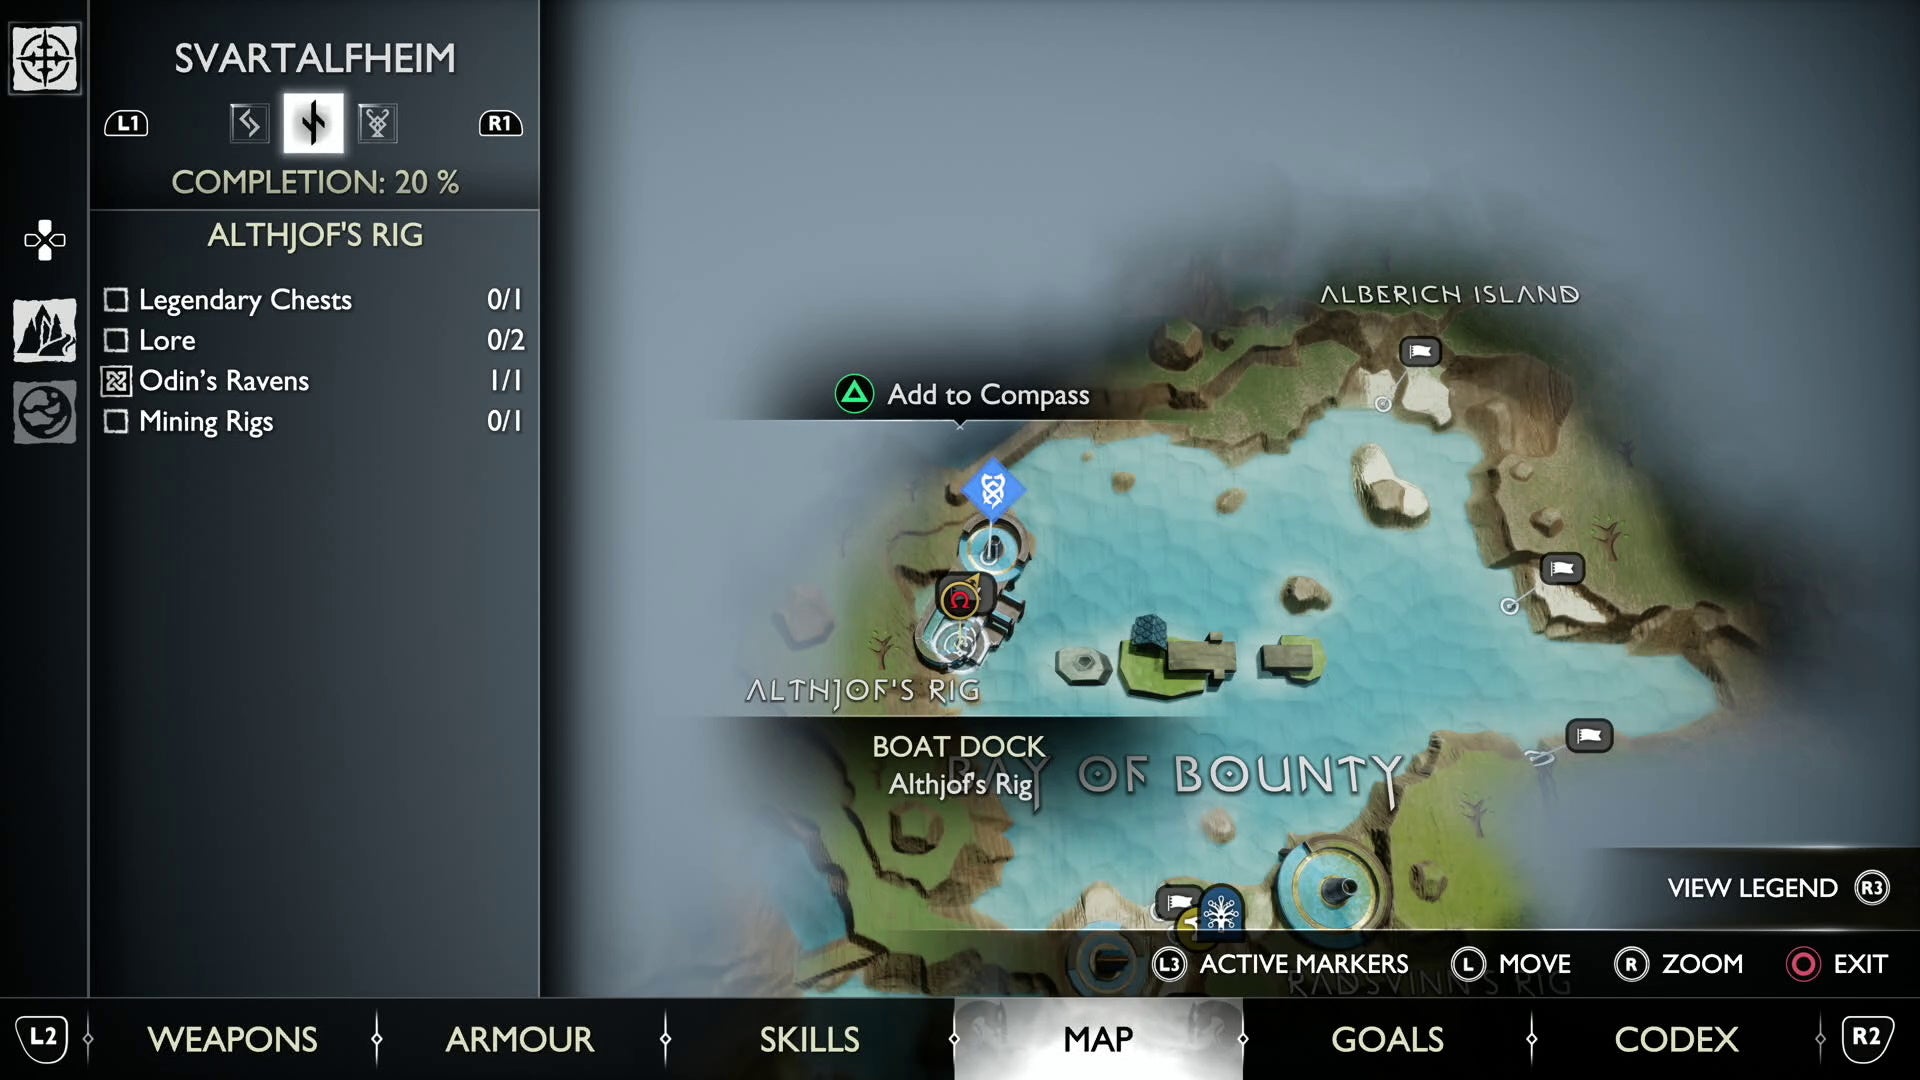
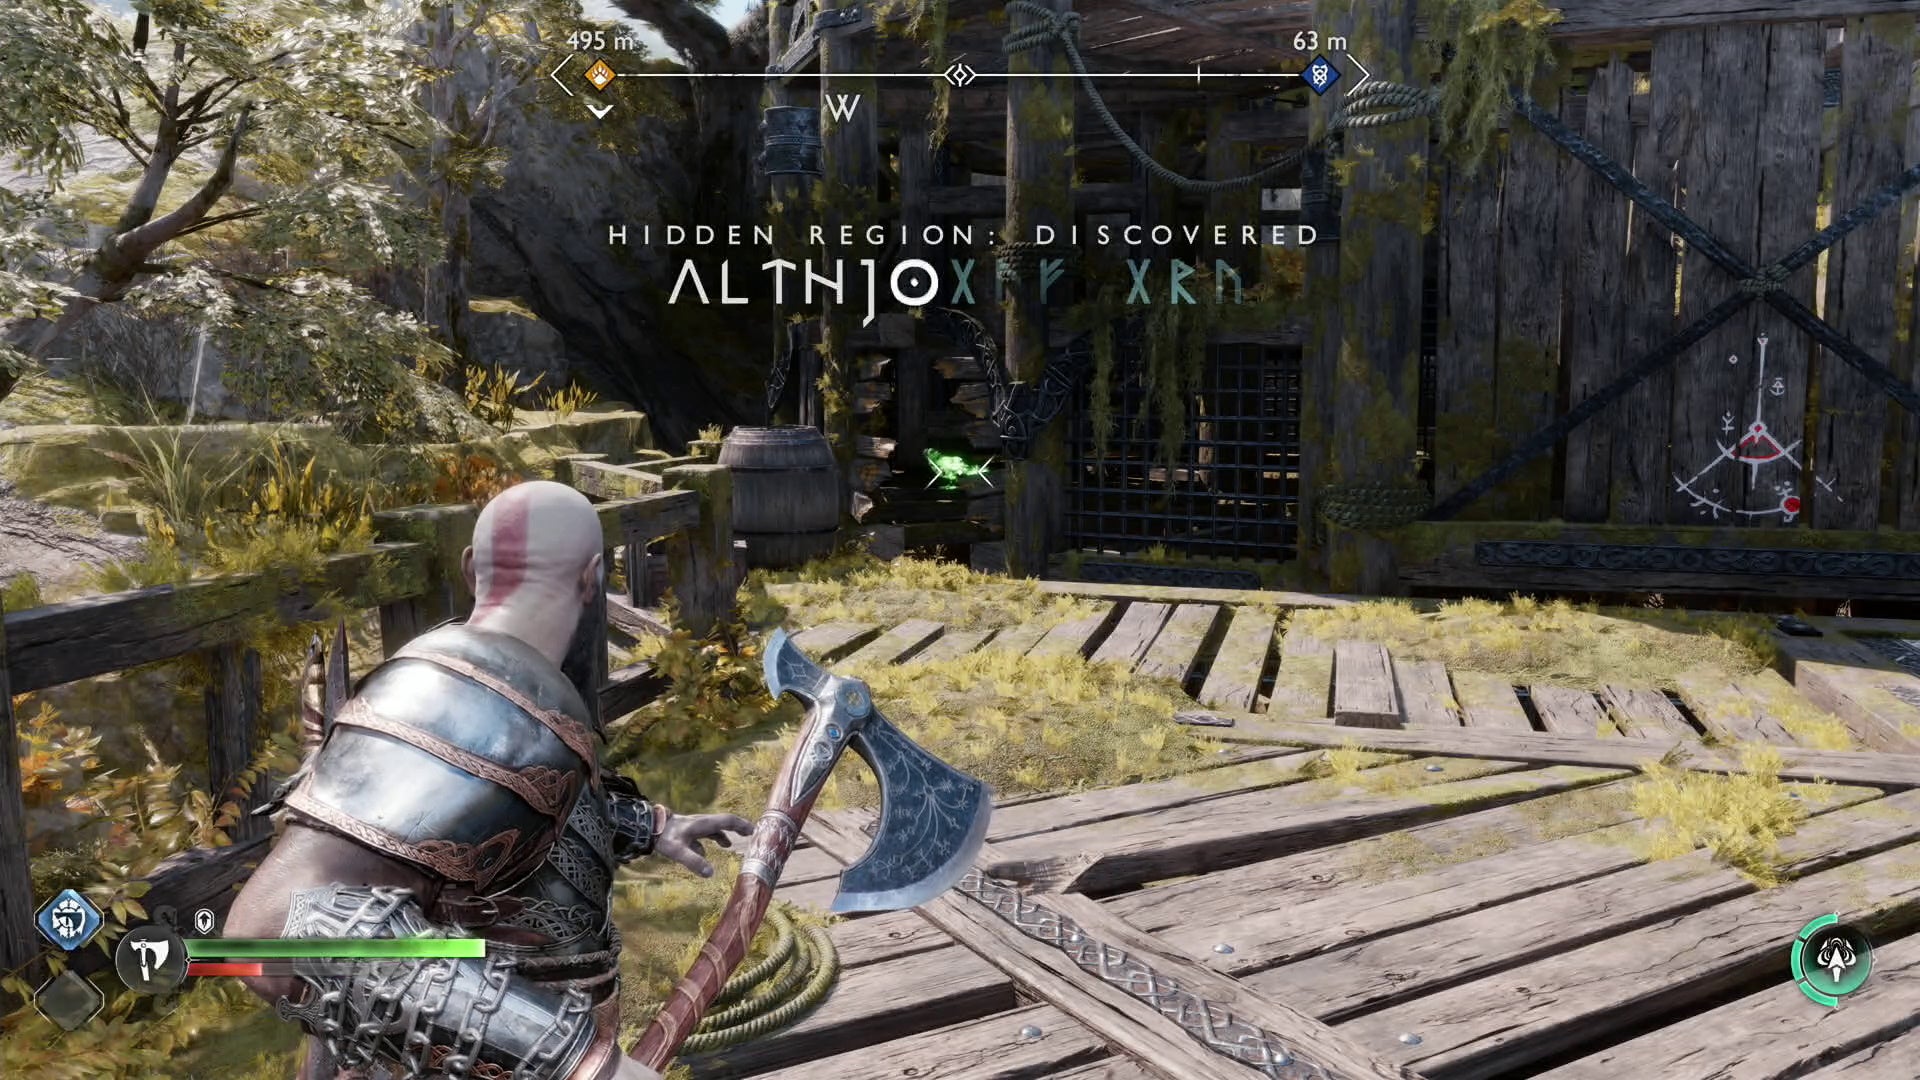
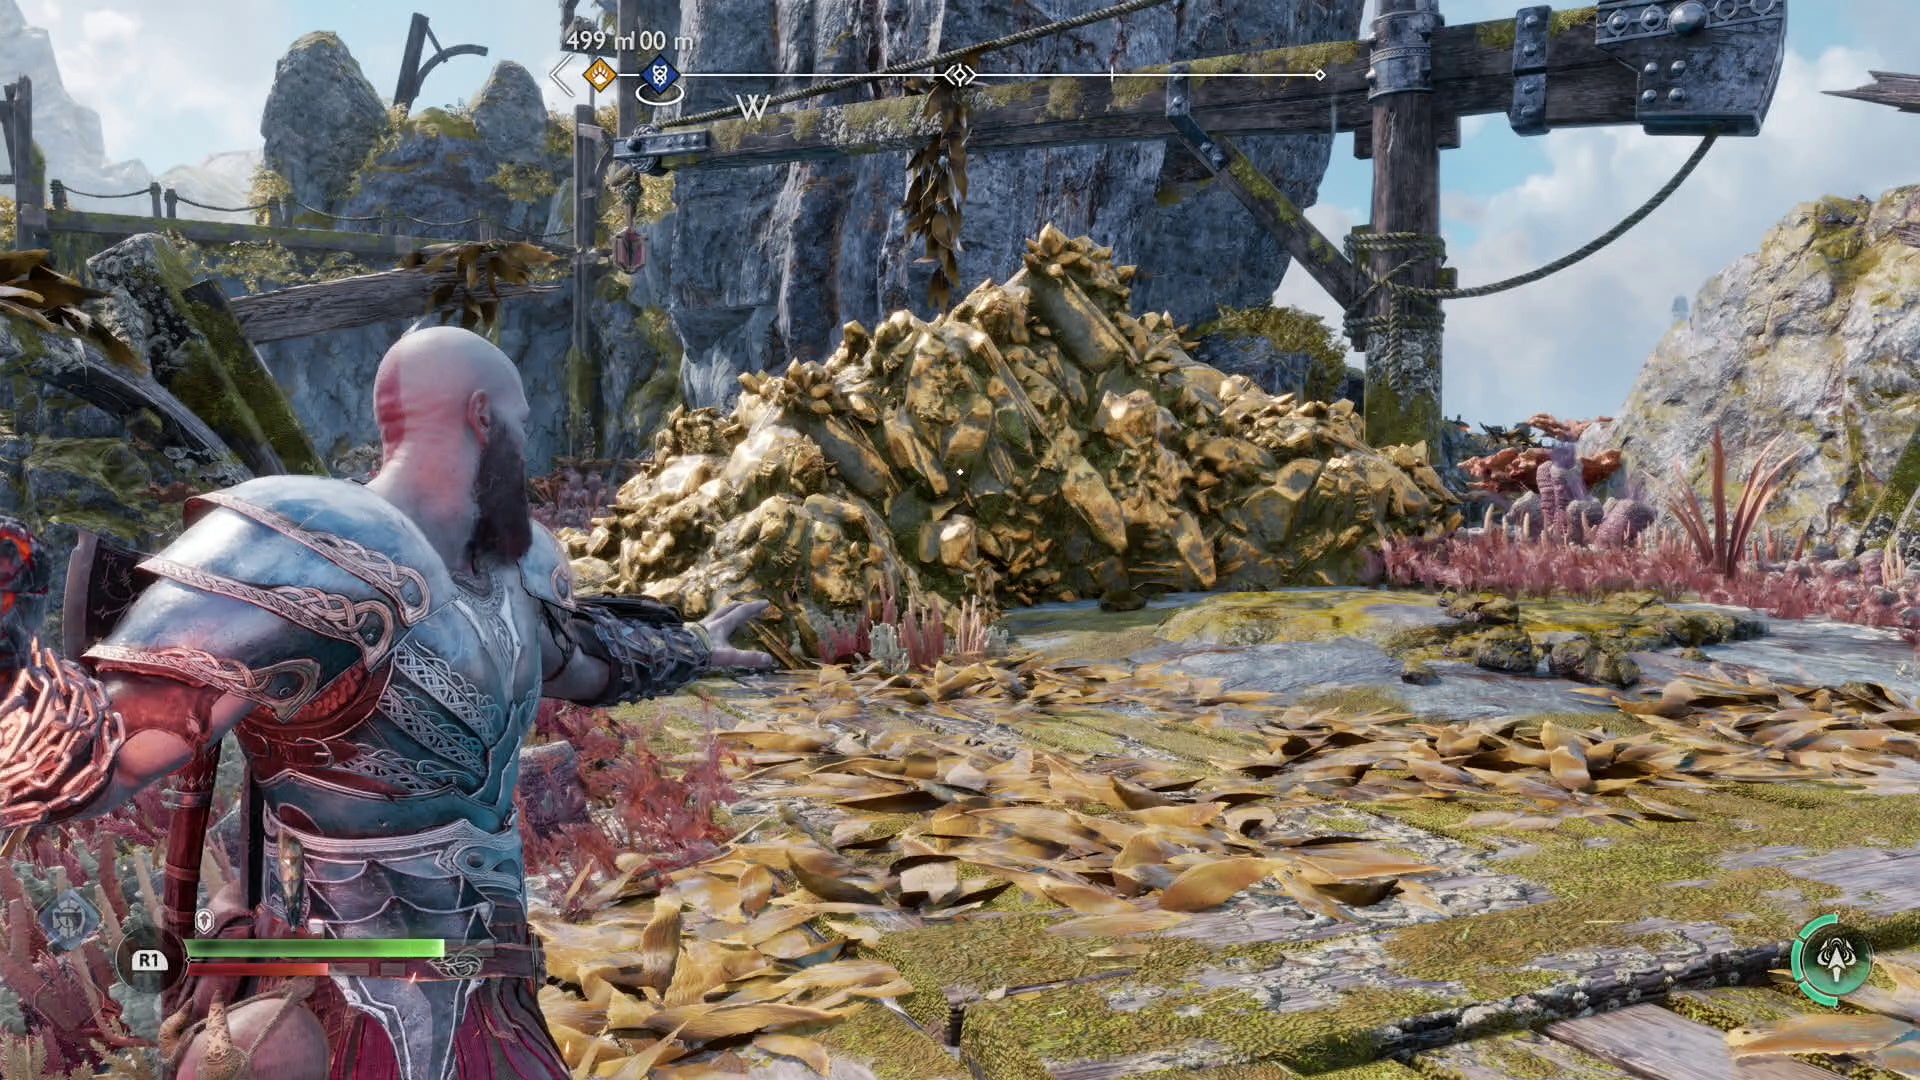
Svartalfheim Althjof’s Rig Odin’s Raven location in God of War Ragnarök
The Althjof’s Rig Raven is located near a barrel facing Kratos when he climbs up the golden chain to gain access to the rig.
Svartalfheim The Watchtower Raven location in God of War Ragnarök
The Watchtower Raven is found flying around in a circle above the area where the dwarven shop is located. It’s right beside where you battle one of The Hateful.
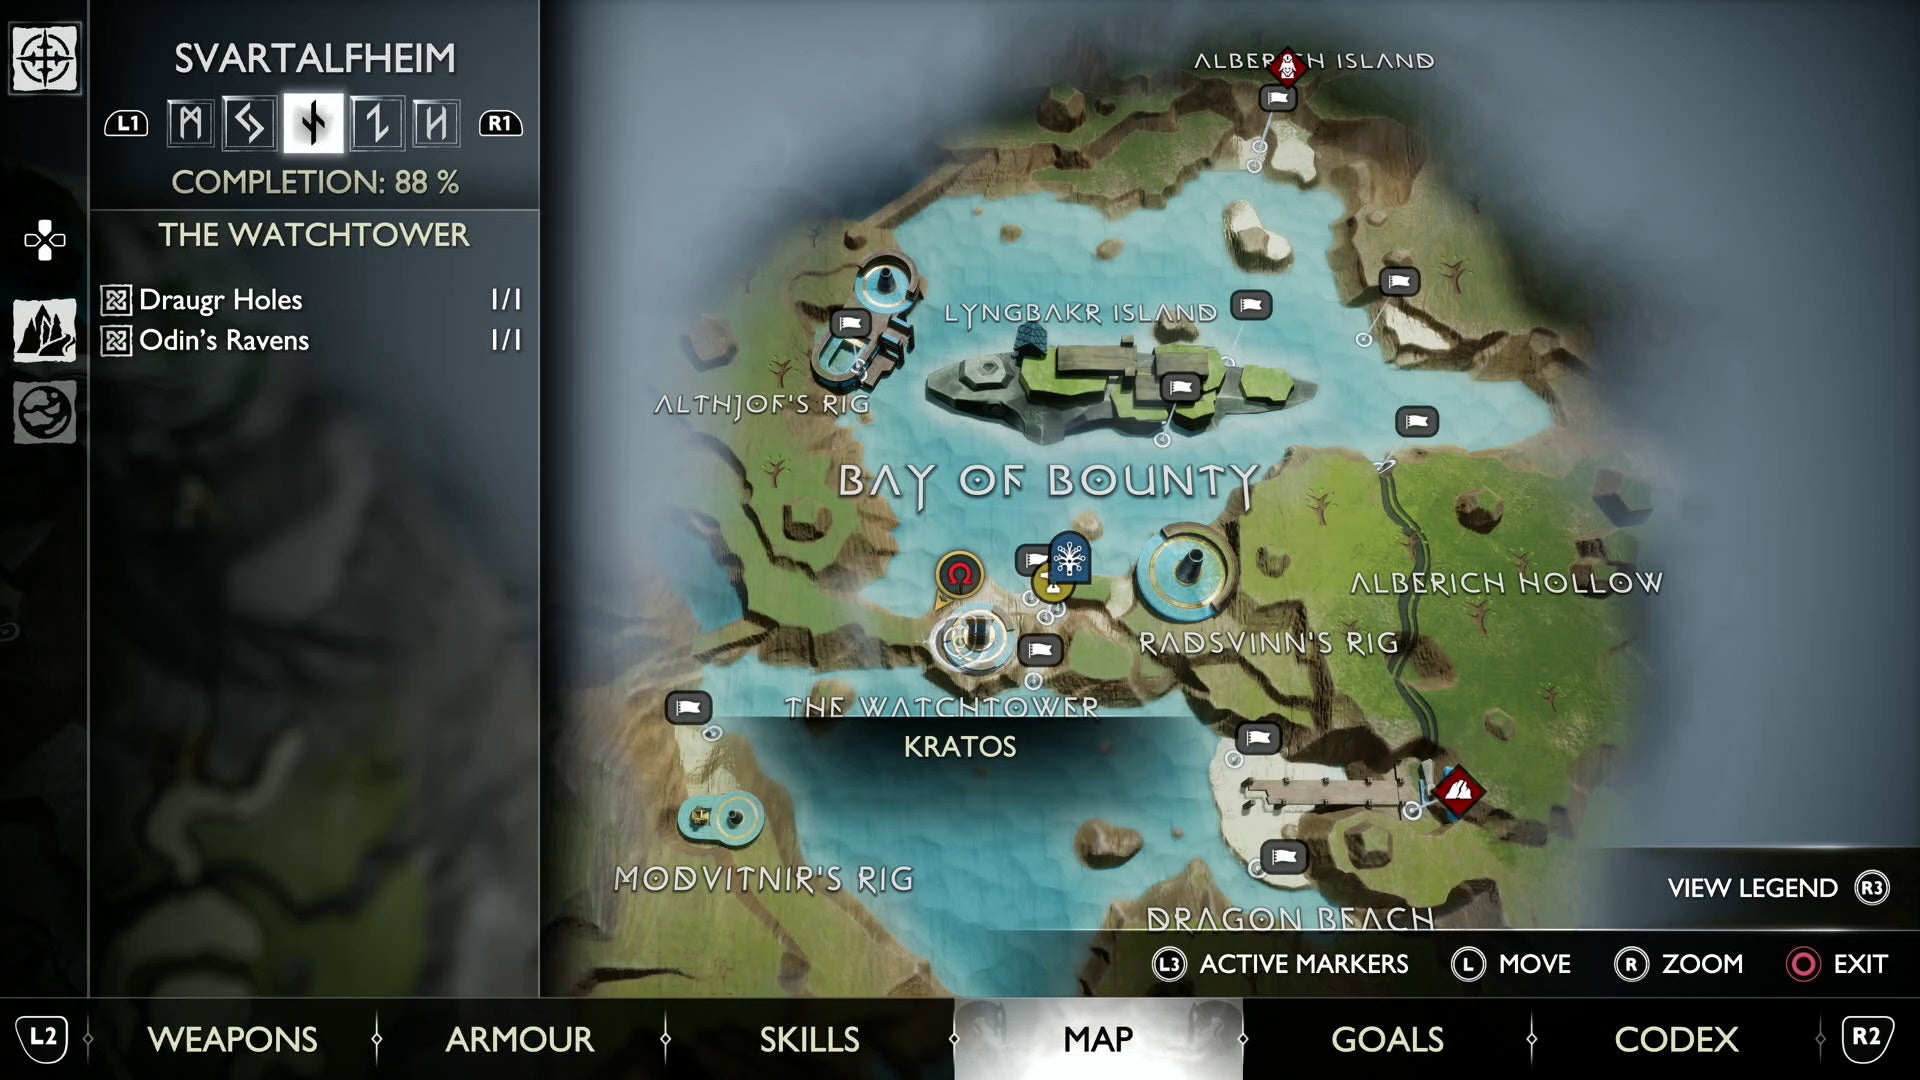
Svartalfheim Radsvinn’s Rig Raven location in God of War Ragnarök
Before climbing onto the main rig itself, look up and to the left at the crane above you. The Raven is perched inside the hook of the crane.

Svartalfheim Lyngbakr Island Raven location in God of War Ragnarök
You’ll come to this area and find the Lyngbakr Island Raven as part of ‘The Weight of Chains’ Favour. Odin’s Raven is located in the second area, accessible by boat after you free one of the fins.
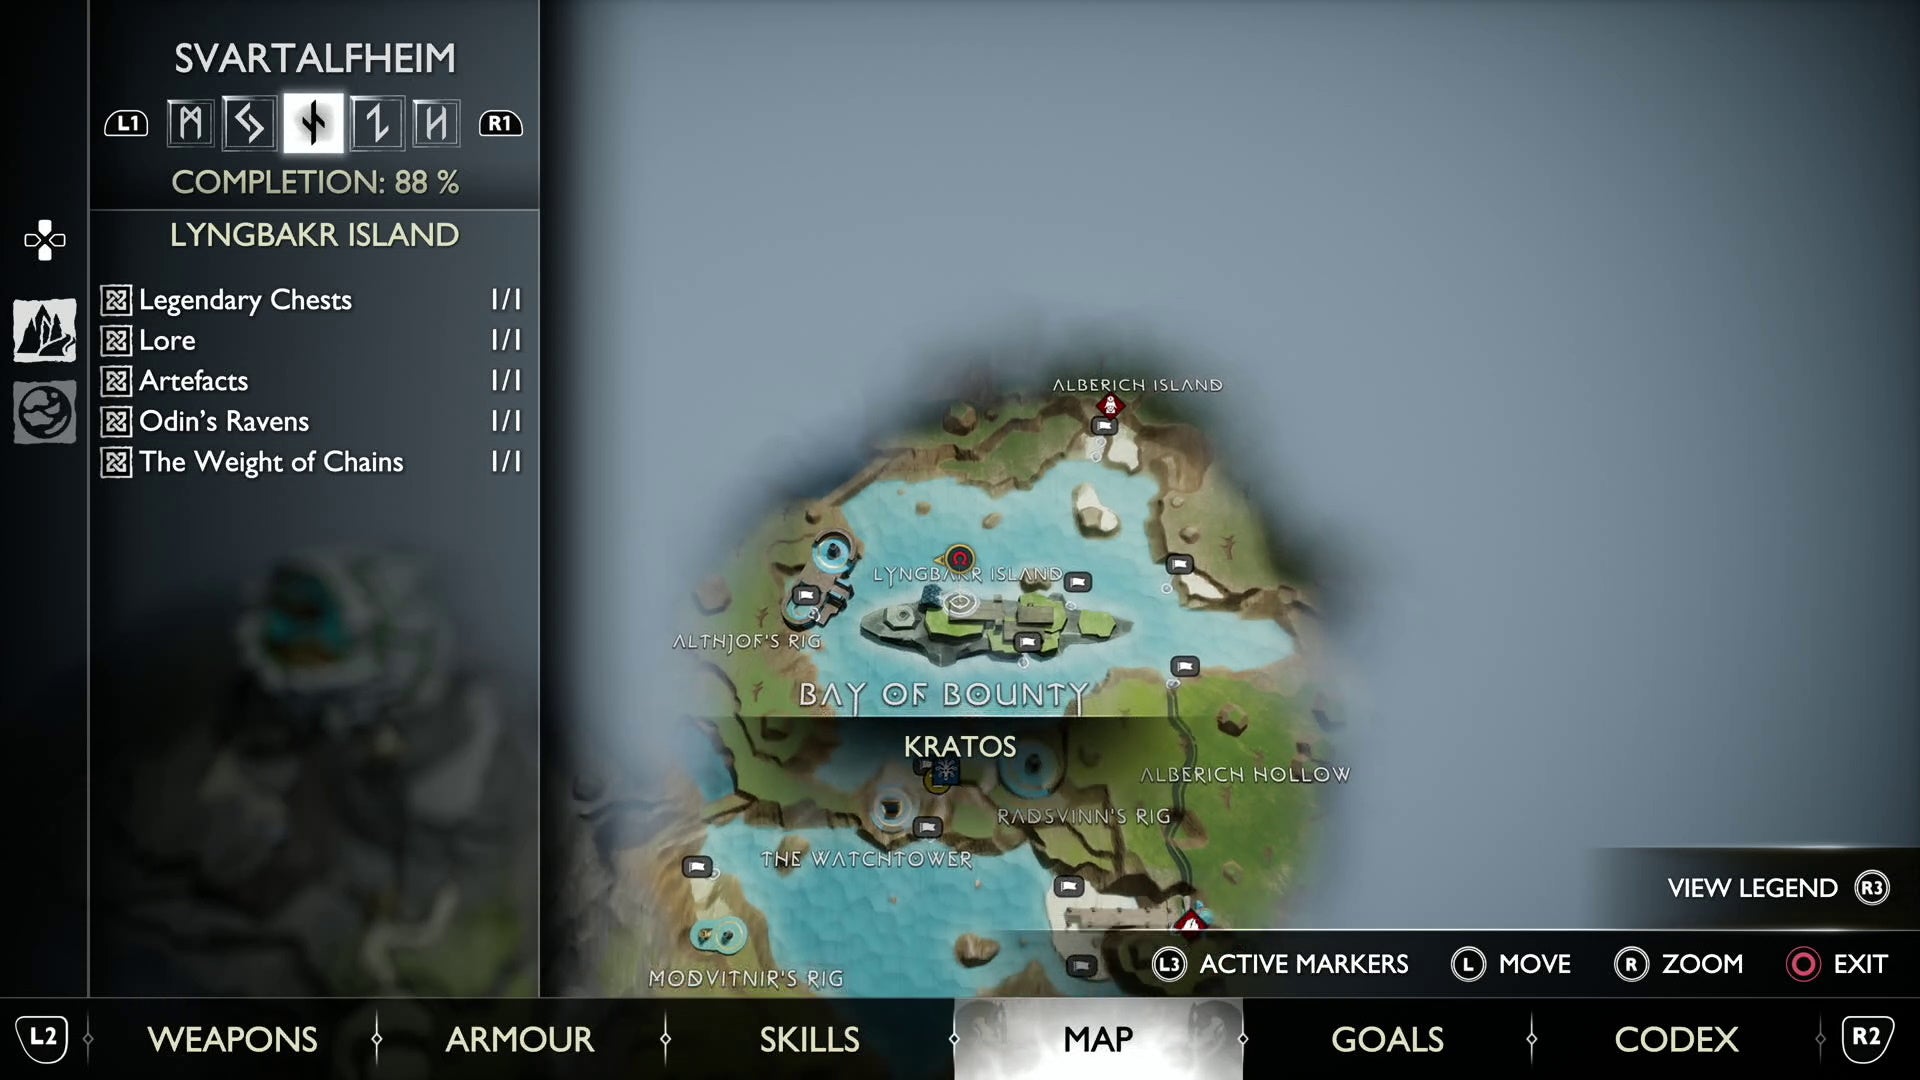
When you come to it, open the gate that leads back to the first area and bring one of the Fire Bombs round to the area covered in debris and clear it with the bomb. Jump across once you do this and crawl in the space to the right of the red chest.
Turn left when you exit this small crawl space and you’ll see the Raven hopping about.
Svartalfheim The Forge Raven location 1 in God of War Ragnarök
You’ll first come across Odin’s Raven in The Forge after riding the cart with Atreus after speaking with Diluc. Don’t worry if you missed it, though, as you can use a Mystic Gateway to get back to The Forge later.
The Raven is easily spotted flying in a circle if you face the large carving of a dwarf in the mountain from the wooden walkway.
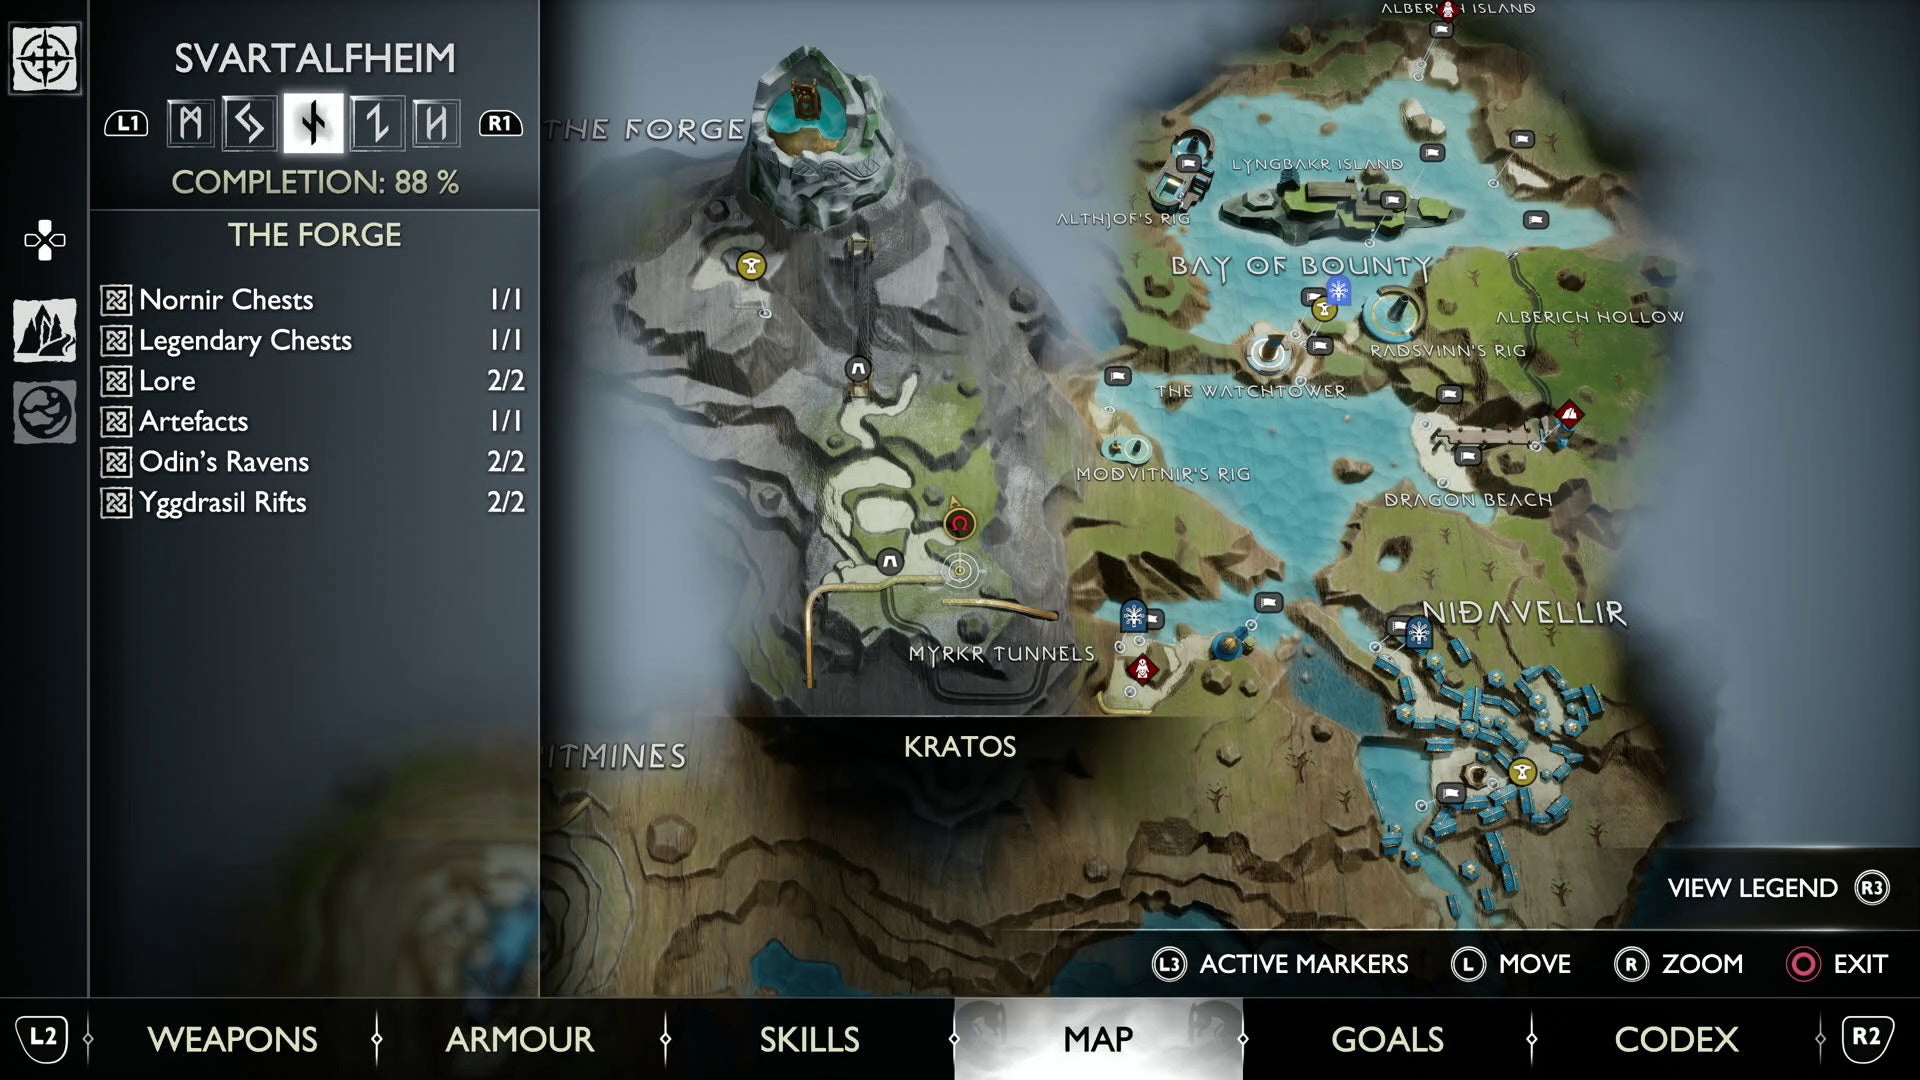
The second of Odin’s Ravens in The Forge is not available to get until you return to Svartalfheim again during the story.
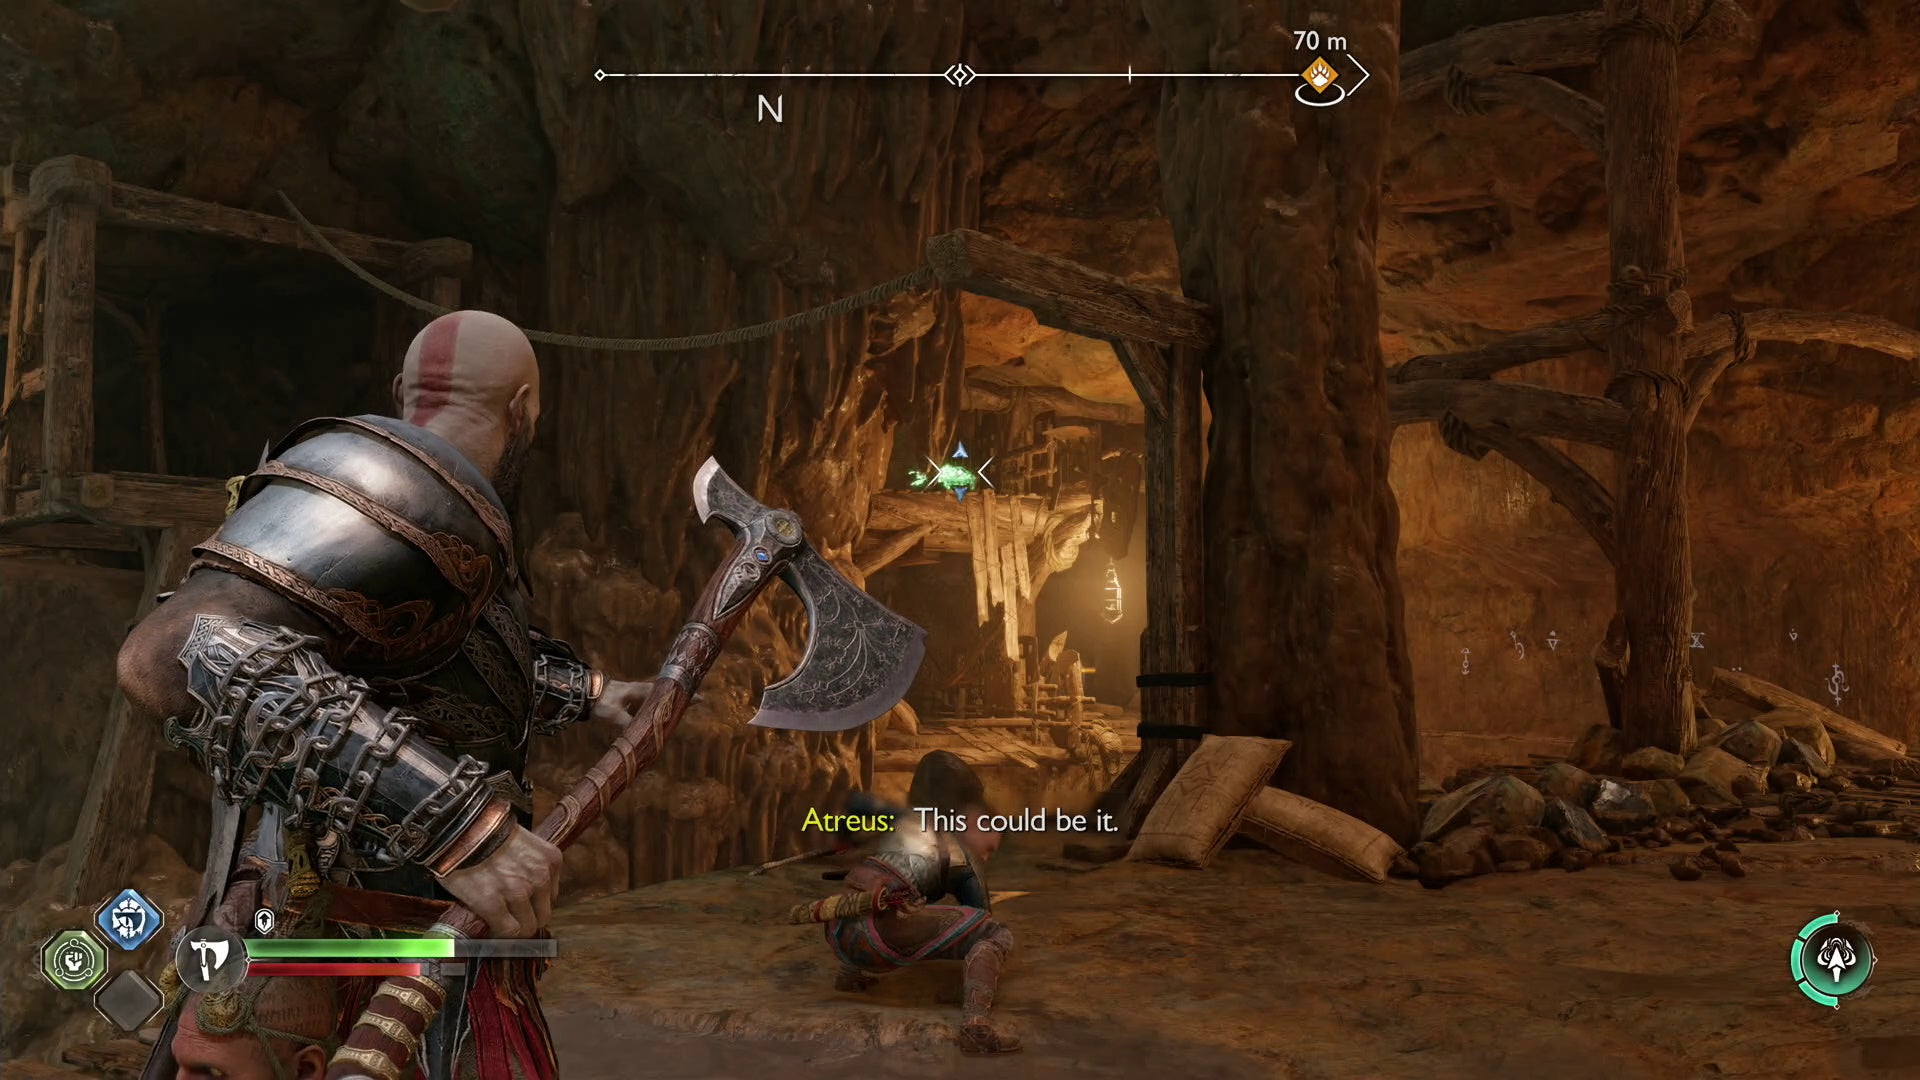
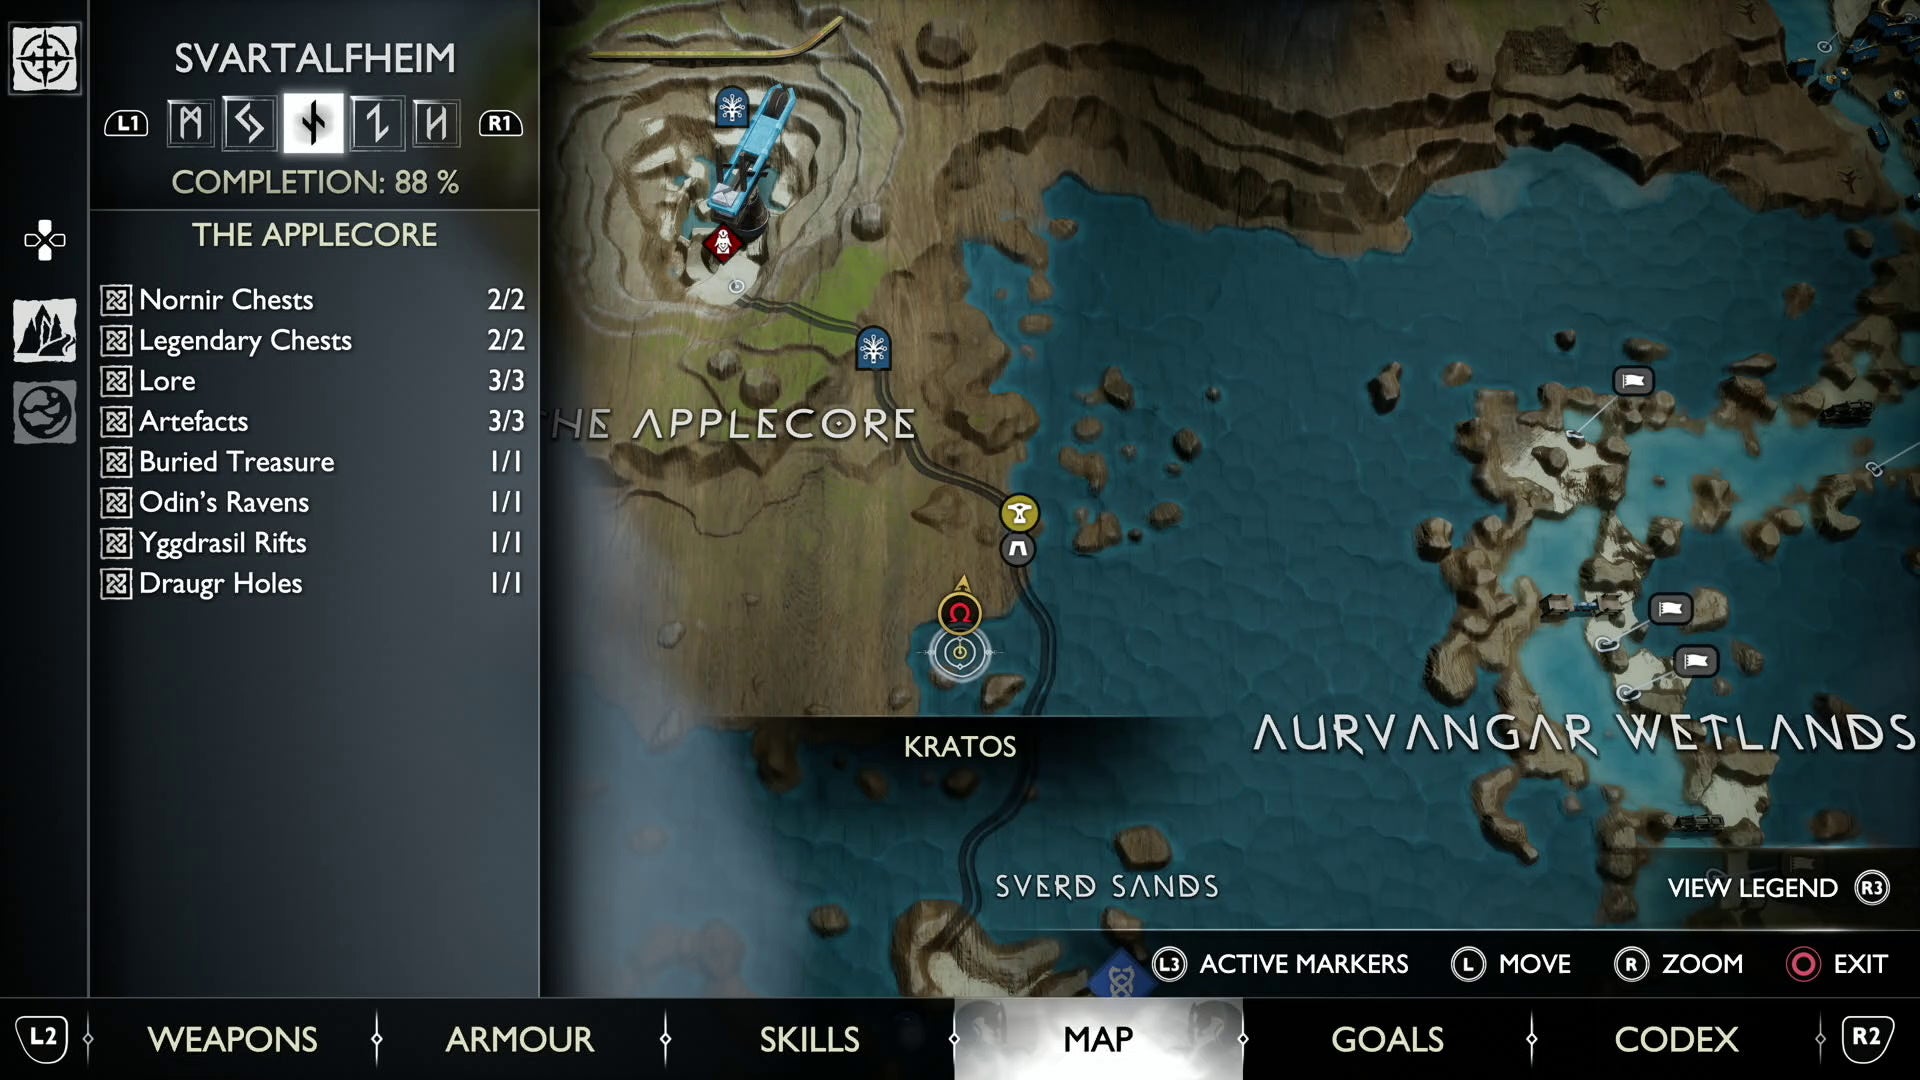
Svartalfheim The Applecore Raven location in God of War Ragnarök
The Applecore Raven is located after solving the puzzle involving the water wheels and Sonic Arrows, right before the door that leads to a red chest and a crawl space. If returning to the area, you’ll have to come from the bottom of The Applecore, not the Jarnsmida Pitmines.
Odin’s Raven is perched on the rafters to the left of the door, by the rope zipline.
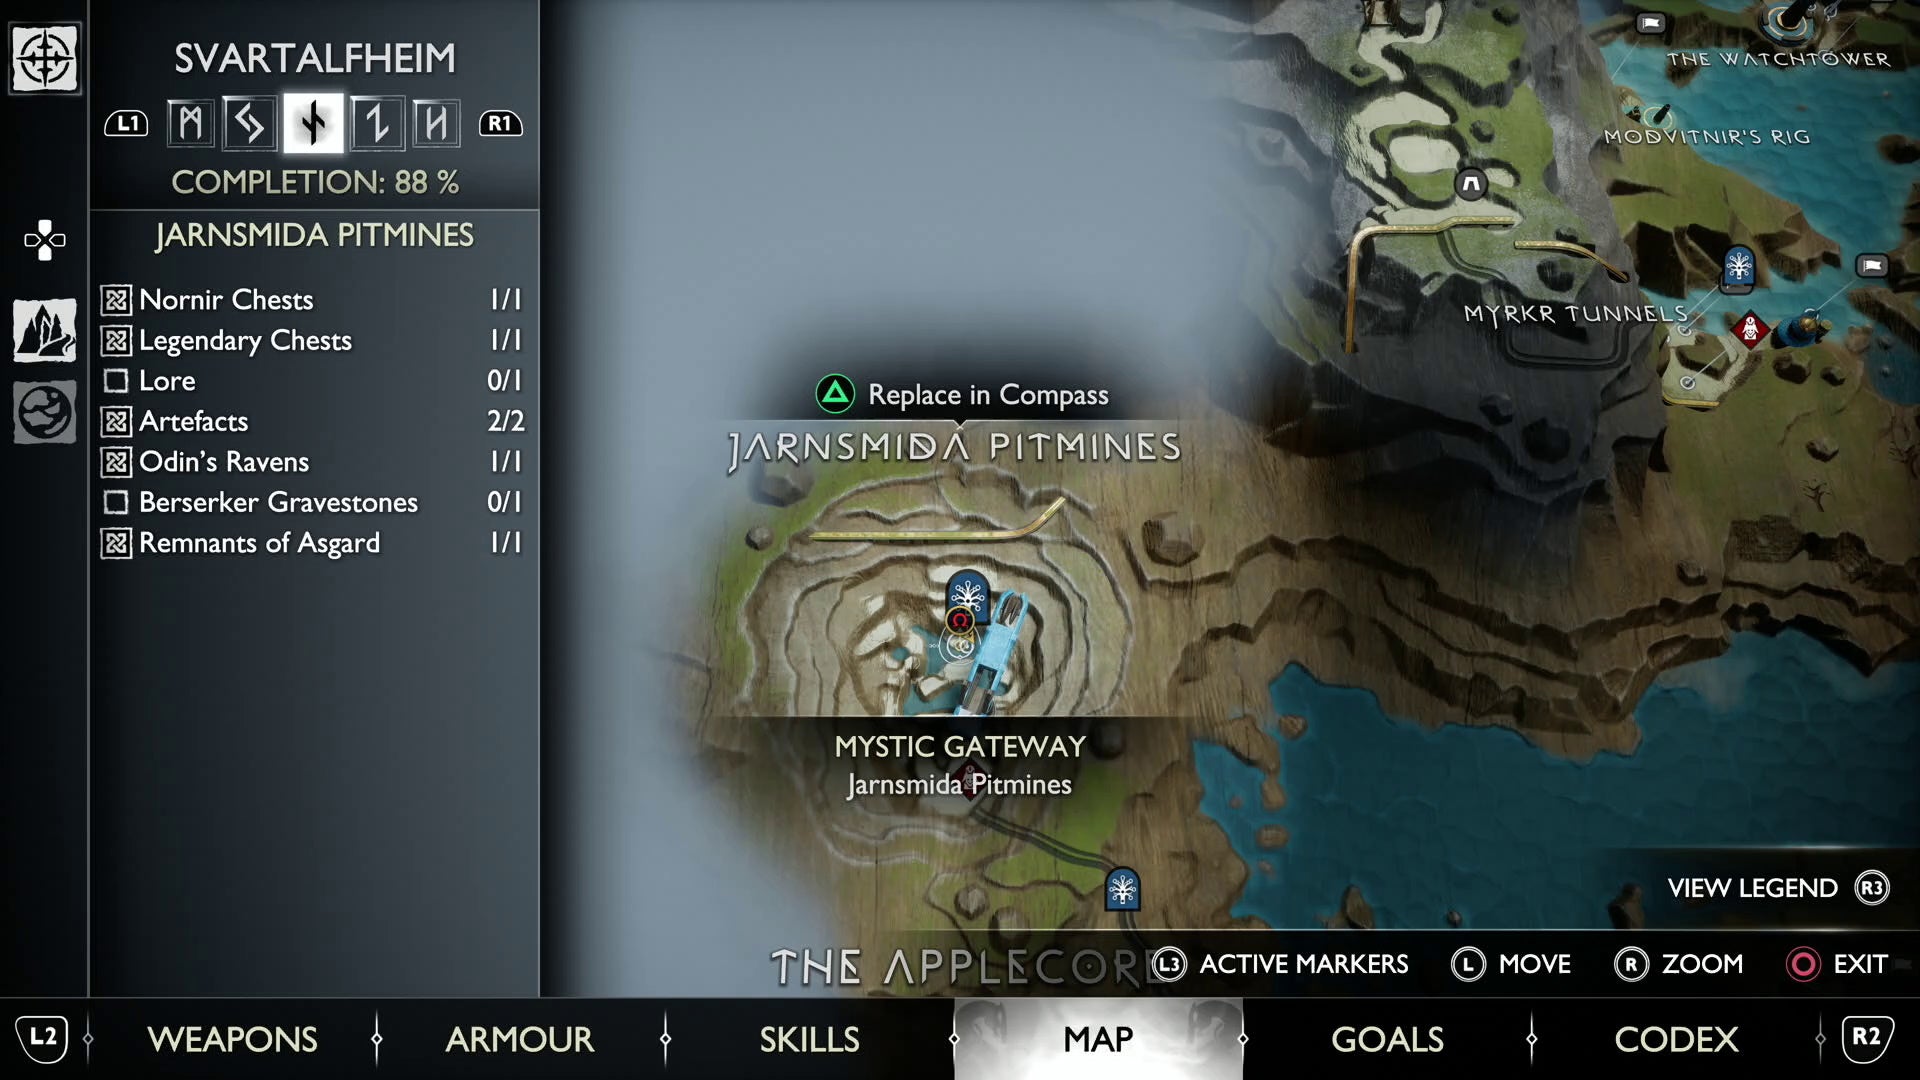
Svartalfheim Jarnsmida Pitmines Raven location in God of War Ragnarök
You’ll first come across the Jarnsmida Pitmines Raven after crashing the cart into the area with Atreus in the story, but can return at any time via a Mystic Gateway if you missed it the first time.
The Raven is located by sliding down the golden chain that leads to a chest, one of the ‘Things Left Behind’ Artefacts, and branches covered in a red mushroom-like material. Look across the water to find this Raven flying in a circle.
That’s it for all the Ravens you can find before returning to Svartalfheim as part of the story. Don’t read any further until you get to this point if you don’t want to see spoilers in the descriptions and pictures!
Svartalfheim The Forge Raven location 2 in God of War Ragnarök
This Raven is only accessible after travelling to the top of The Forge area with Brok as part of the story. It’s the place with the large bell in the middle.
You’ll see the Raven perched on the side of the mountain, just above the golden chain you use to get down to the main area with the large bell.
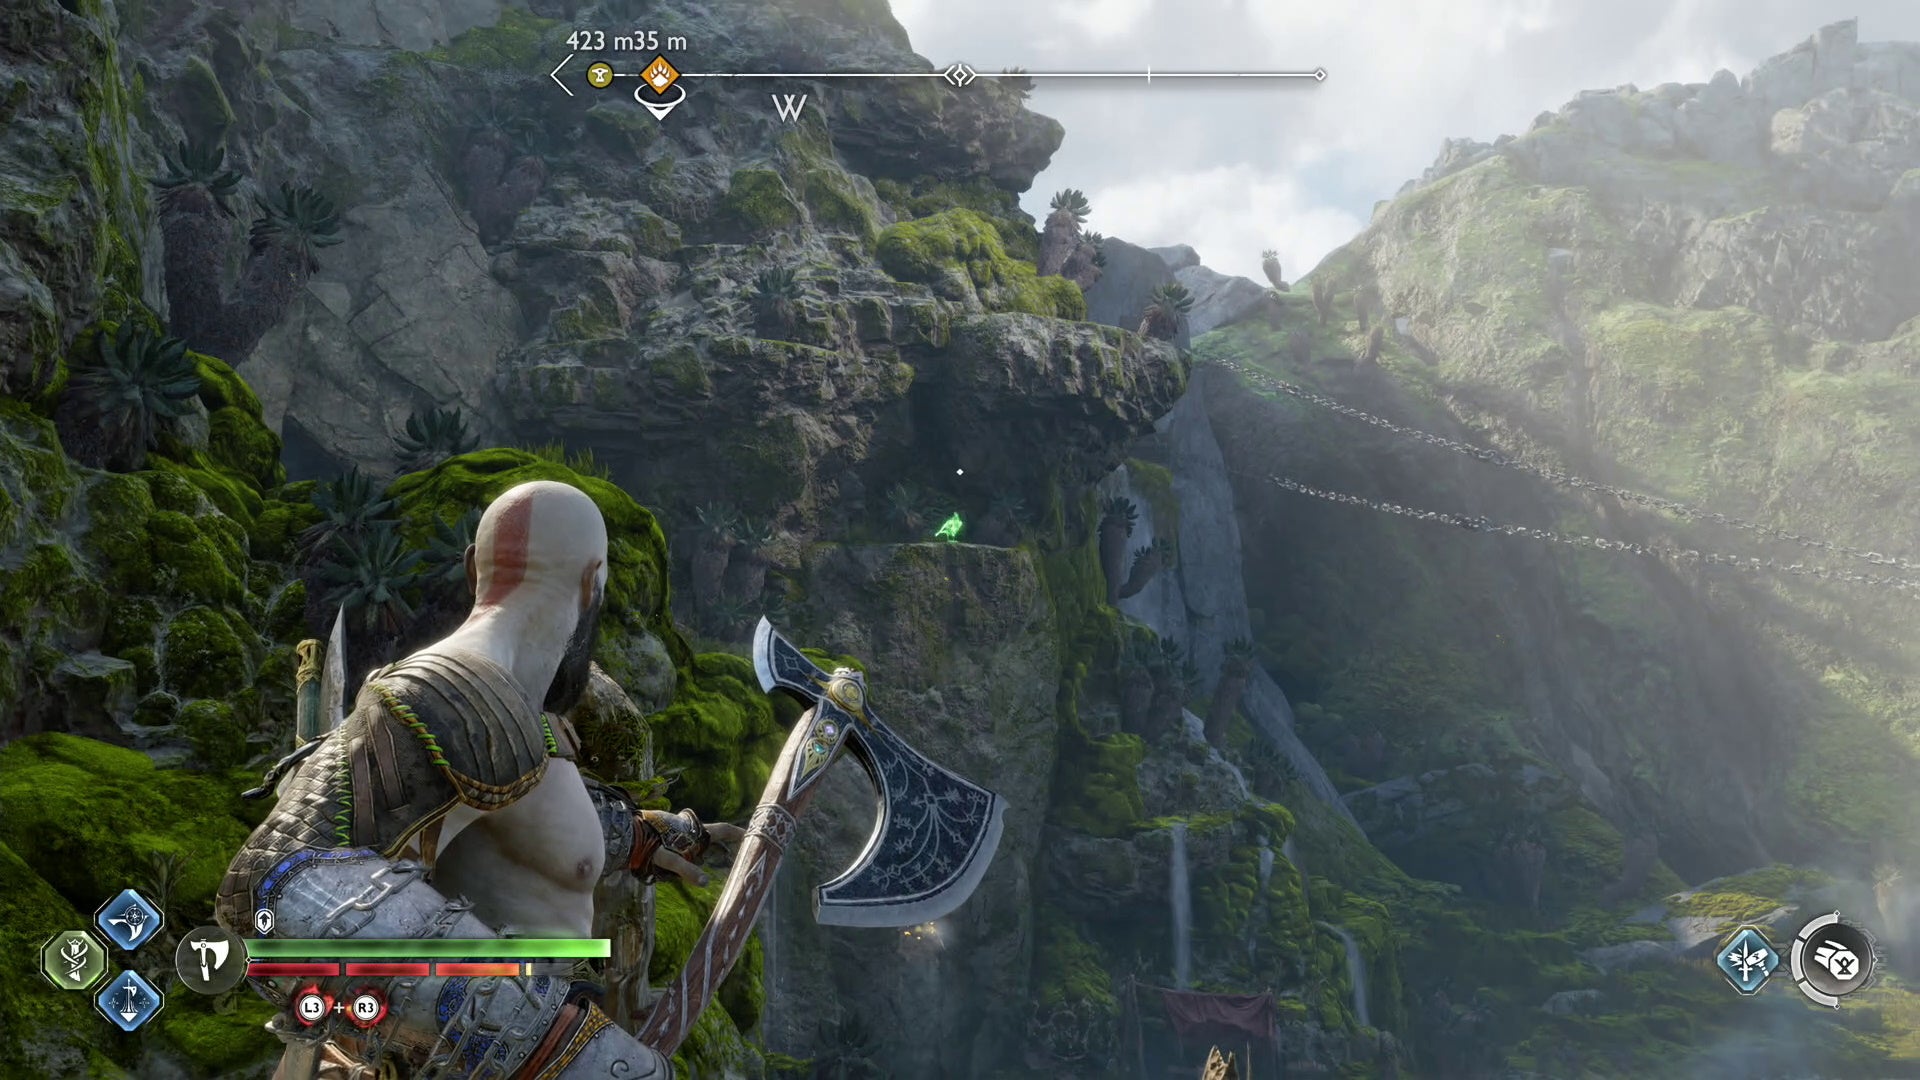
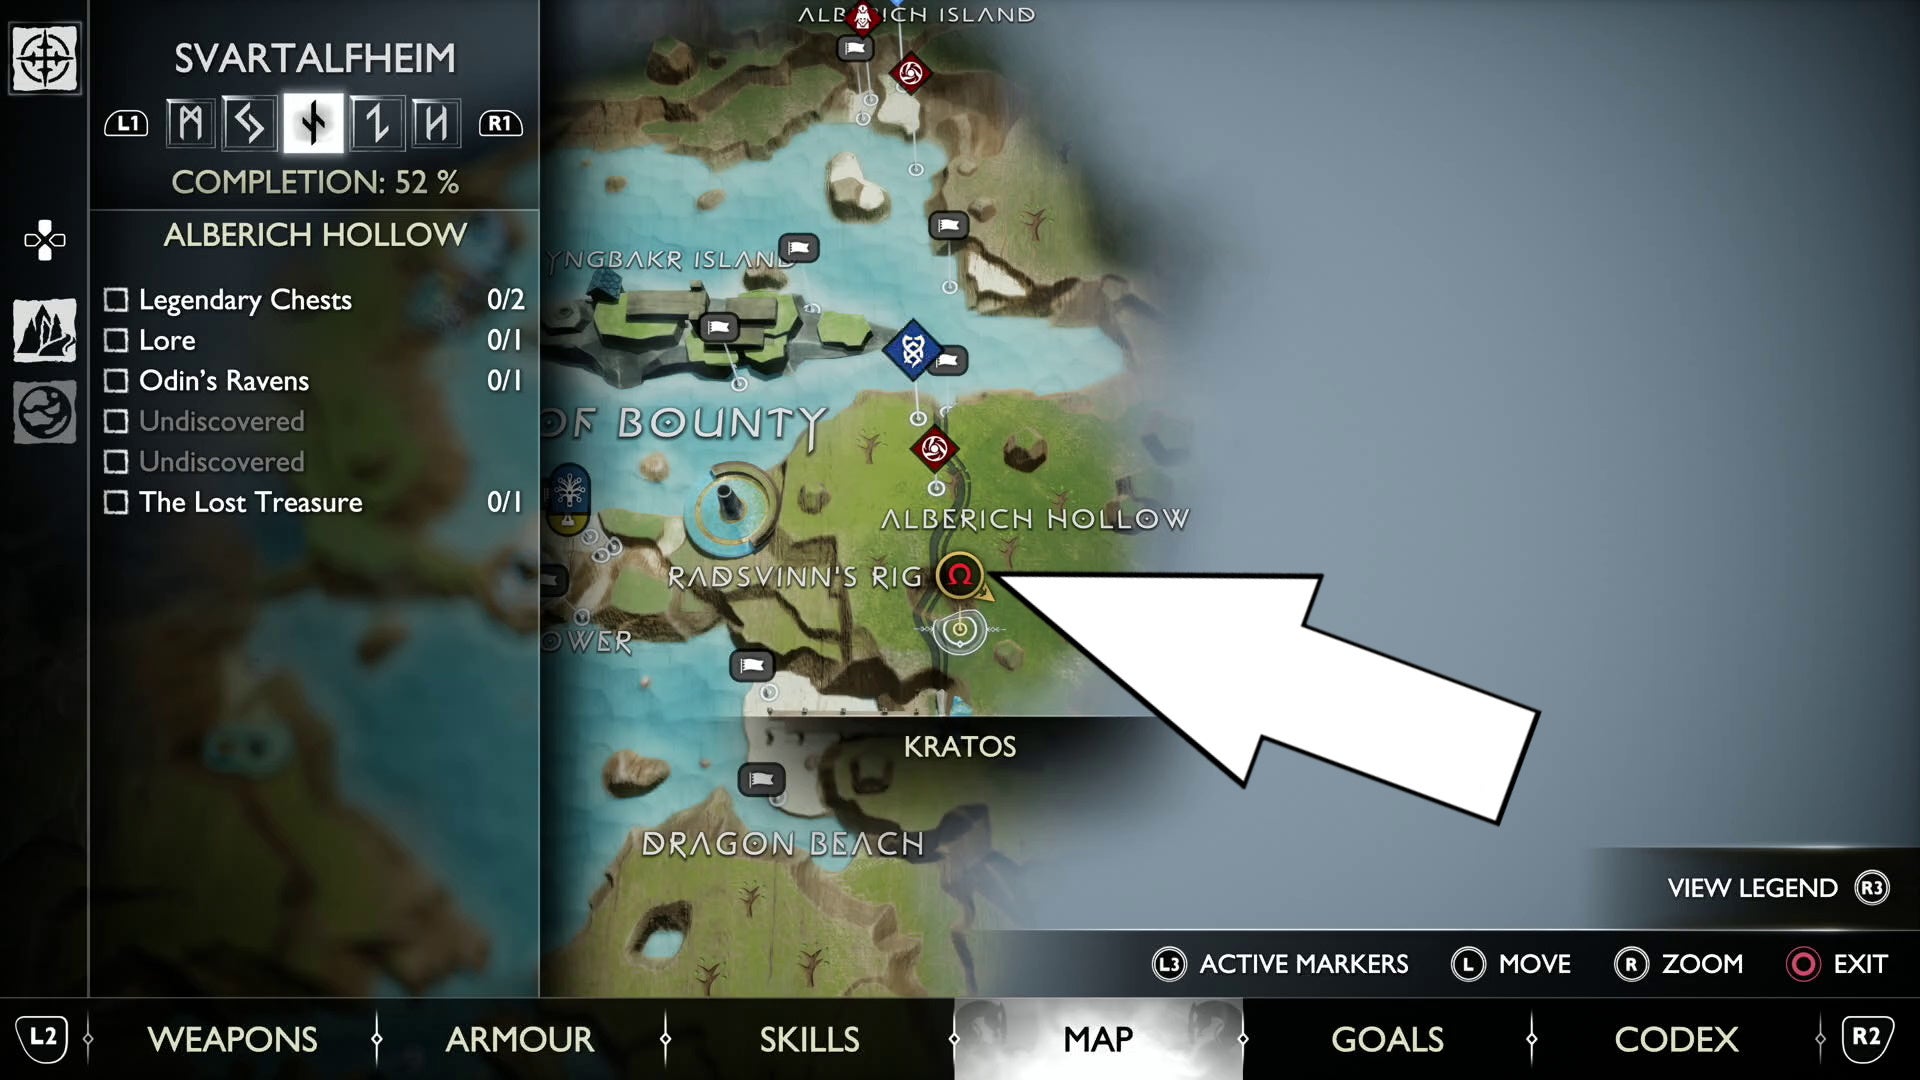
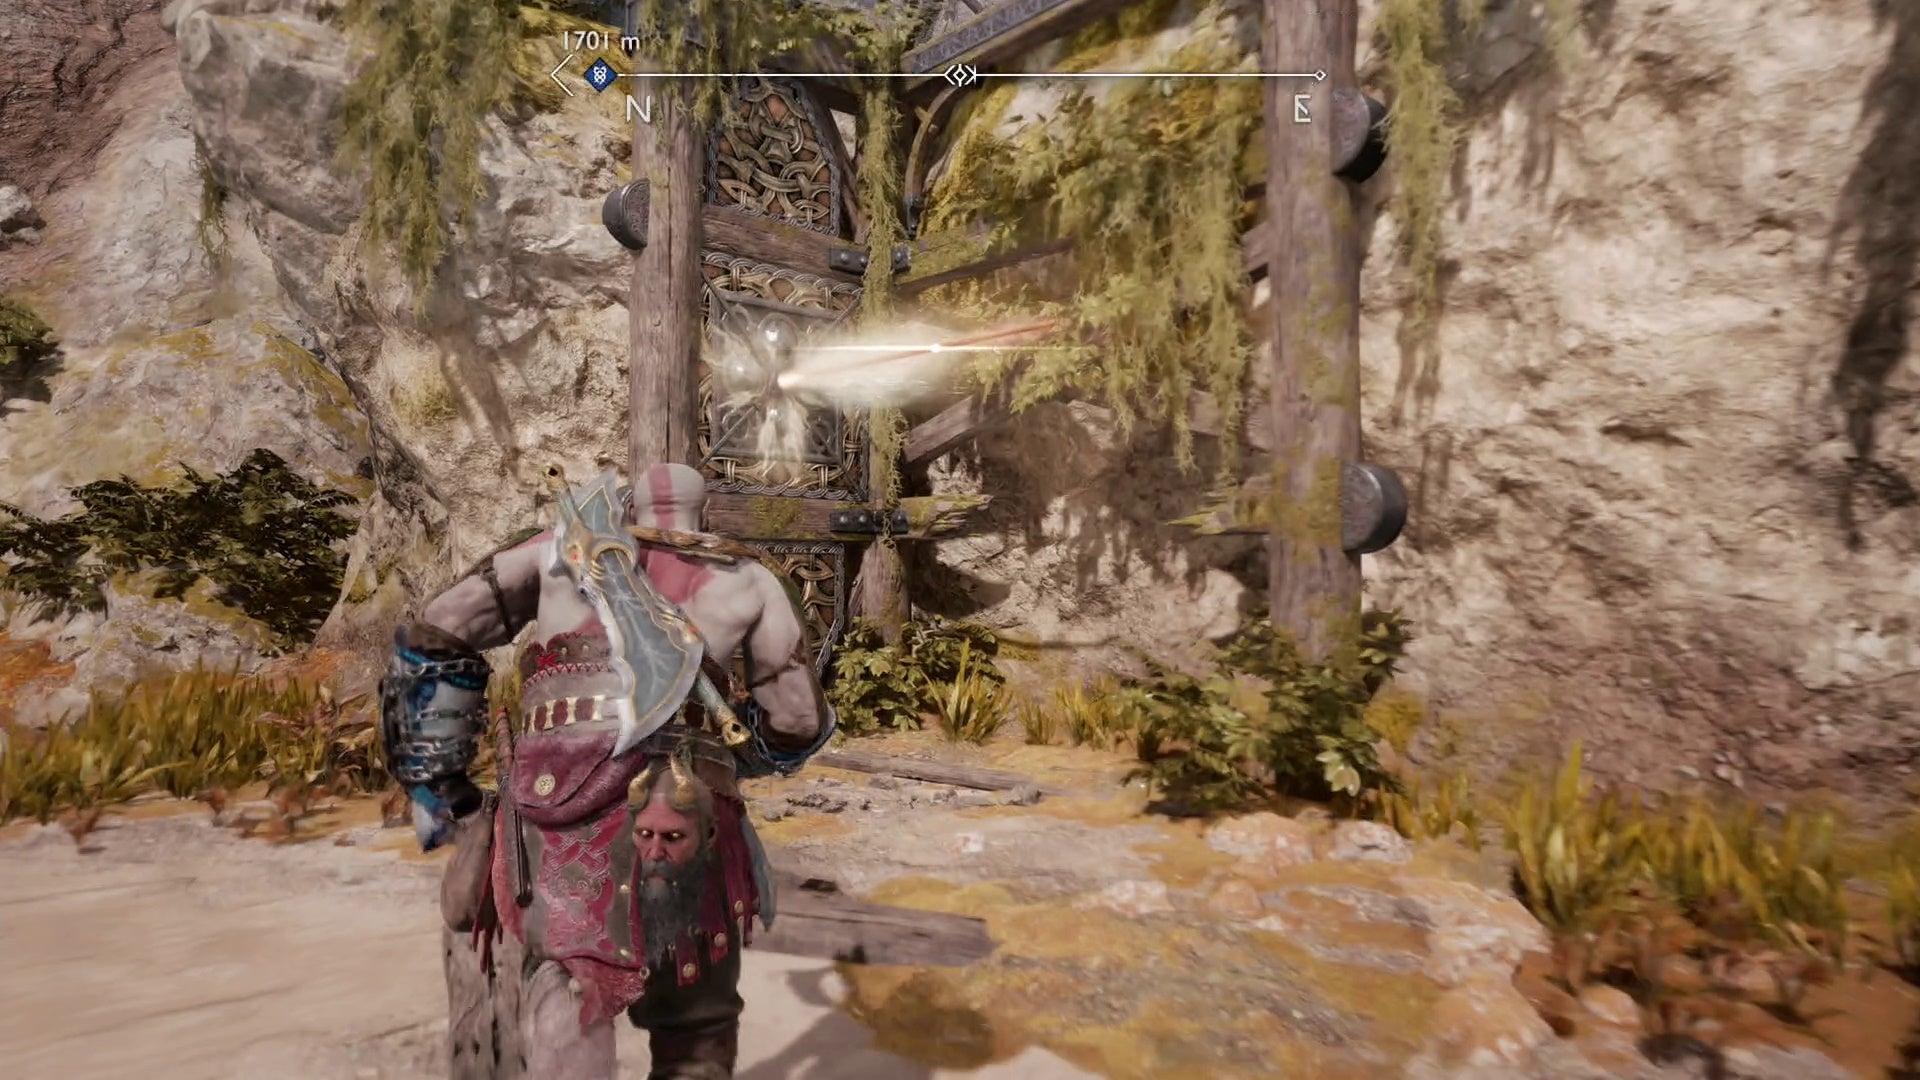
Svartalfheim Alberich Hollow Raven location in God of War Ragnarök
You can only get the Raven in Alberich Hollow after acquiring the weapon from The Forge in Svartalfheim with Brok, because you can only access the area by using this weapon to climb Radsvinn’s Rig.
Once you do have this weapon, use it to go up the rig, take a left, then go forward and take a left by the large statue of the dwarf. You’ll see the Raven perched to your left once you clear the debris just past the Legendary Chest containing the second Muspelheim Seed.
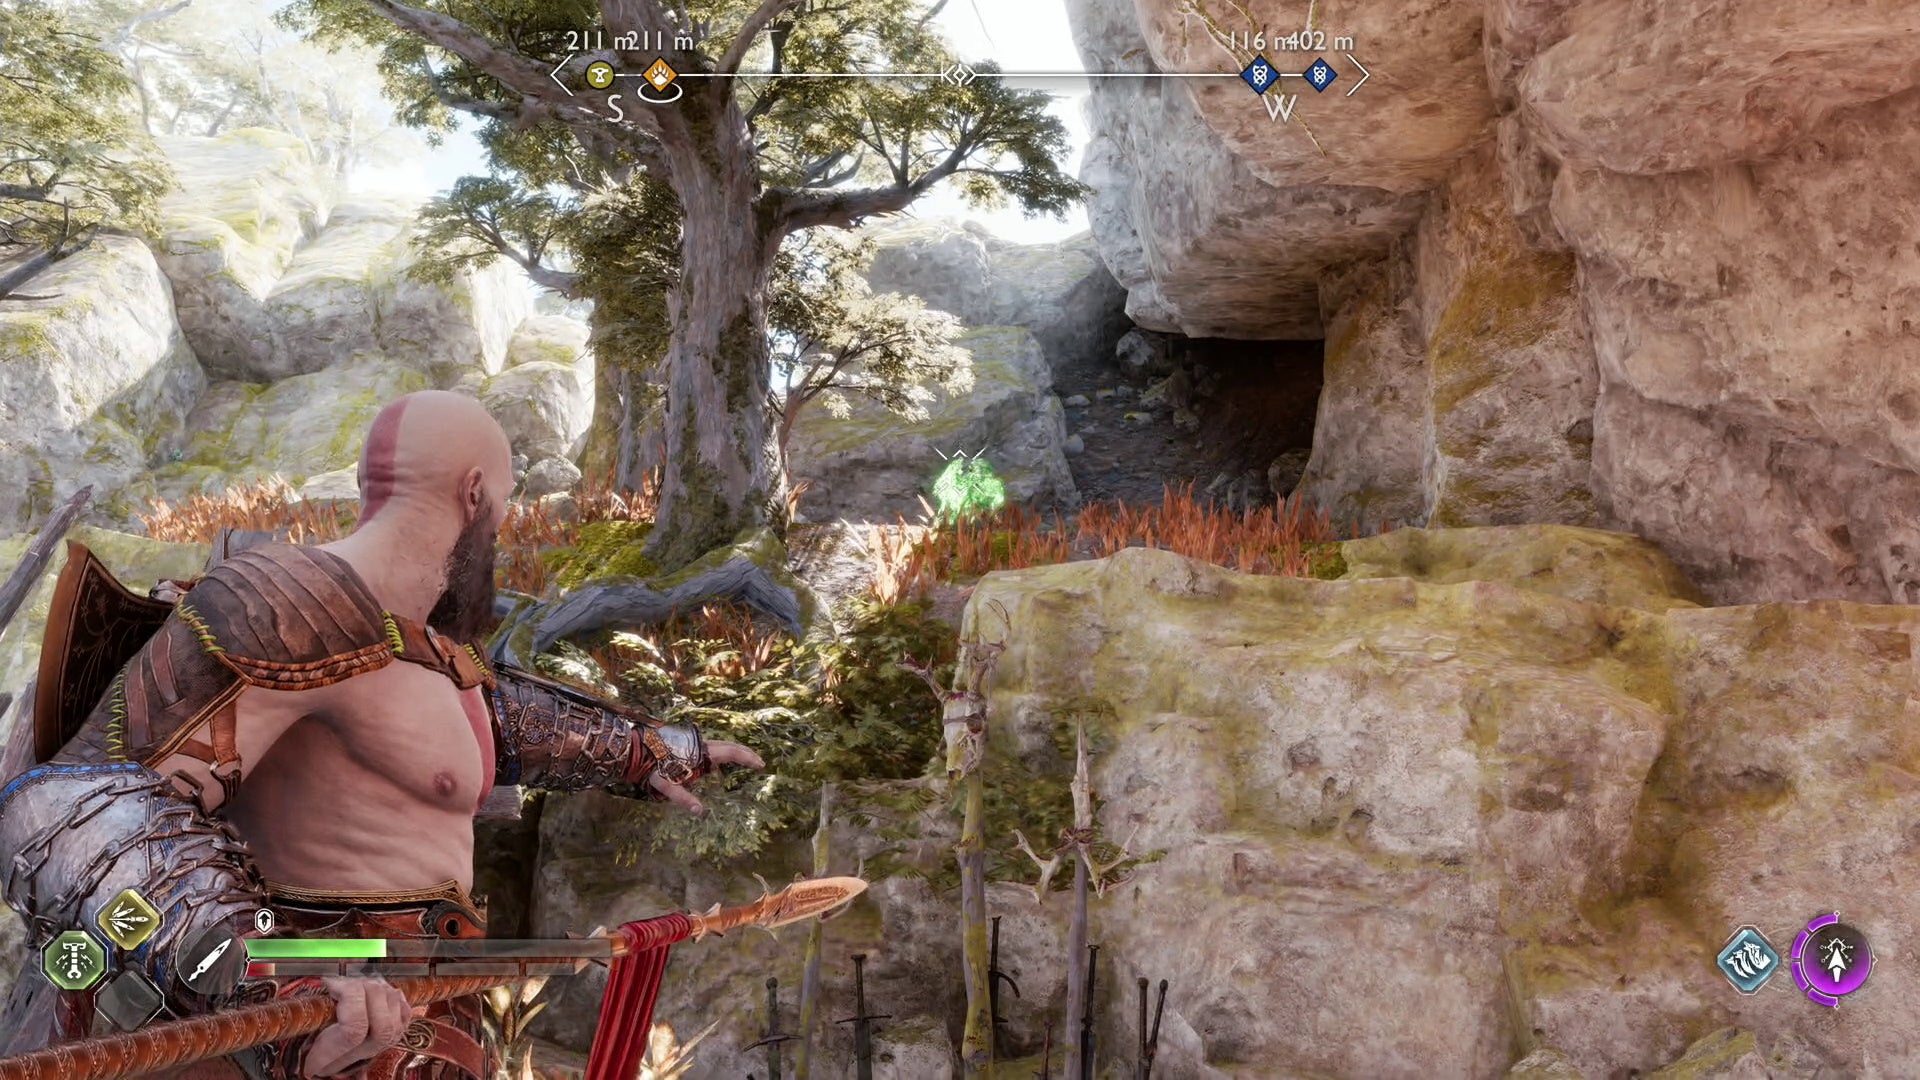
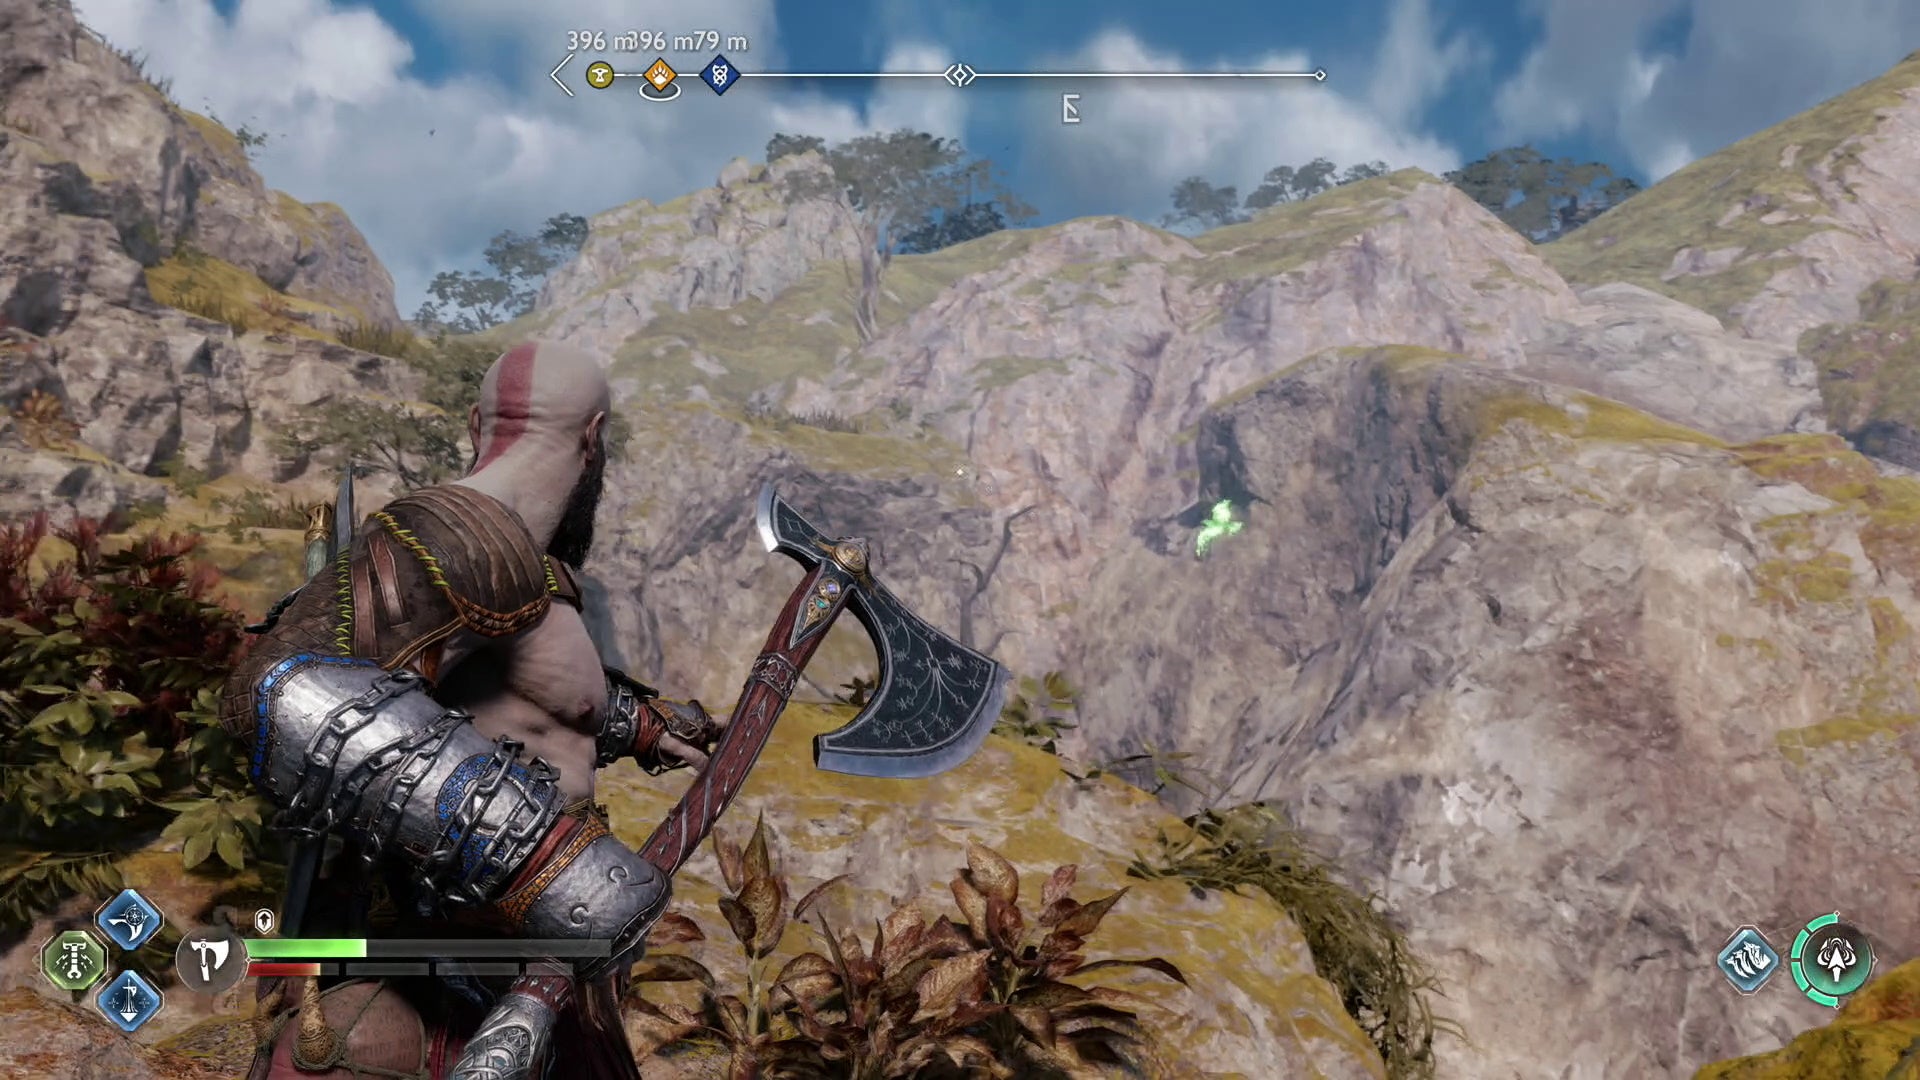
Svartalfheim Alberich Island Raven location 1 in God of War Ragnarök
You can only access this Raven’s location after acquiring the weapon from The Forge in Svartalfheim with Brok as part of the story. Once you do, use it to the left of the Nornir Chest on the island to climb up.
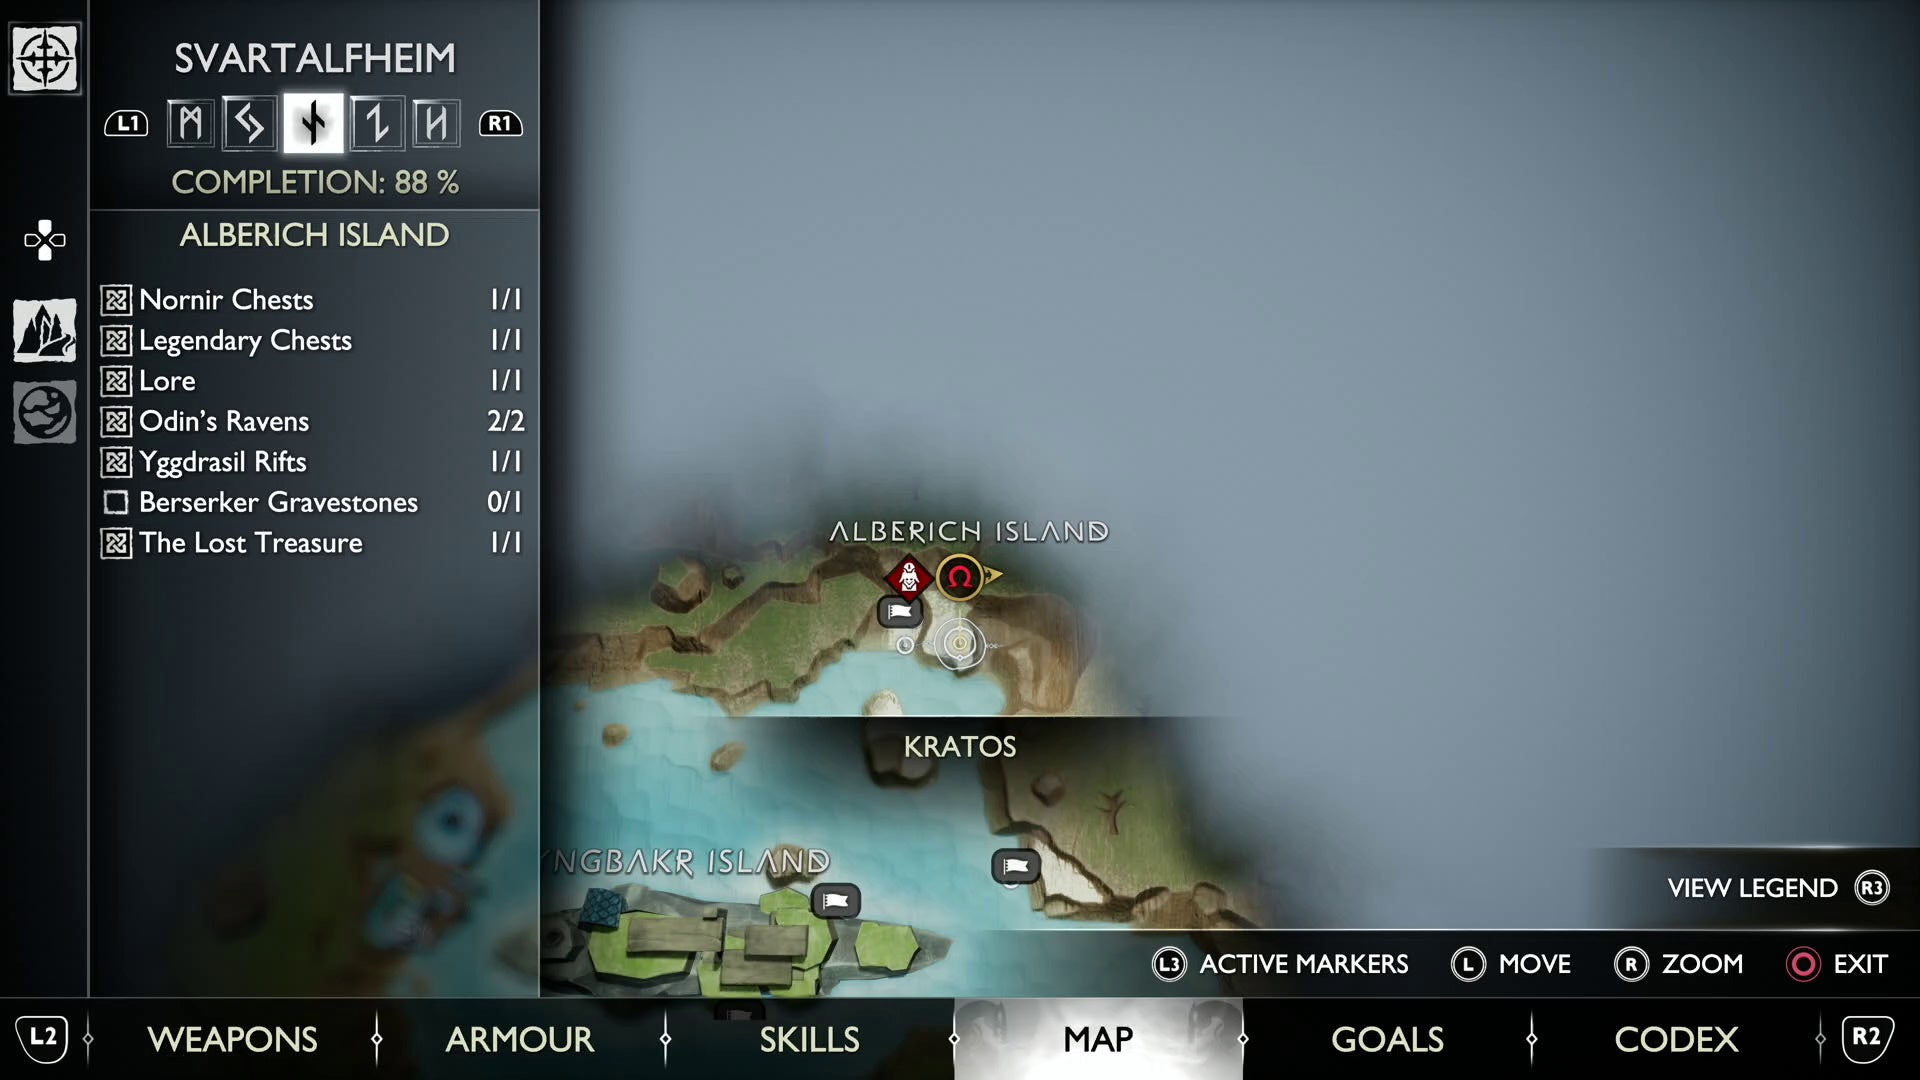
You’ll find the son’s spirit as part of the ‘Lost Treasure’ Favour to your left, but if you go up and left you’ll see some debris you can clear with a Sonic Arrow – the Raven flying in a circle behind this debris.
Svartalfheim Alberich Island Raven location 2 in God of War Ragnarök
Following the path after getting the first Raven in Alberich Island, this second one is located in a gap between the rocks across the water from one of the Lost Lindwyrm locations, just to the right of where the ‘Washed Ashore’ Treasure Map is.
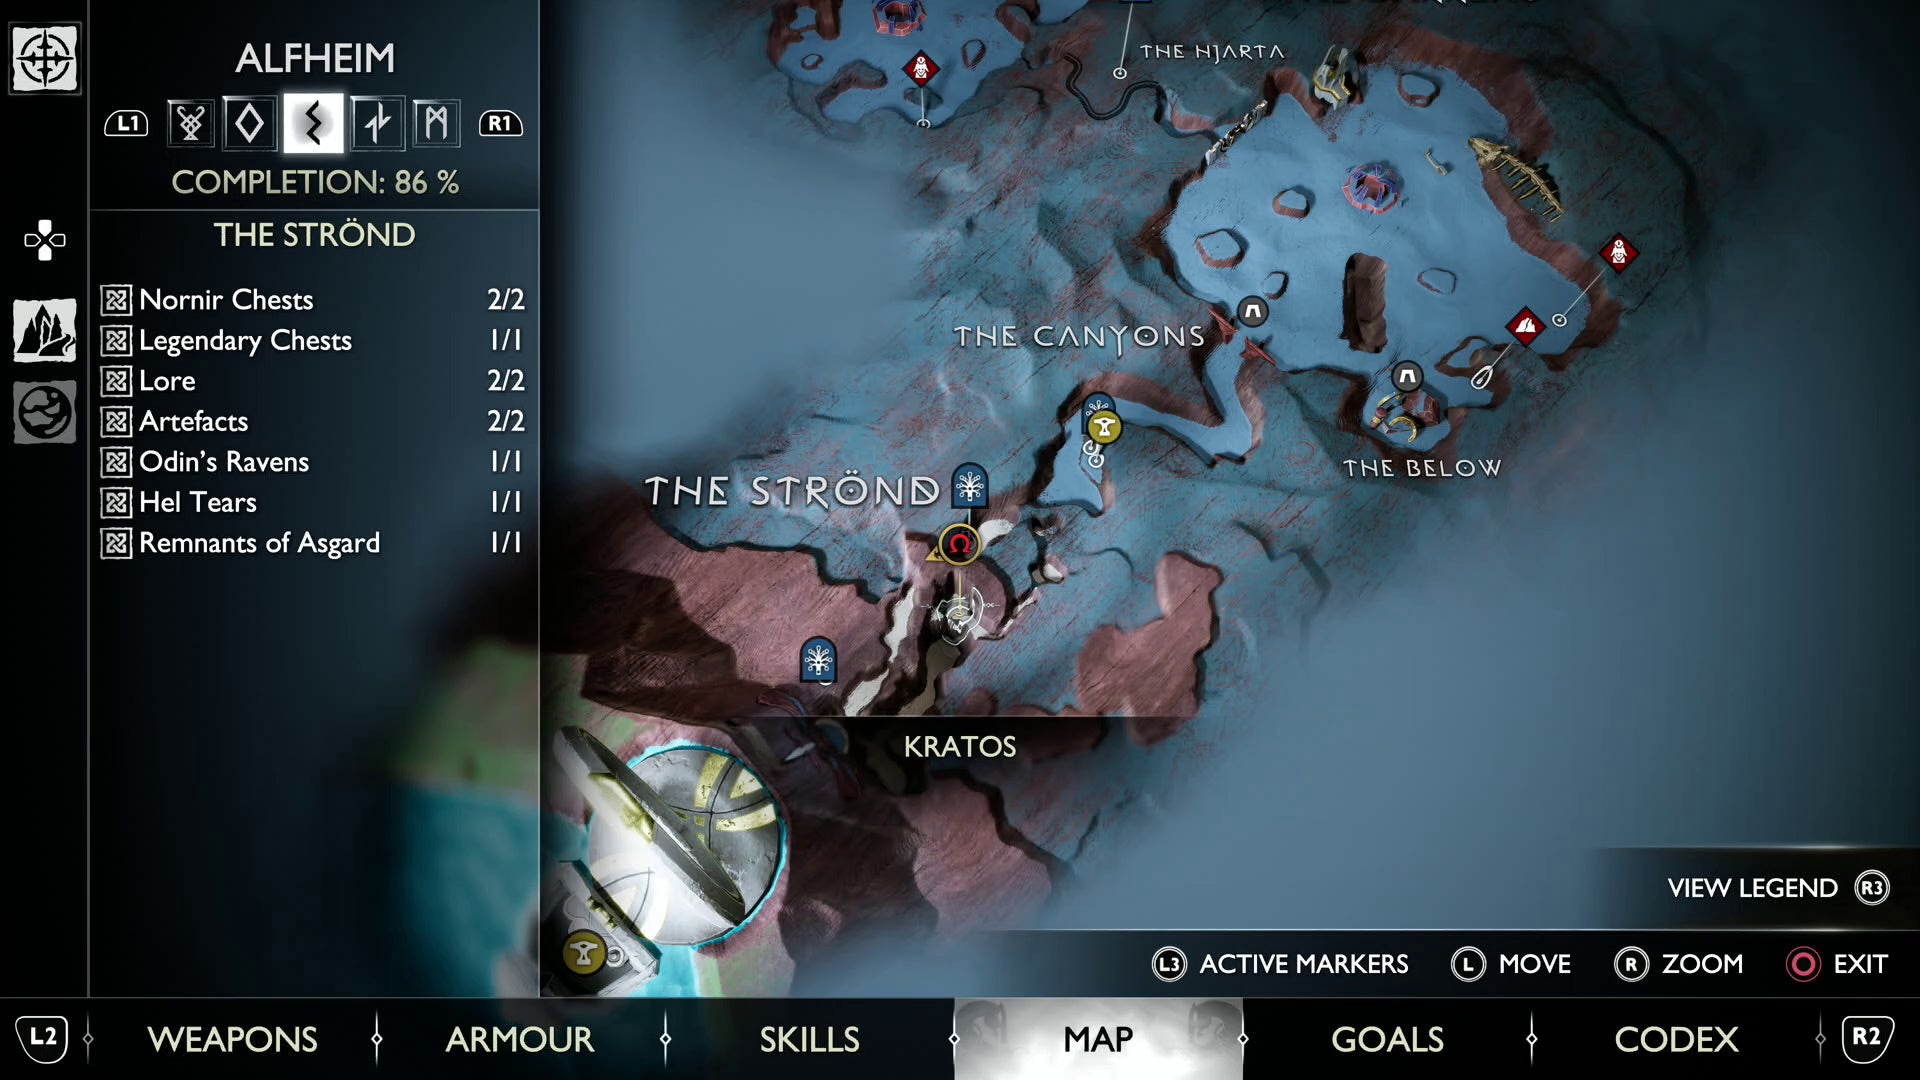
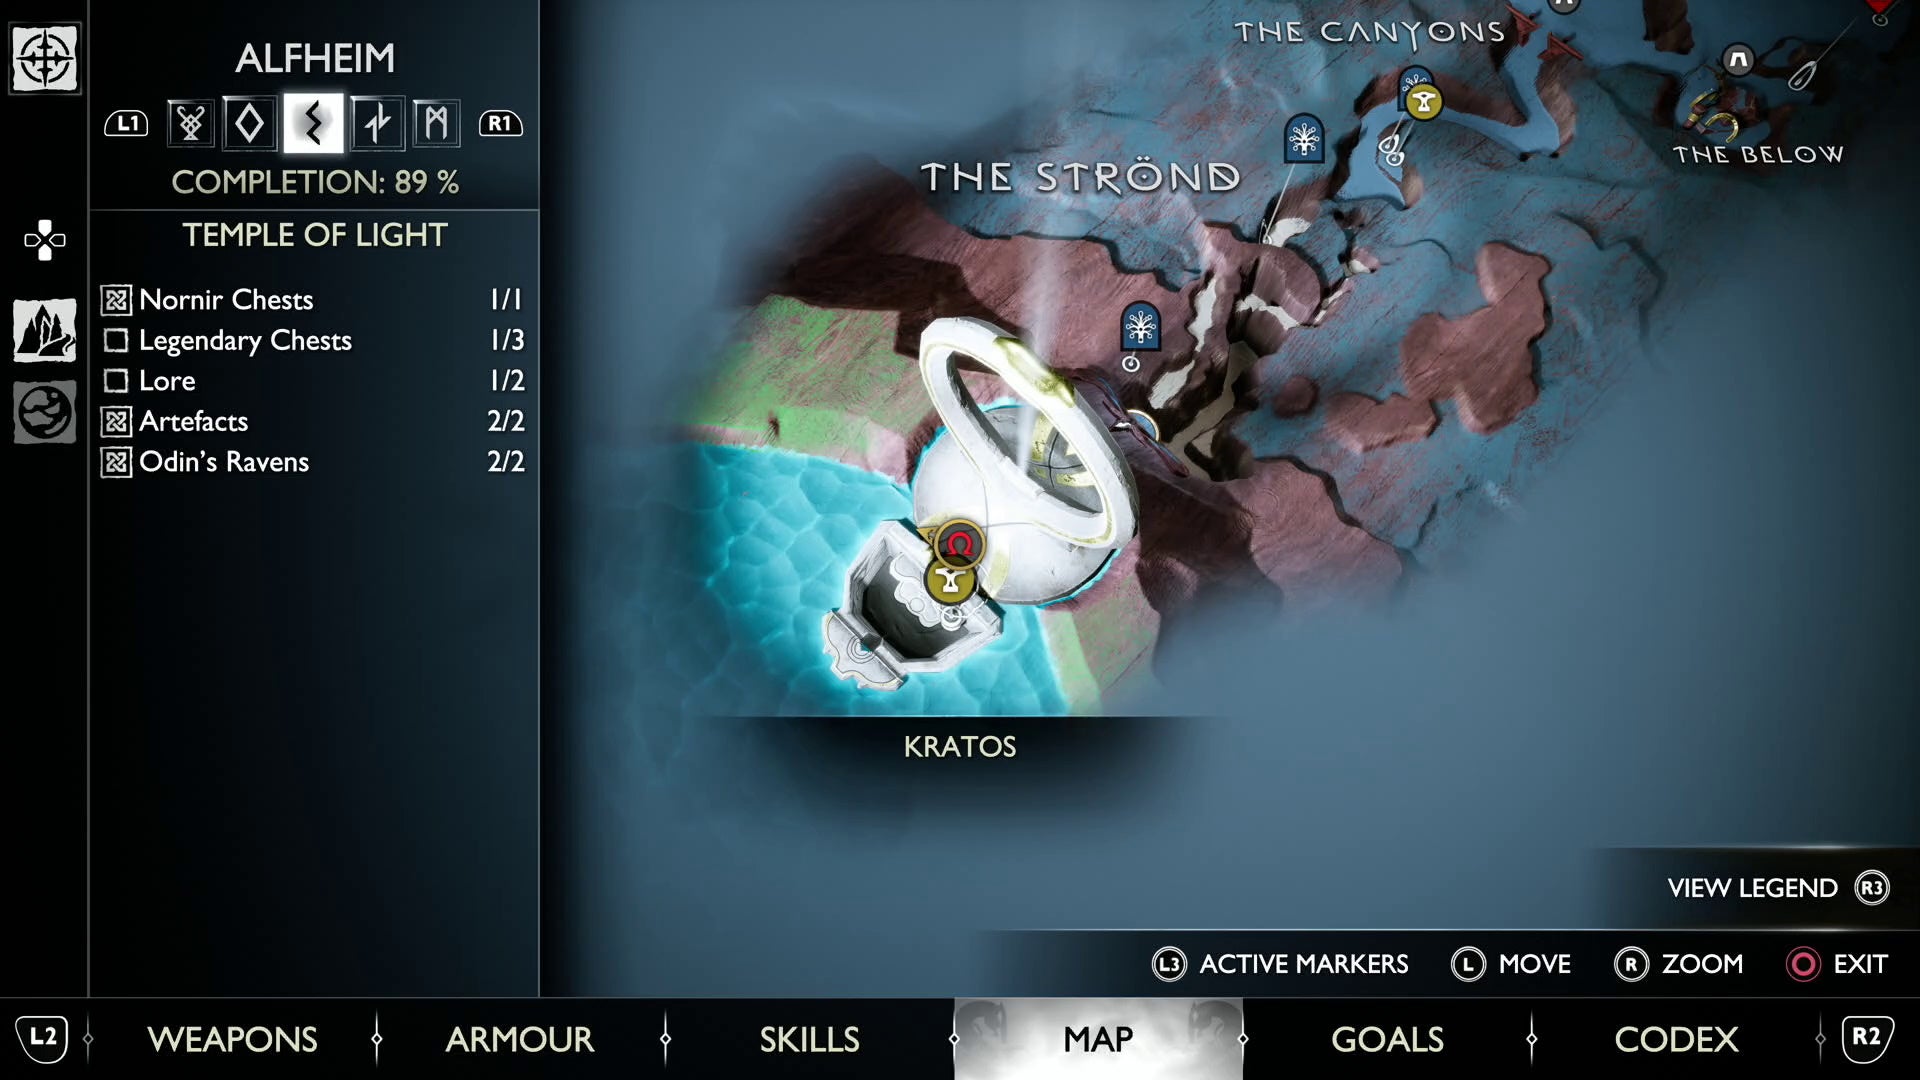
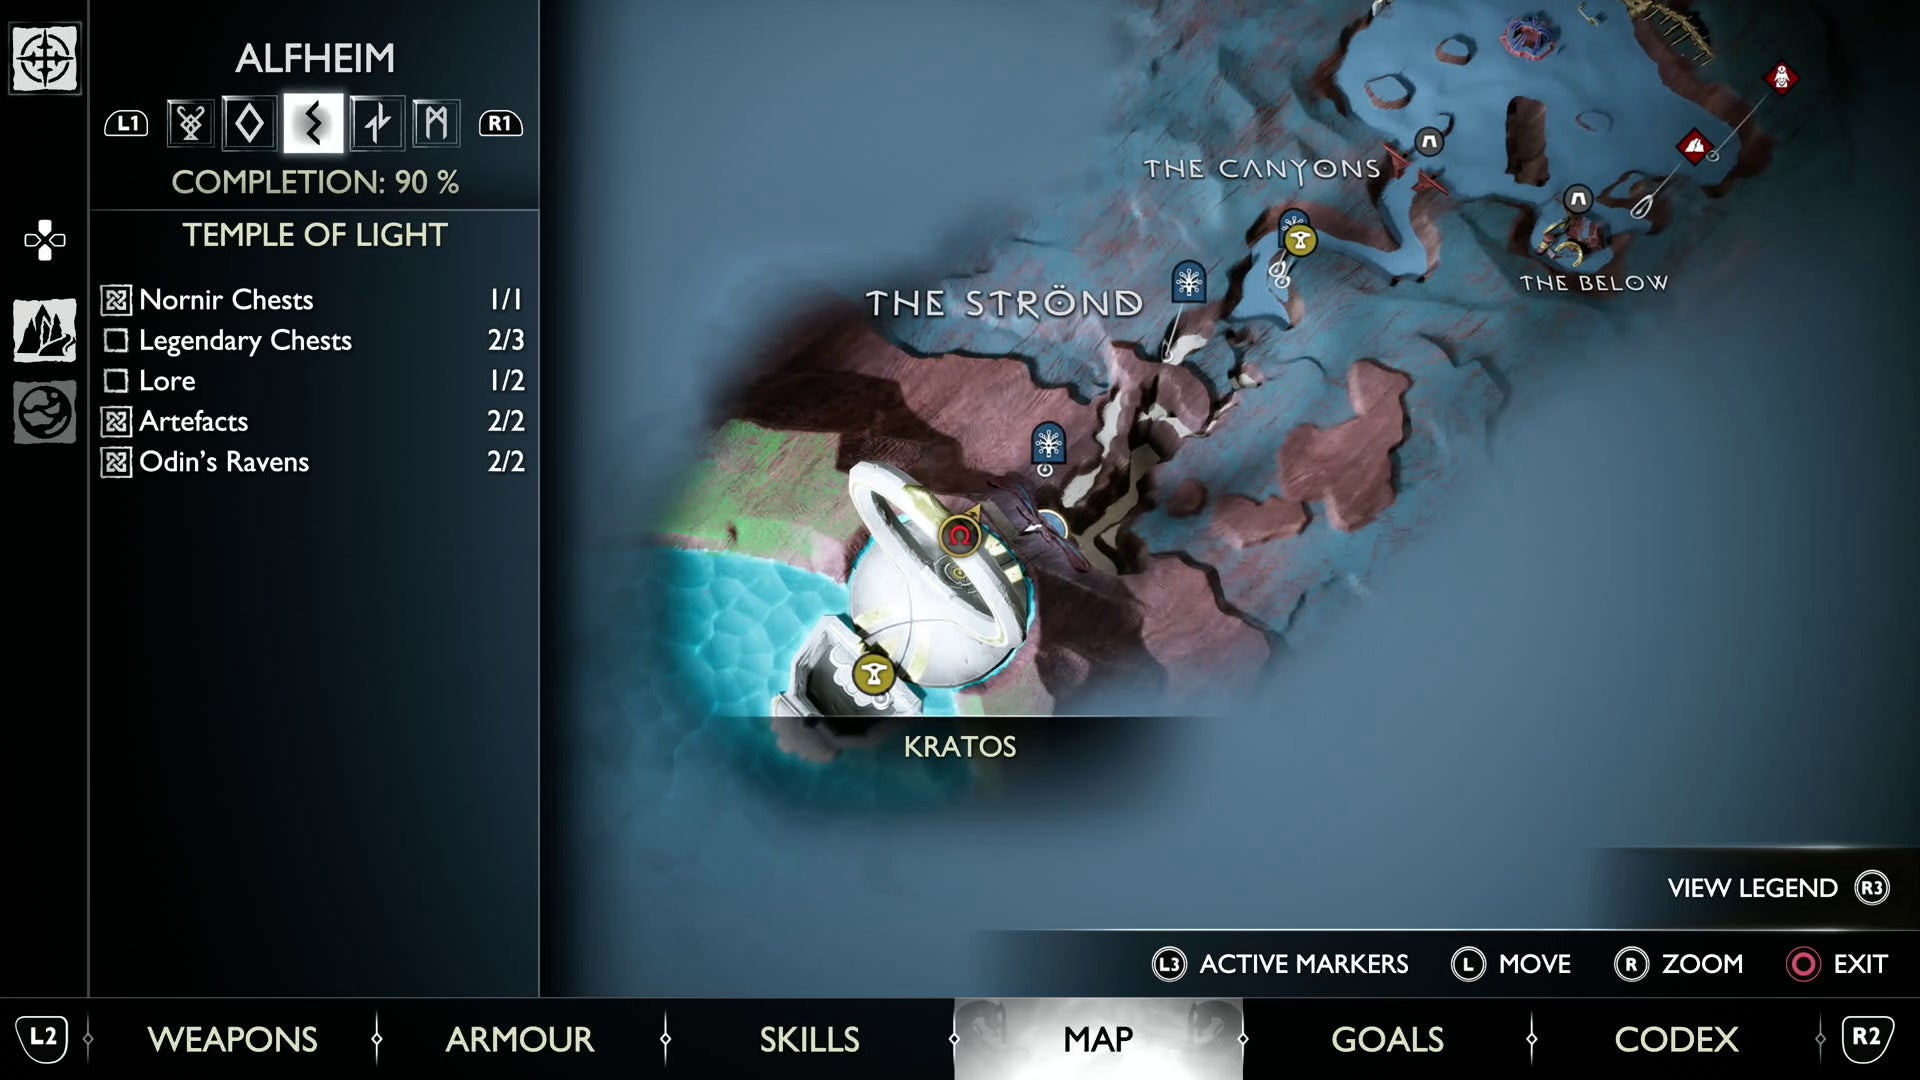
God of War Ragnarök Alfheim Odin’s Ravens locations explained
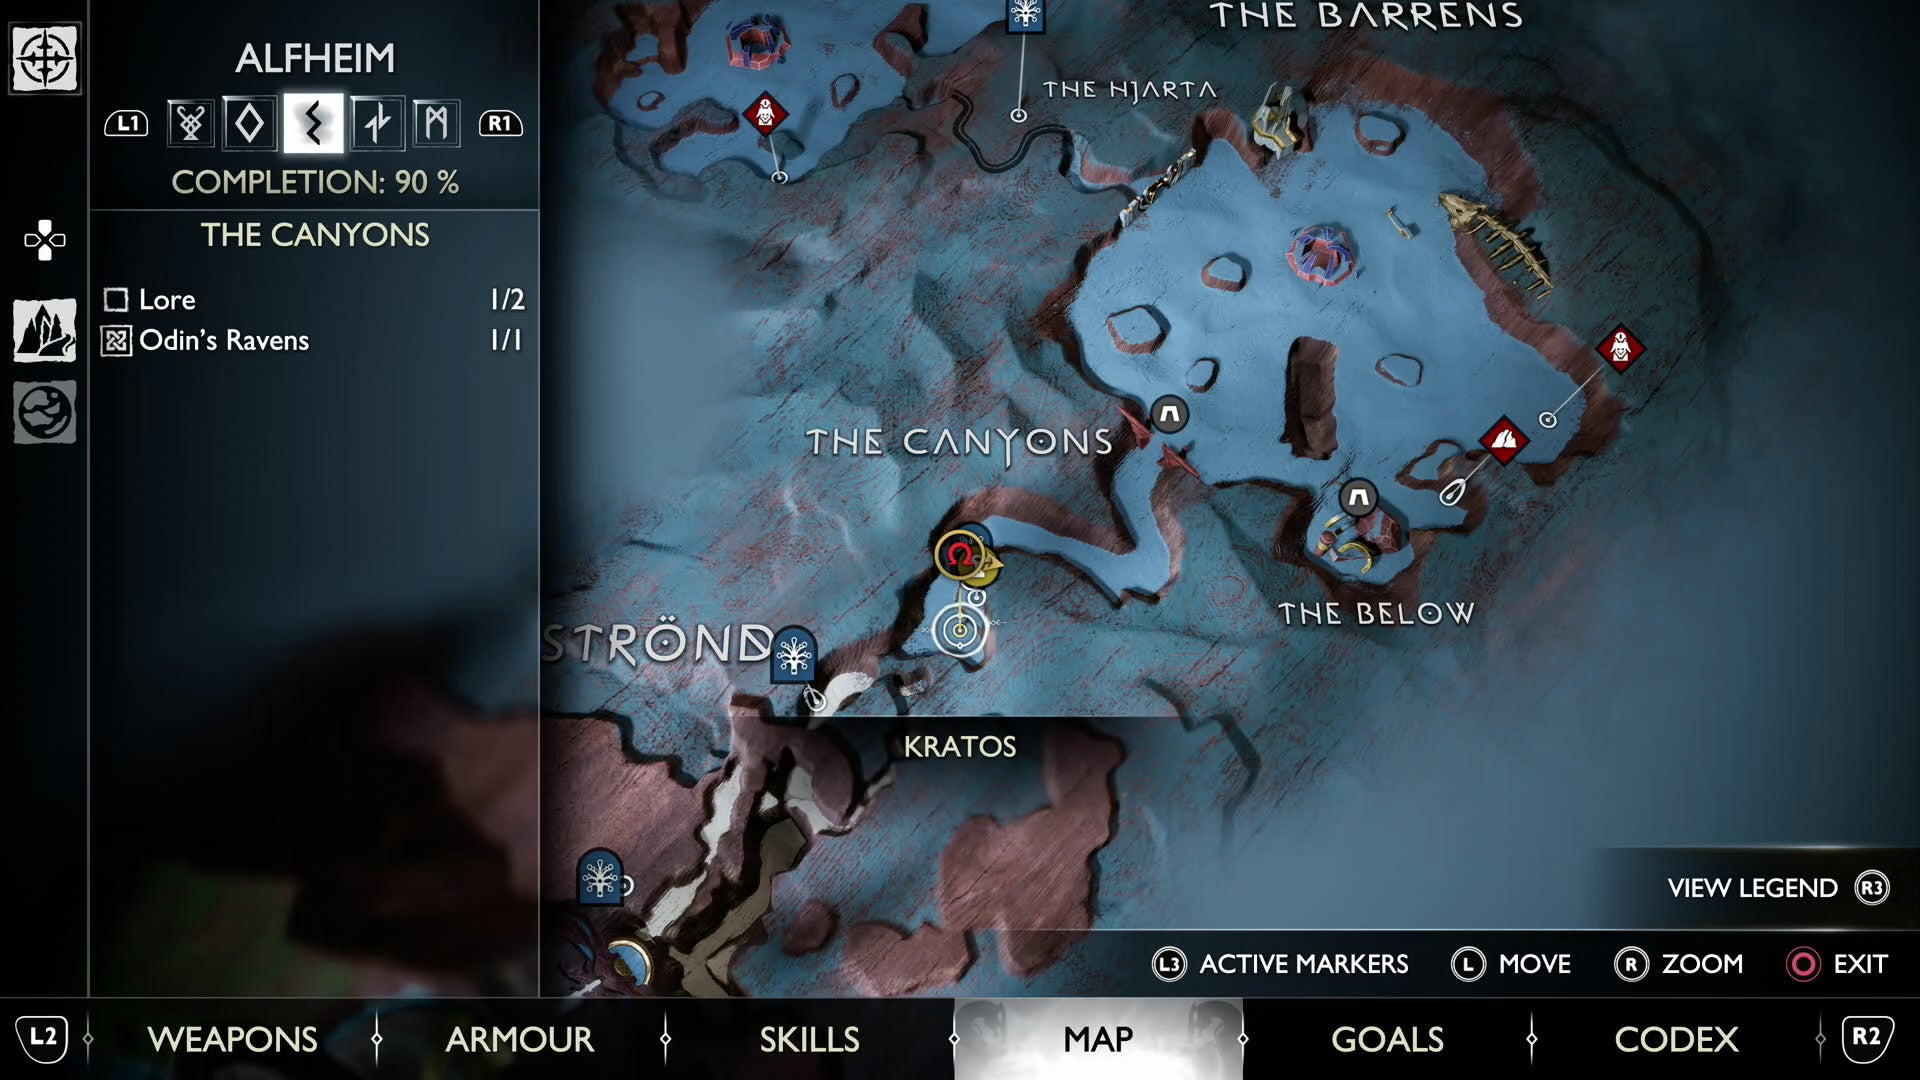
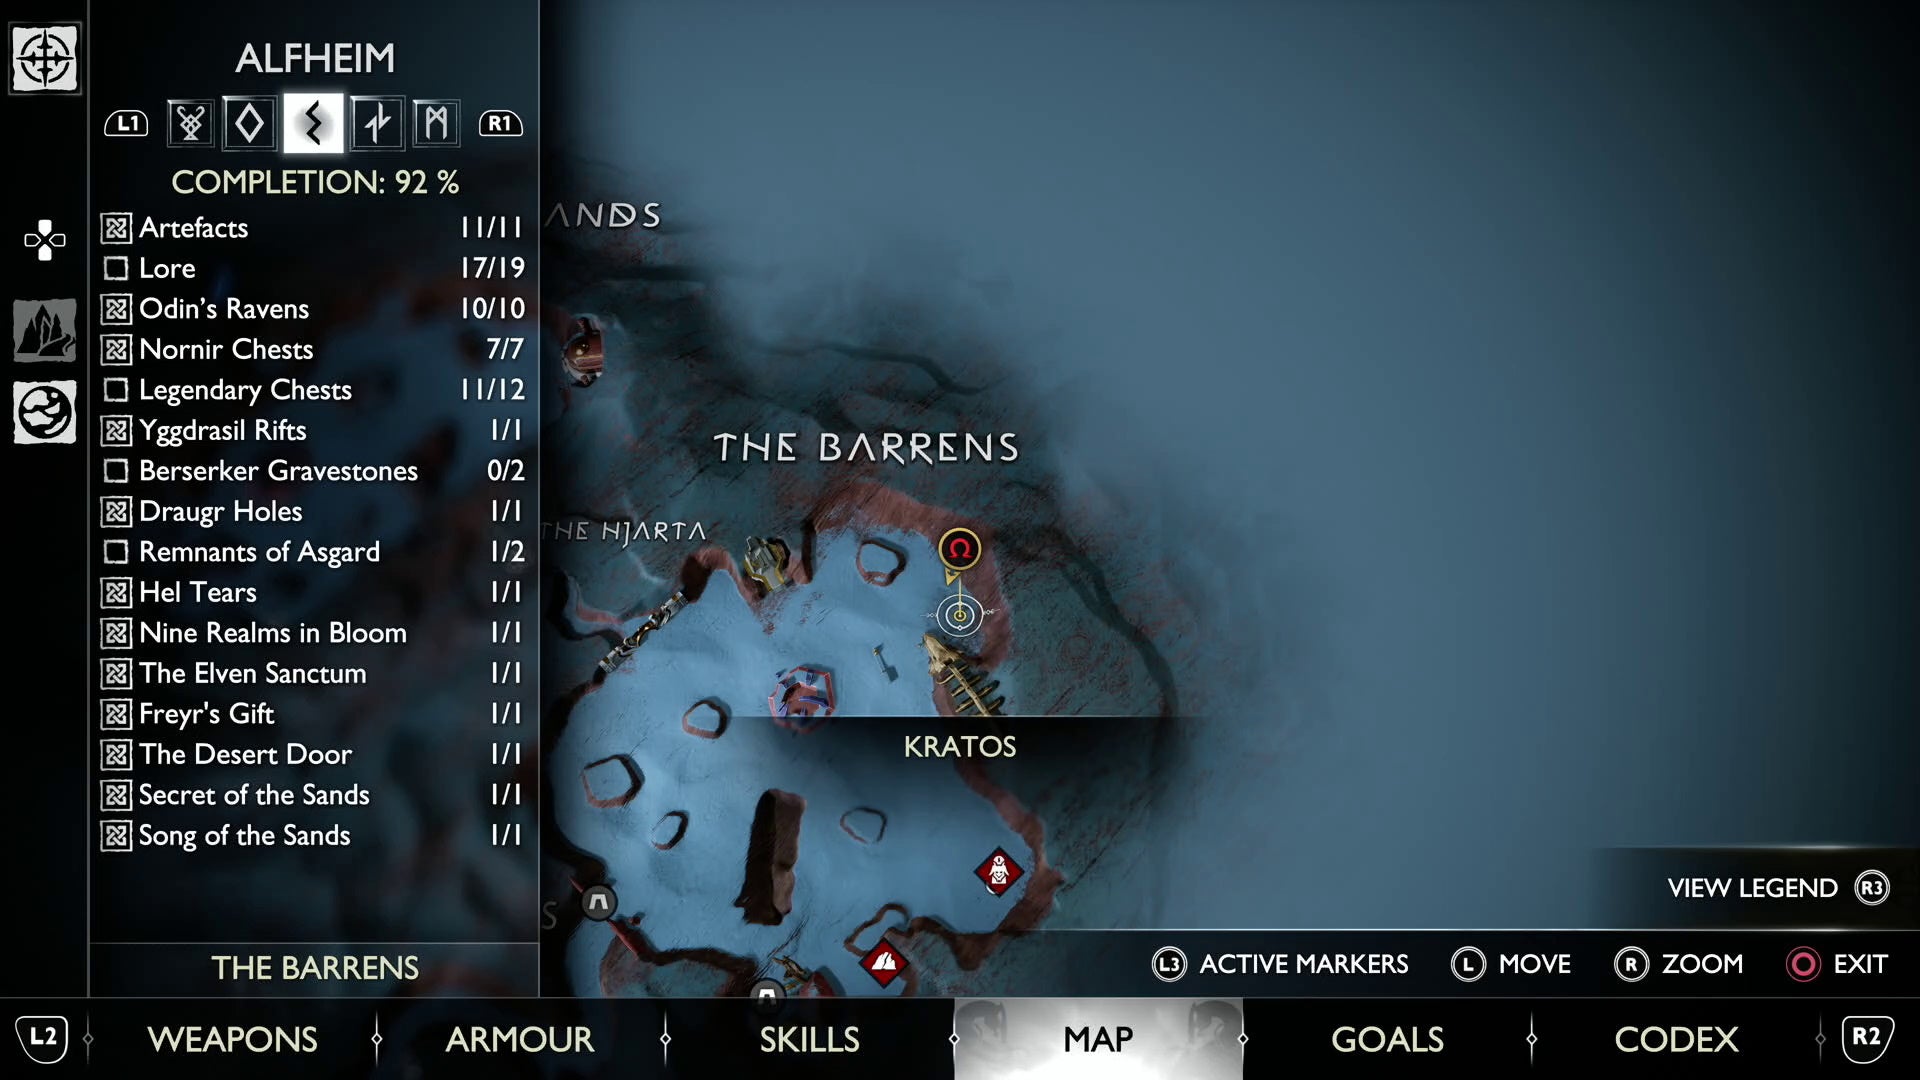
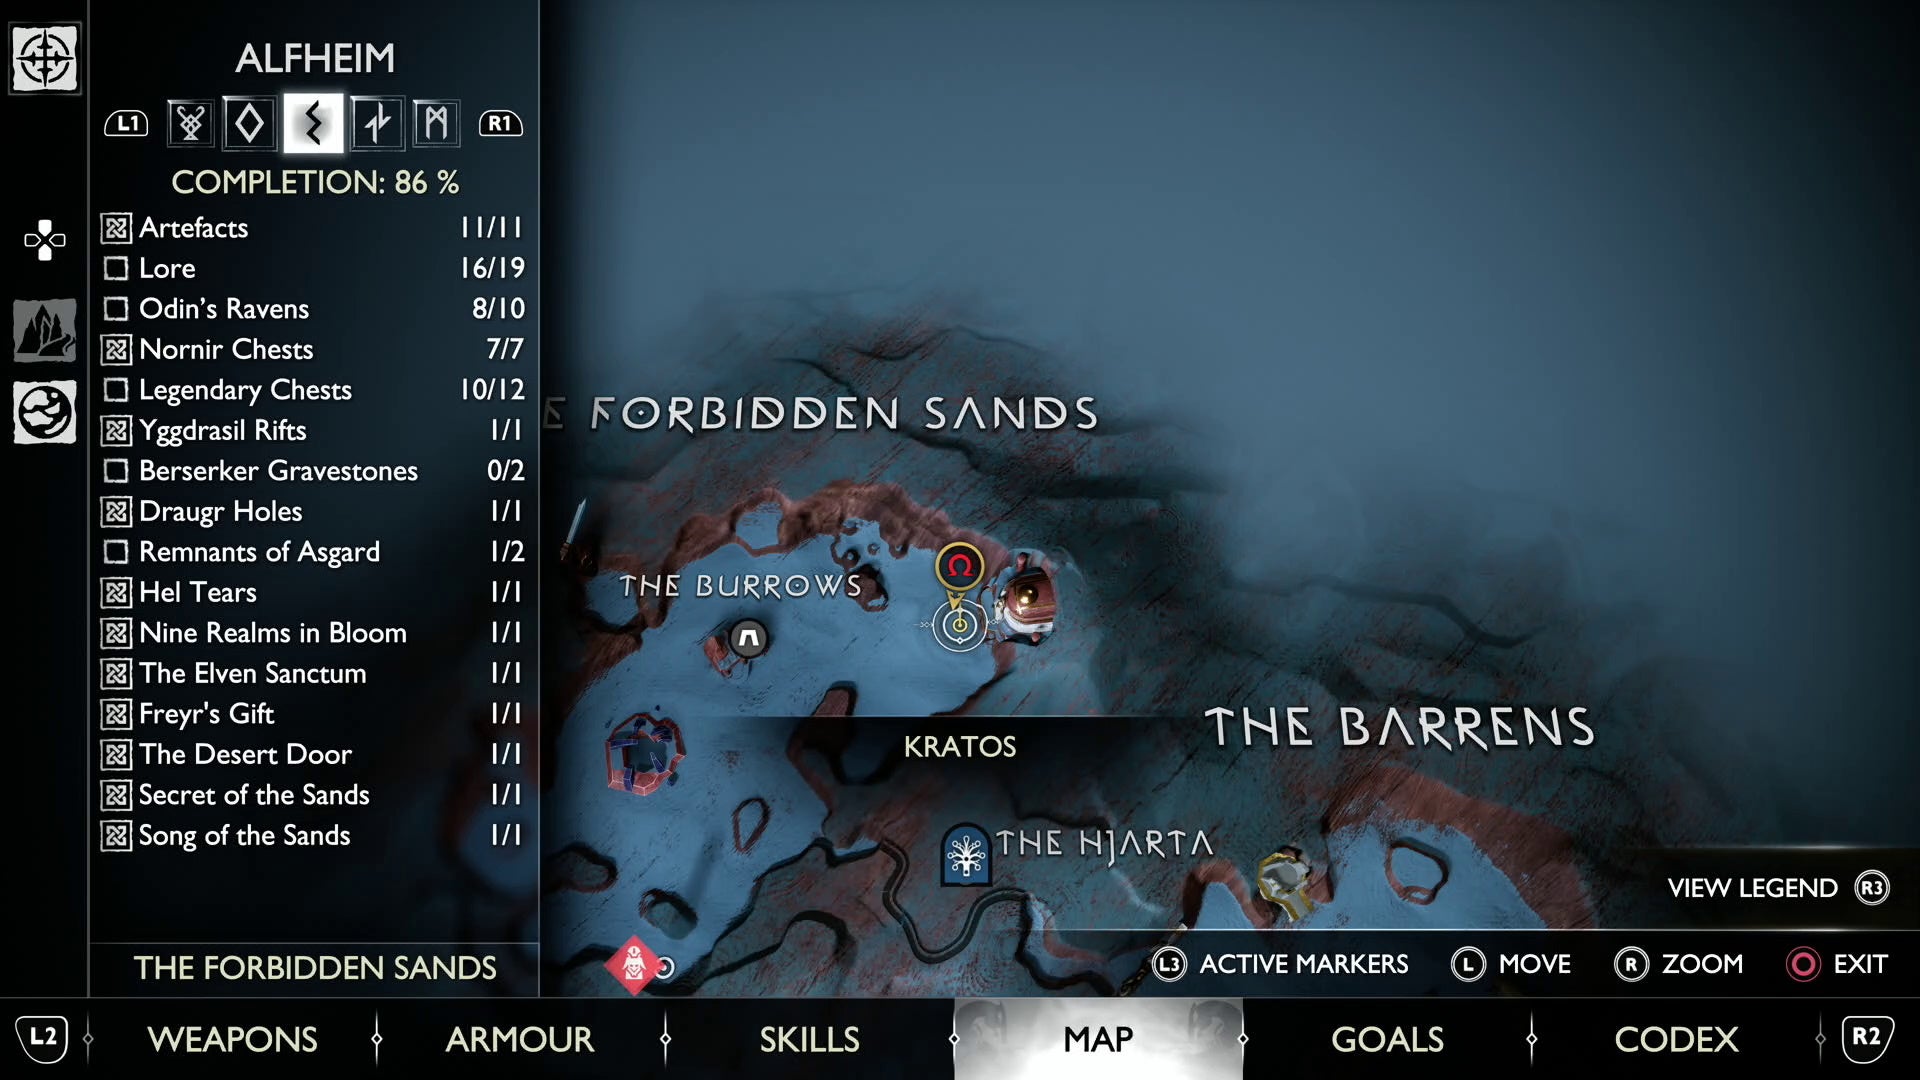
There are 10 of Odin’s Ravens to find in Alfheim, with six available to find on your first trip to the elven Realm, but you’ll have to wait until you get a special tool as part of the main story before you can return and collect the rest.
Here’s where to find all of Odin’s Ravens in Alfheim:
Alfheim The Strond Raven location in God of War Ragnarök
The Strond Raven is found perched on a tree on the path towards the Temple of Light, just after the first Strond Nornir Chest, and just before you encountered the purple Twilight Stone for the first time.
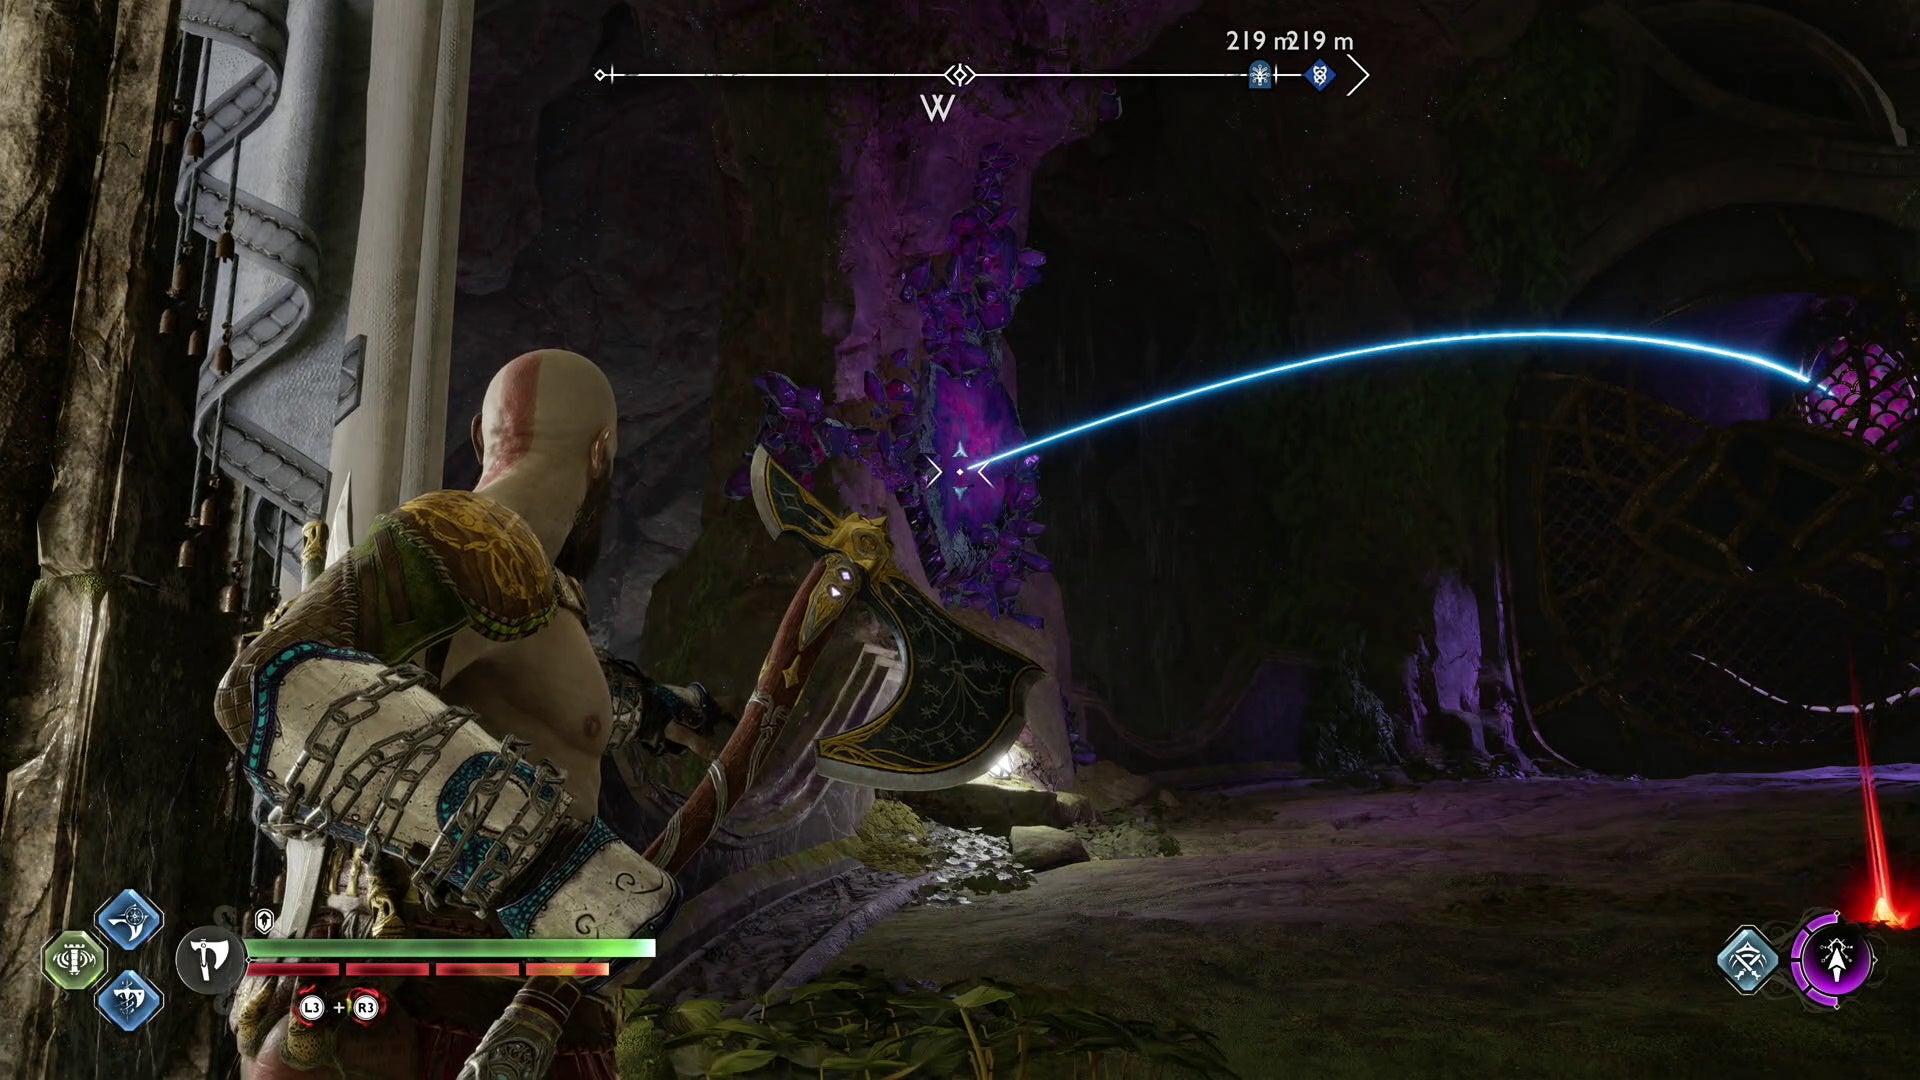
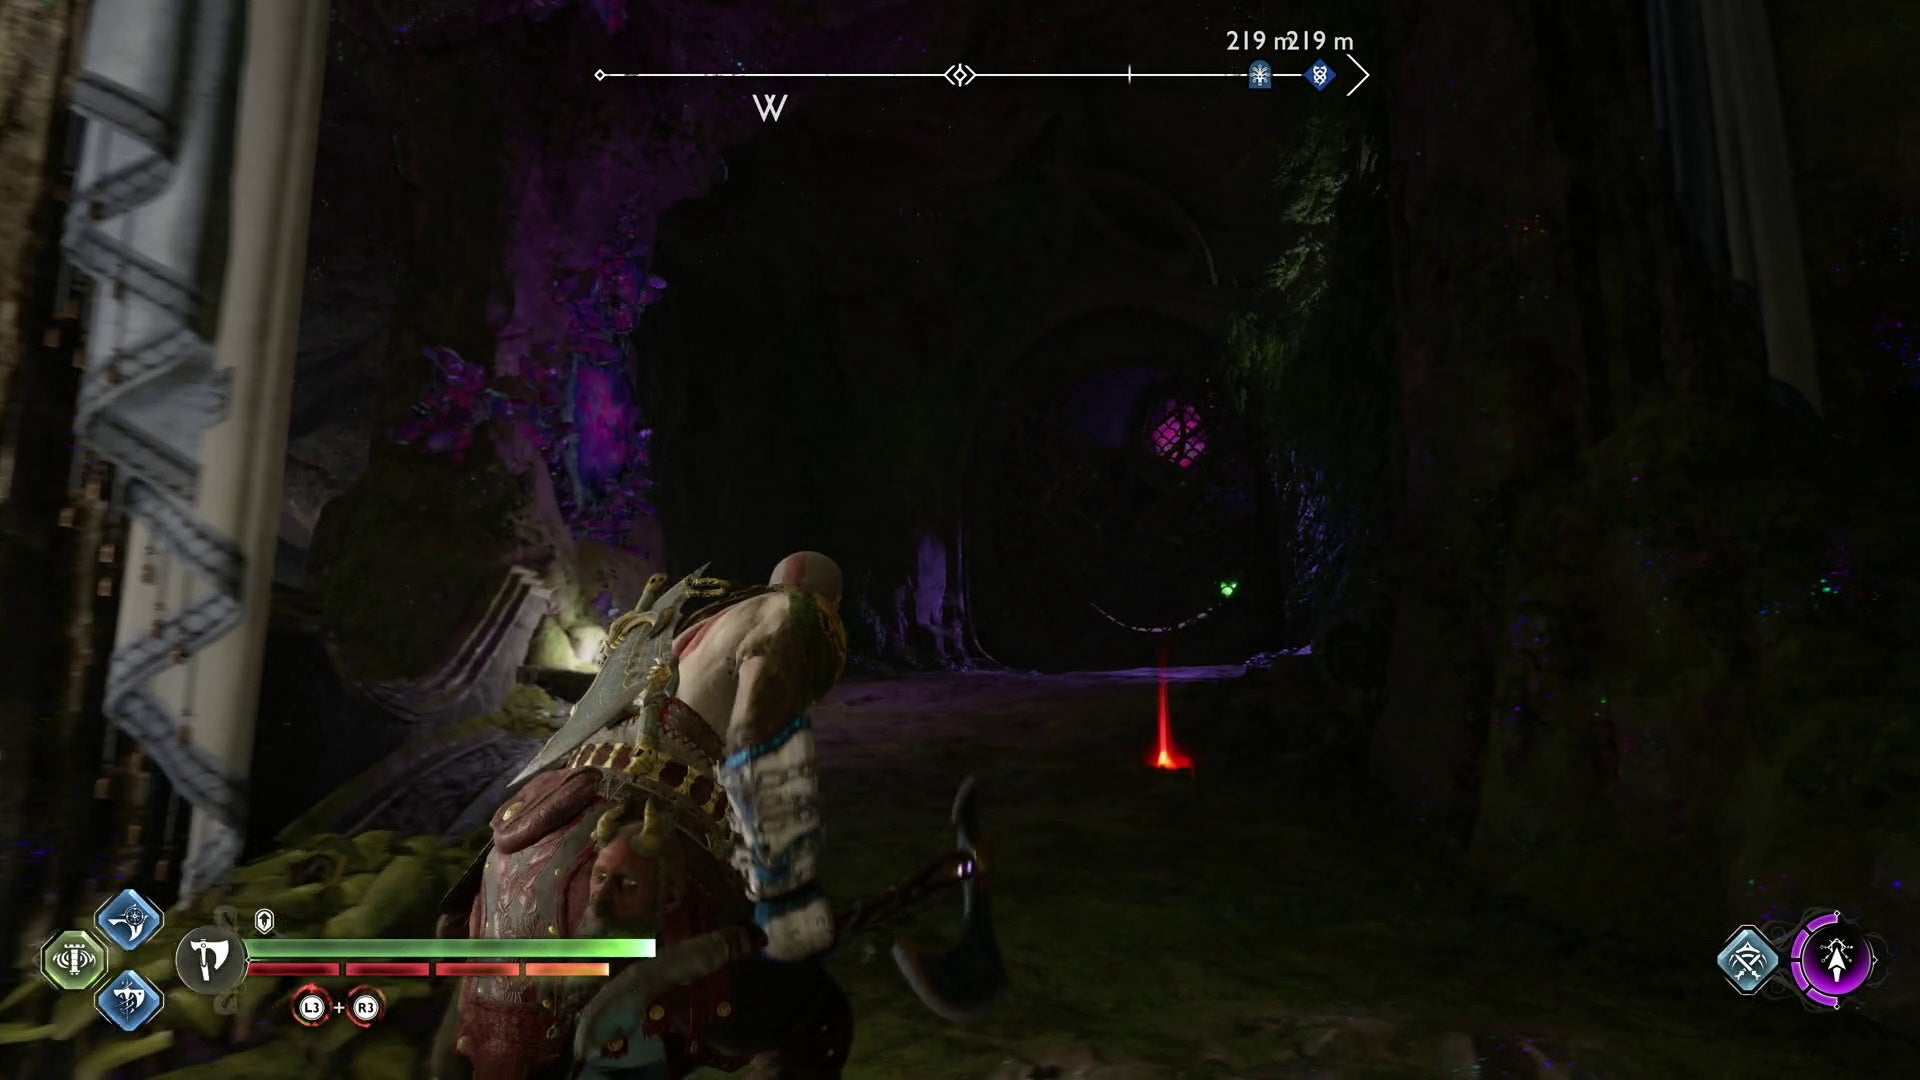
Alfheim Temple of Light Raven location 1 in God of War Ragnarök
The first Temple of Light Raven is found behind a metal gate by some Purple Twilight Stone accessed by jumping down the end ledge of the spiral staircase, before the door that leads to the white marble Legendary Chest.
As the Raven is trapped behind a gate, you need to throw your axe at the Purple Twilight stone outside of it, so the axe bounces off the stone inside the gate and hits the Raven.
Alfheim Temple of Light Raven location 2 in God of War Ragnarök
This second Temple of Light Raven is found in the room before encountering the Temple of Light Nornir Chest. It’s perched on a platform across from the stairs, at the far end of the room, just before the door that leads to the next area.
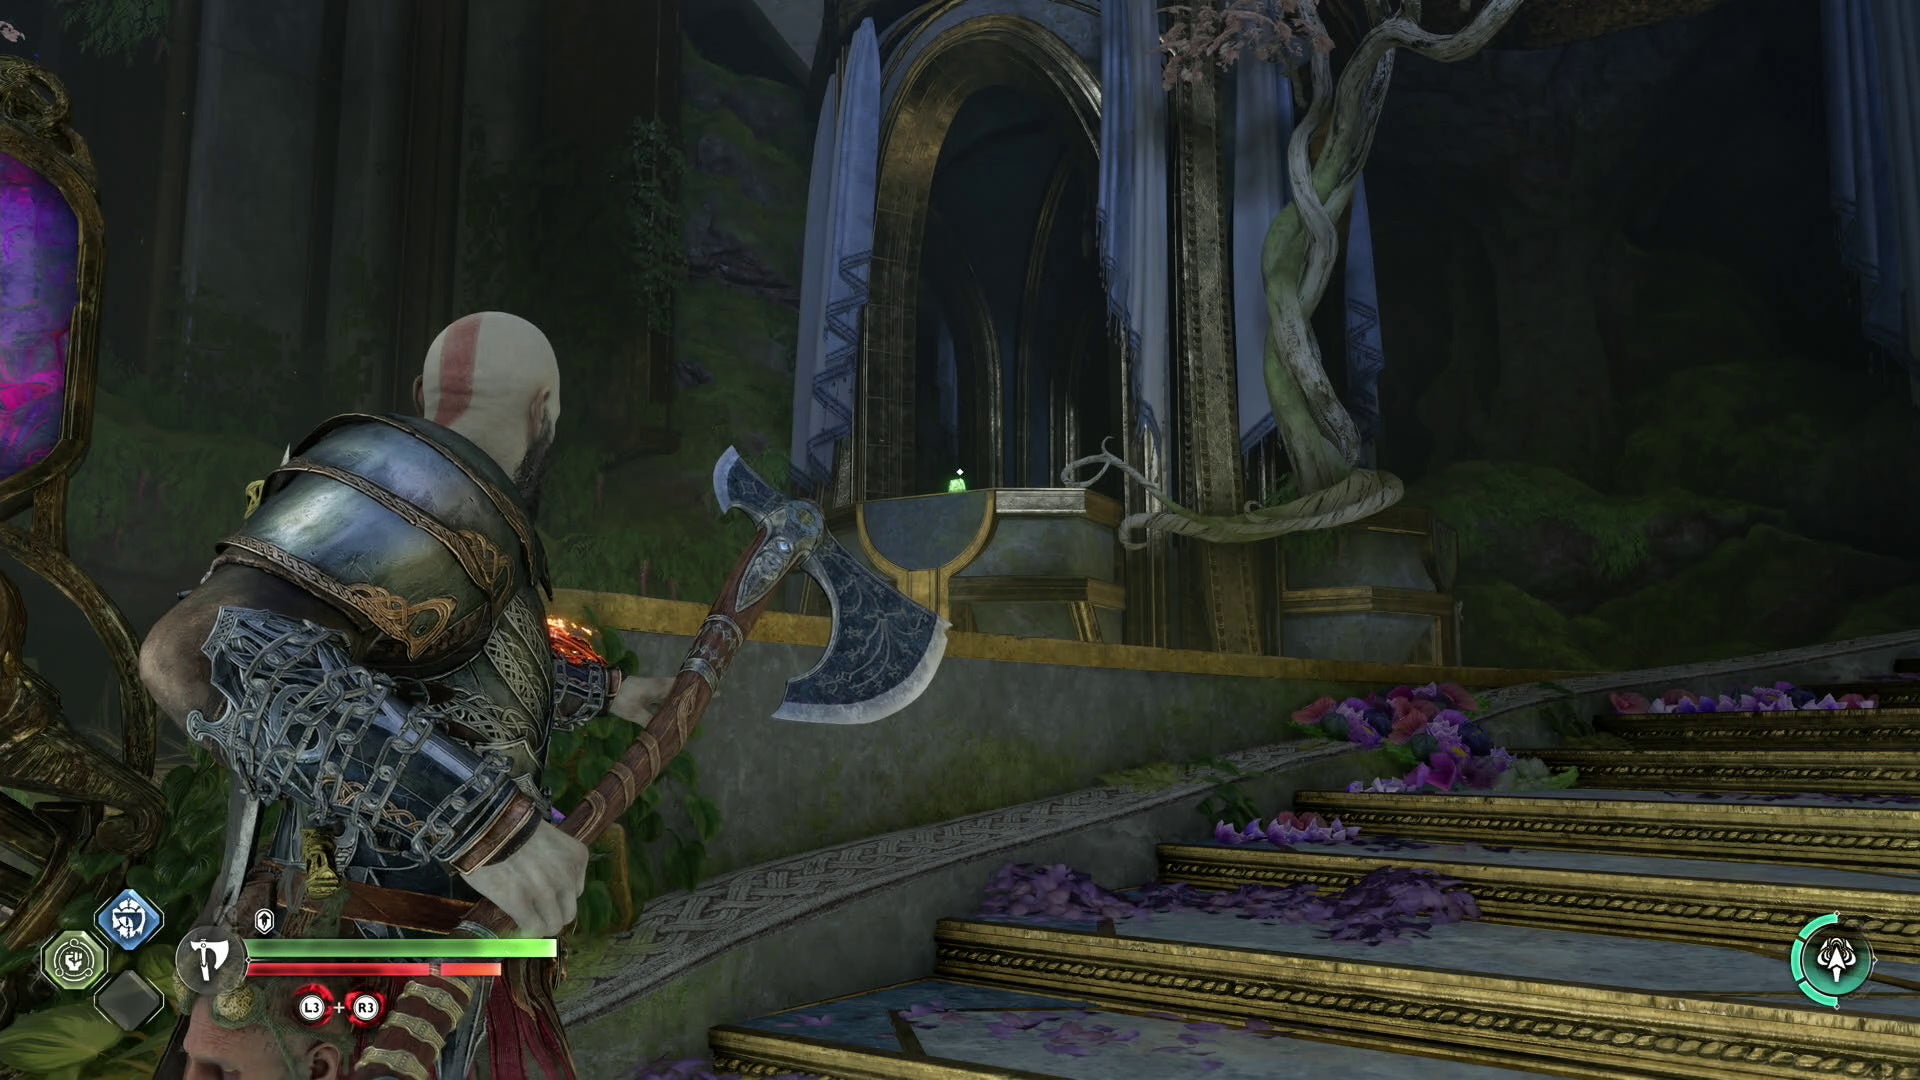
Alfheim The Canyons Raven location in God of War Ragnarök
Once you complete the ‘Groa’s Secret’ part of The Path main story, you’ll gain access to The Canyon that leads to The Barrens desert in Alfheim.
Odin’s Raven in The Canyon is located to the right of the dwarven shop. It’s not perched, so you’ll have to try and get as close as possible to it as it flies in a circle to try and hit it accurately.
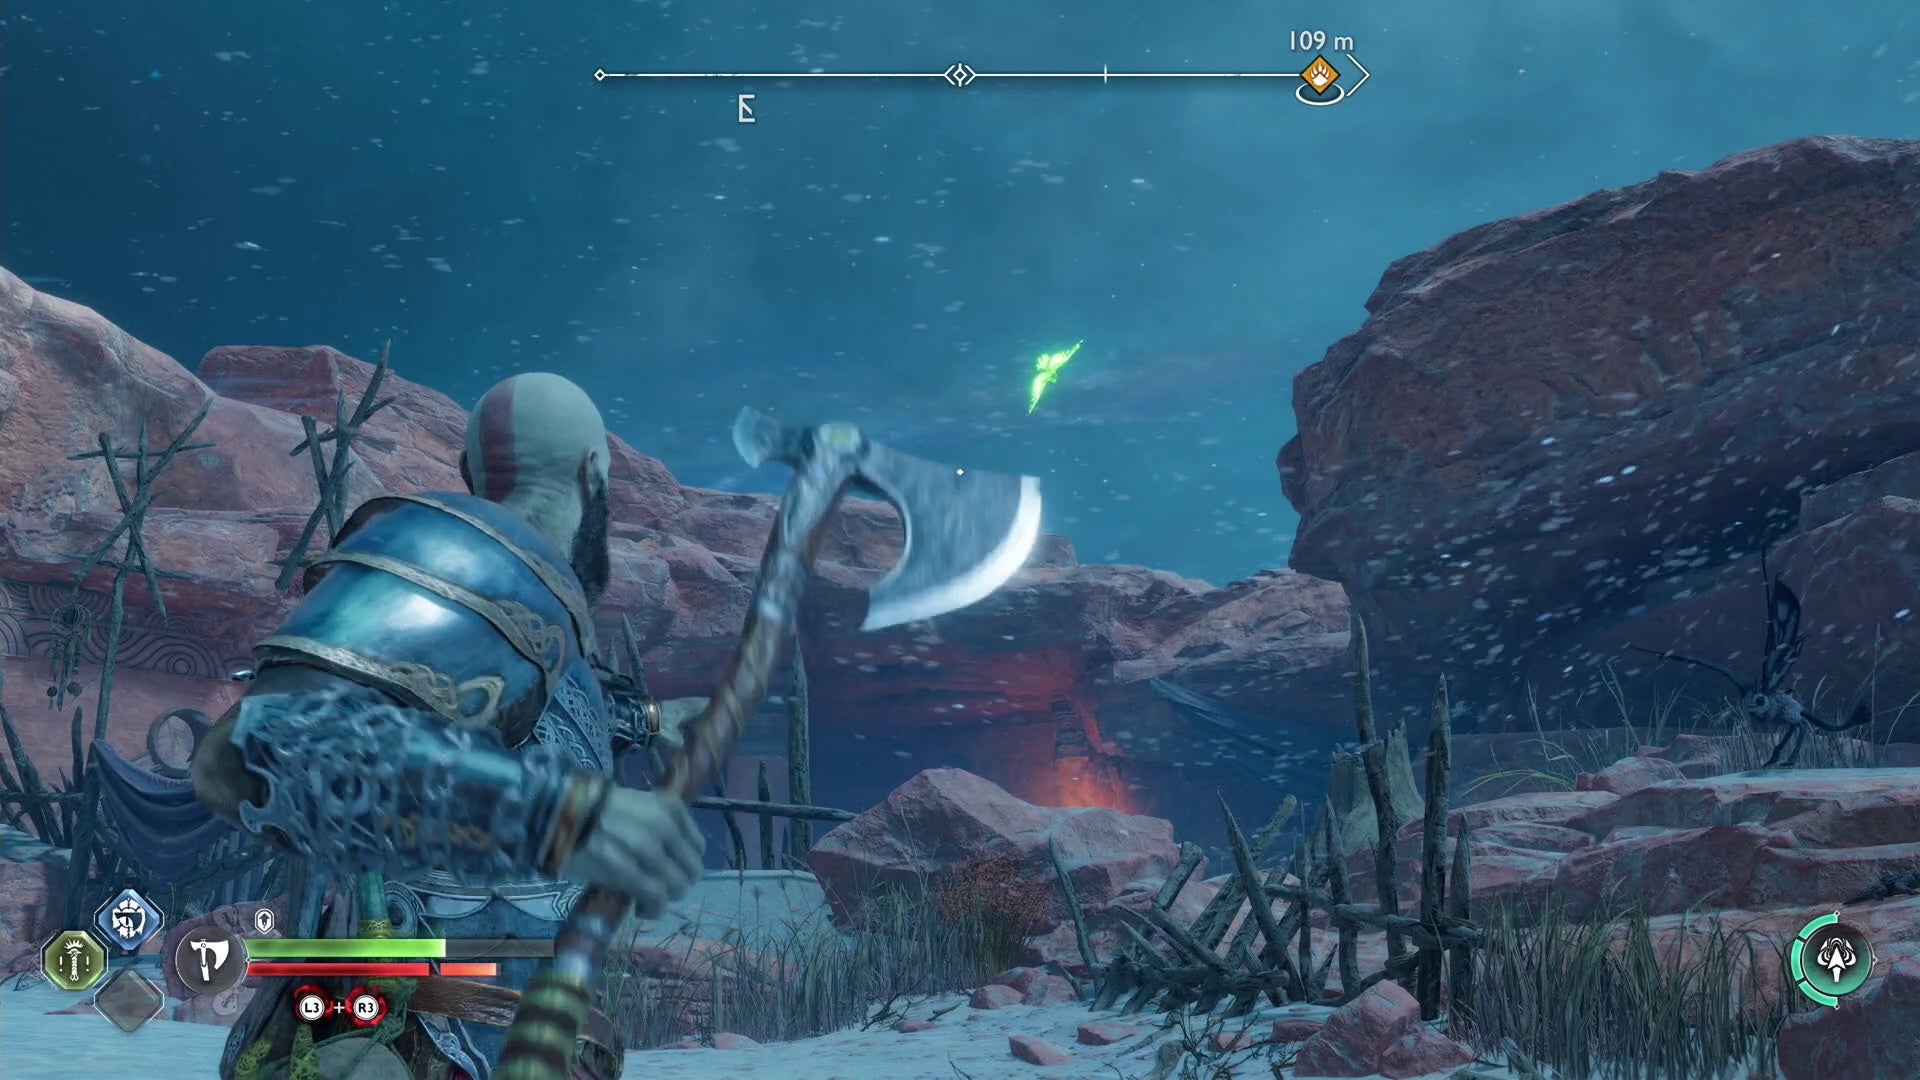
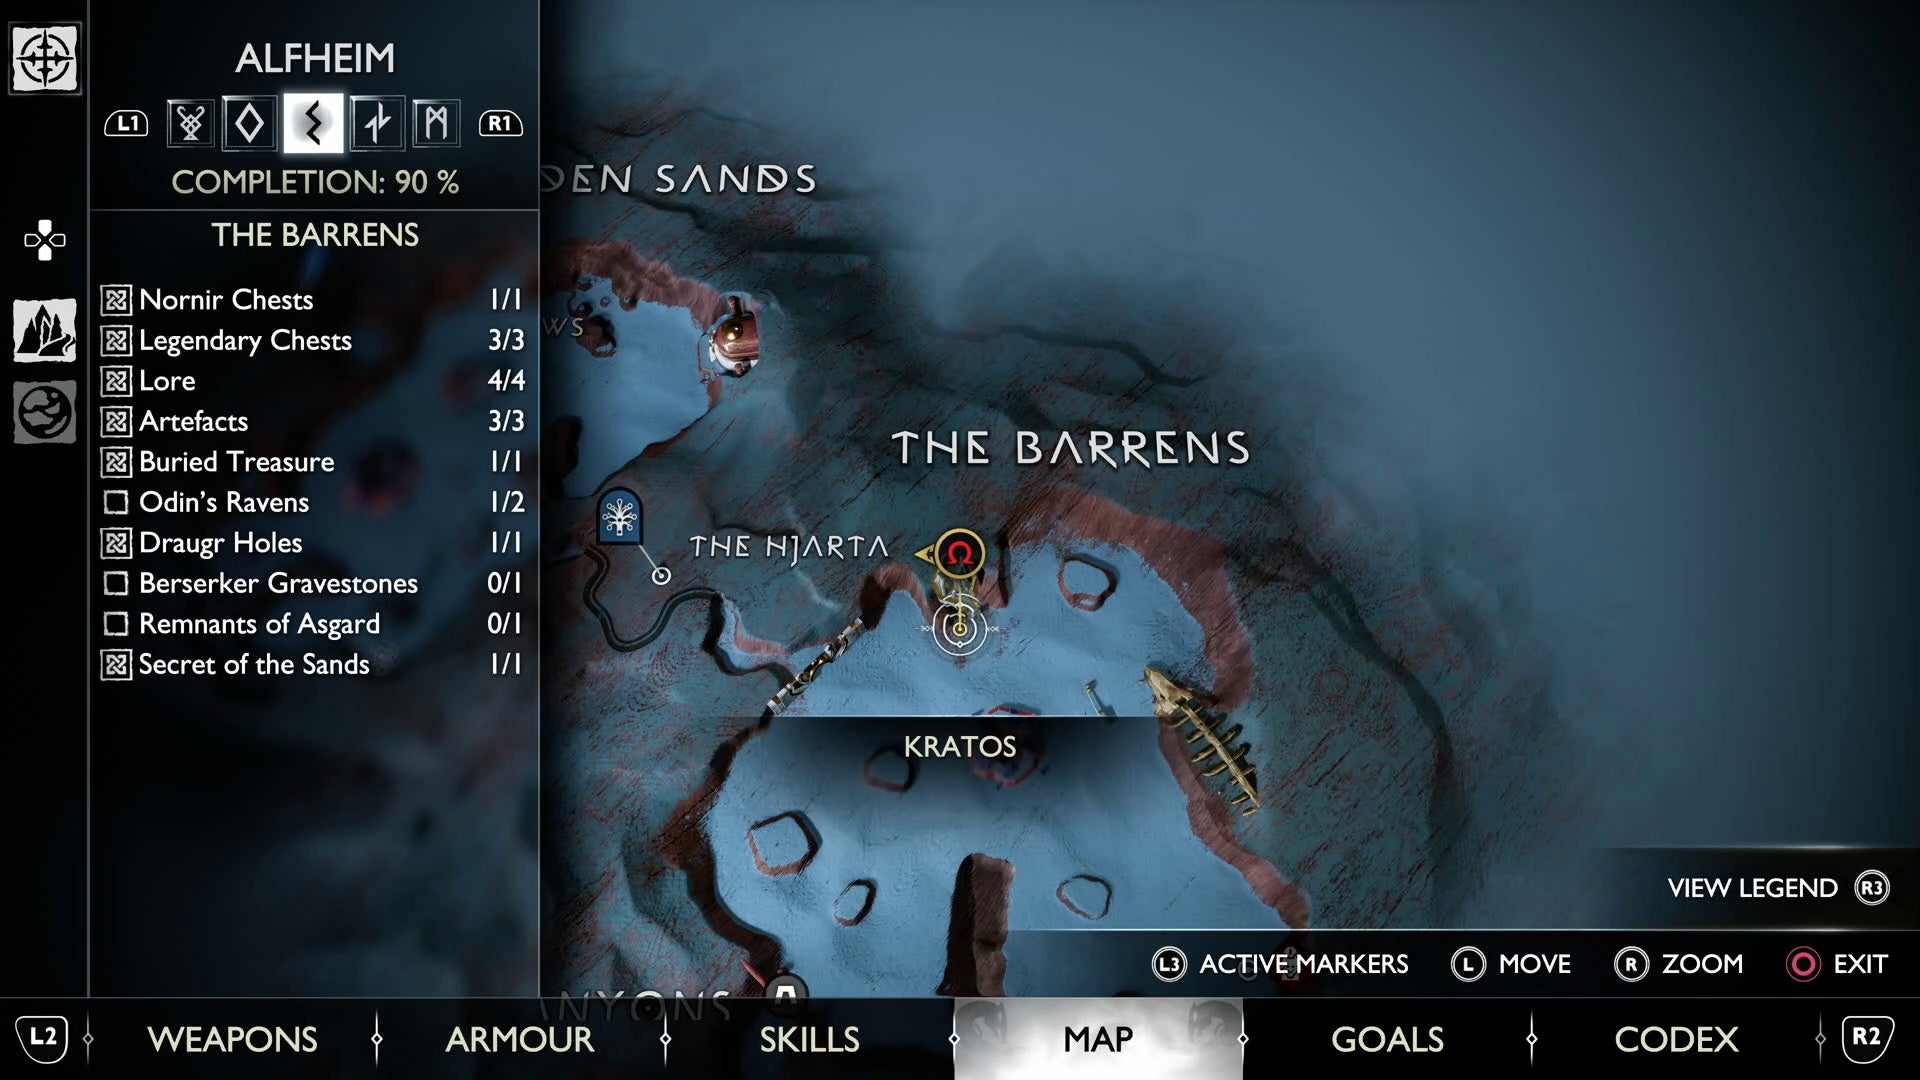
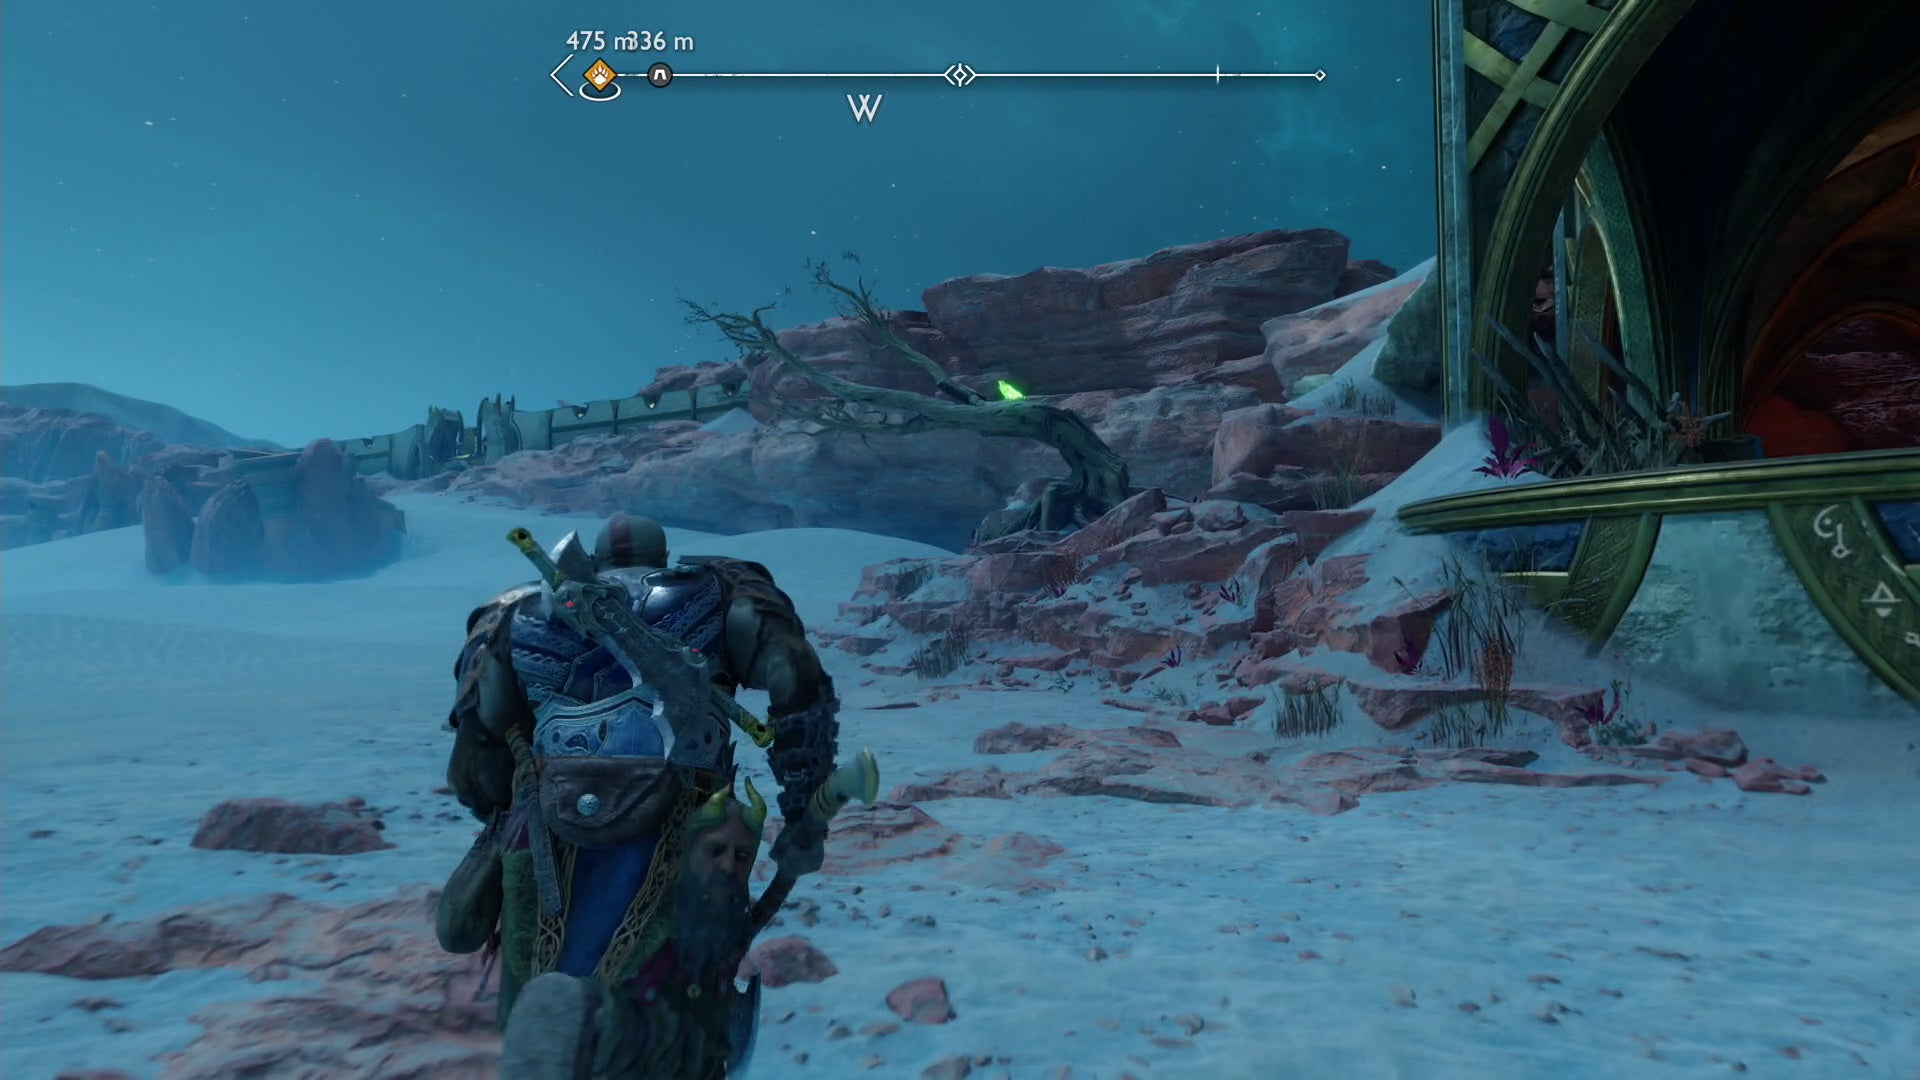
Alfheim The Barrens Raven location 1 in God of War Ragnarök
There are two of Odin’s Ravens to find in The Barrens of Alfheim, with the first perched on a tree to the west of the desert, near the small structure containing a Legendary Chest and Lore Marker.
Alfheim The Barrens Raven location 2 in God of War Ragnarök
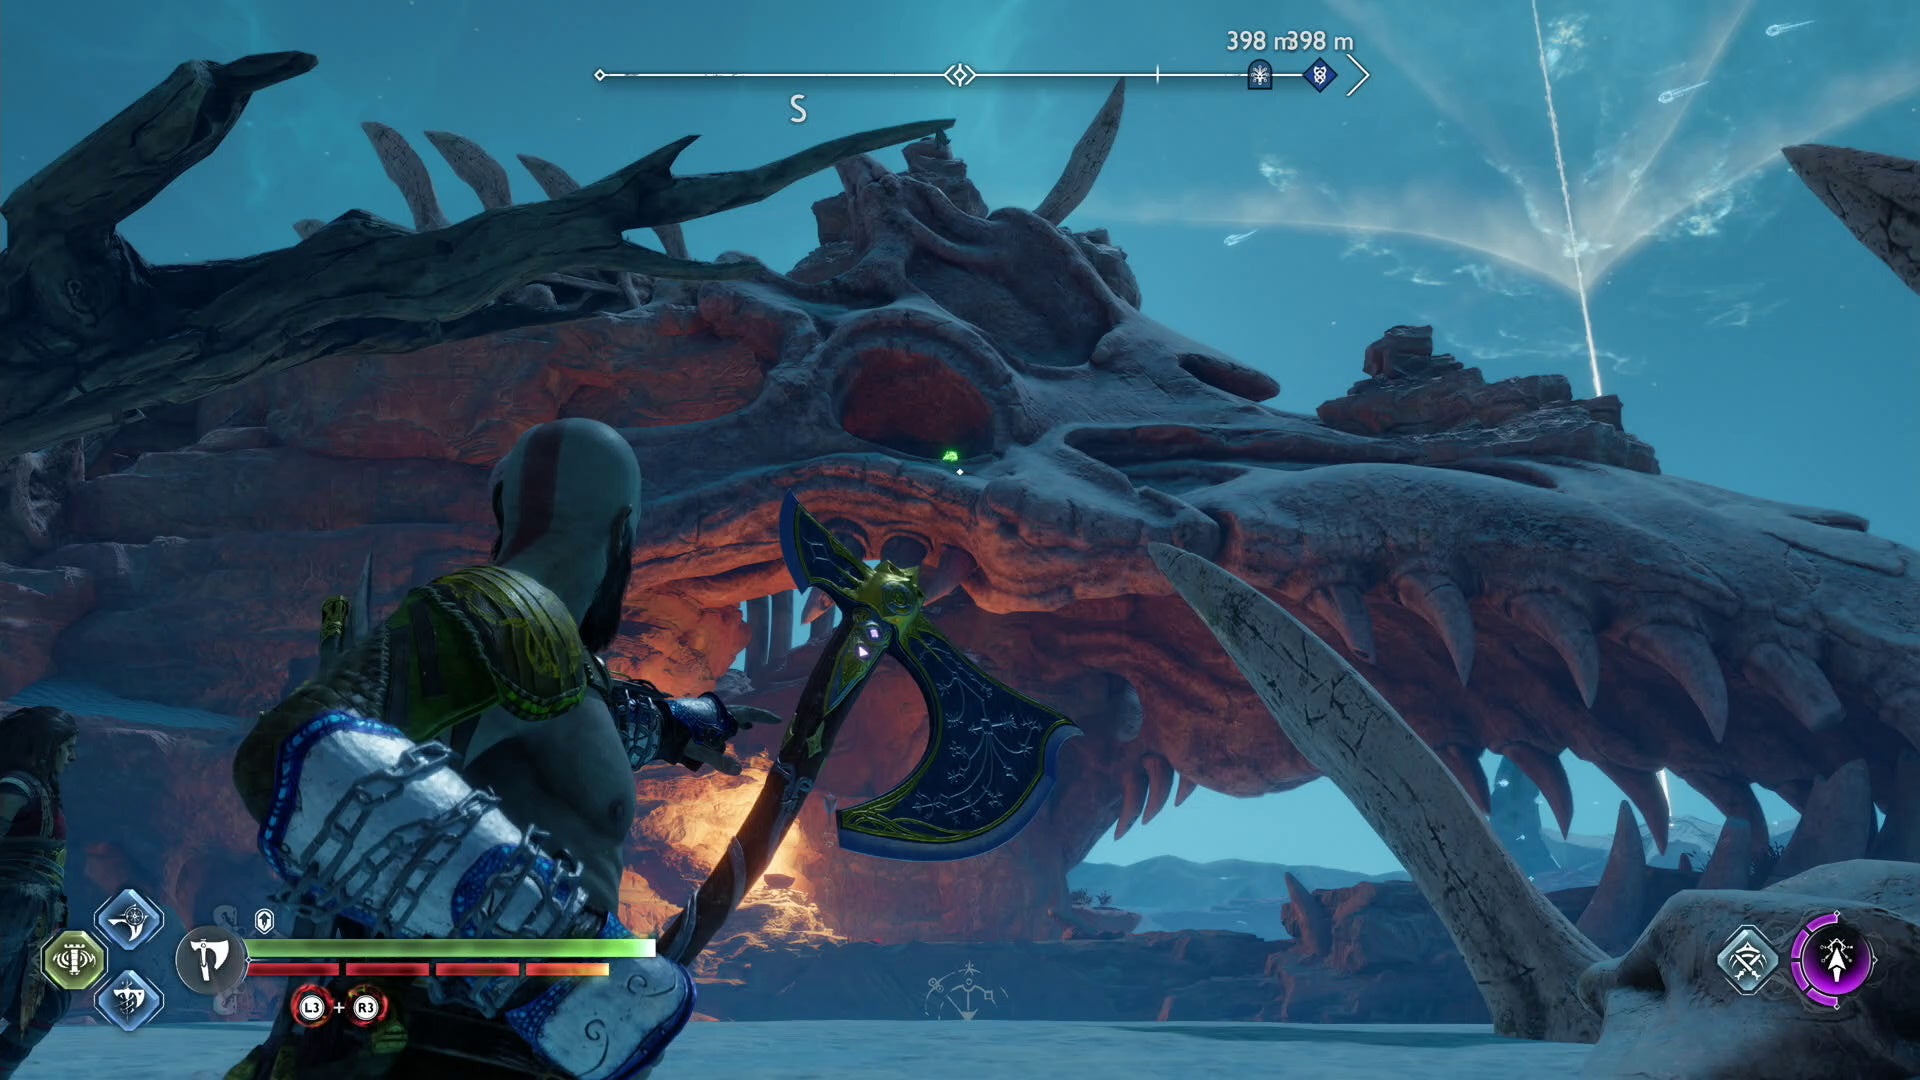
The second of Odin’s Ravens in The Barrens is found in the left eye of the giant bone carcass to the north, just opposite the first Raven’s location.
Alfheim The Forbidden Sands Raven location 1 in God of War Ragnarök
The first of Odin’s Ravens in the Forbidden Sands of Alfheim is behind the troll ‘statue’ and lore marker in the southwestern area.
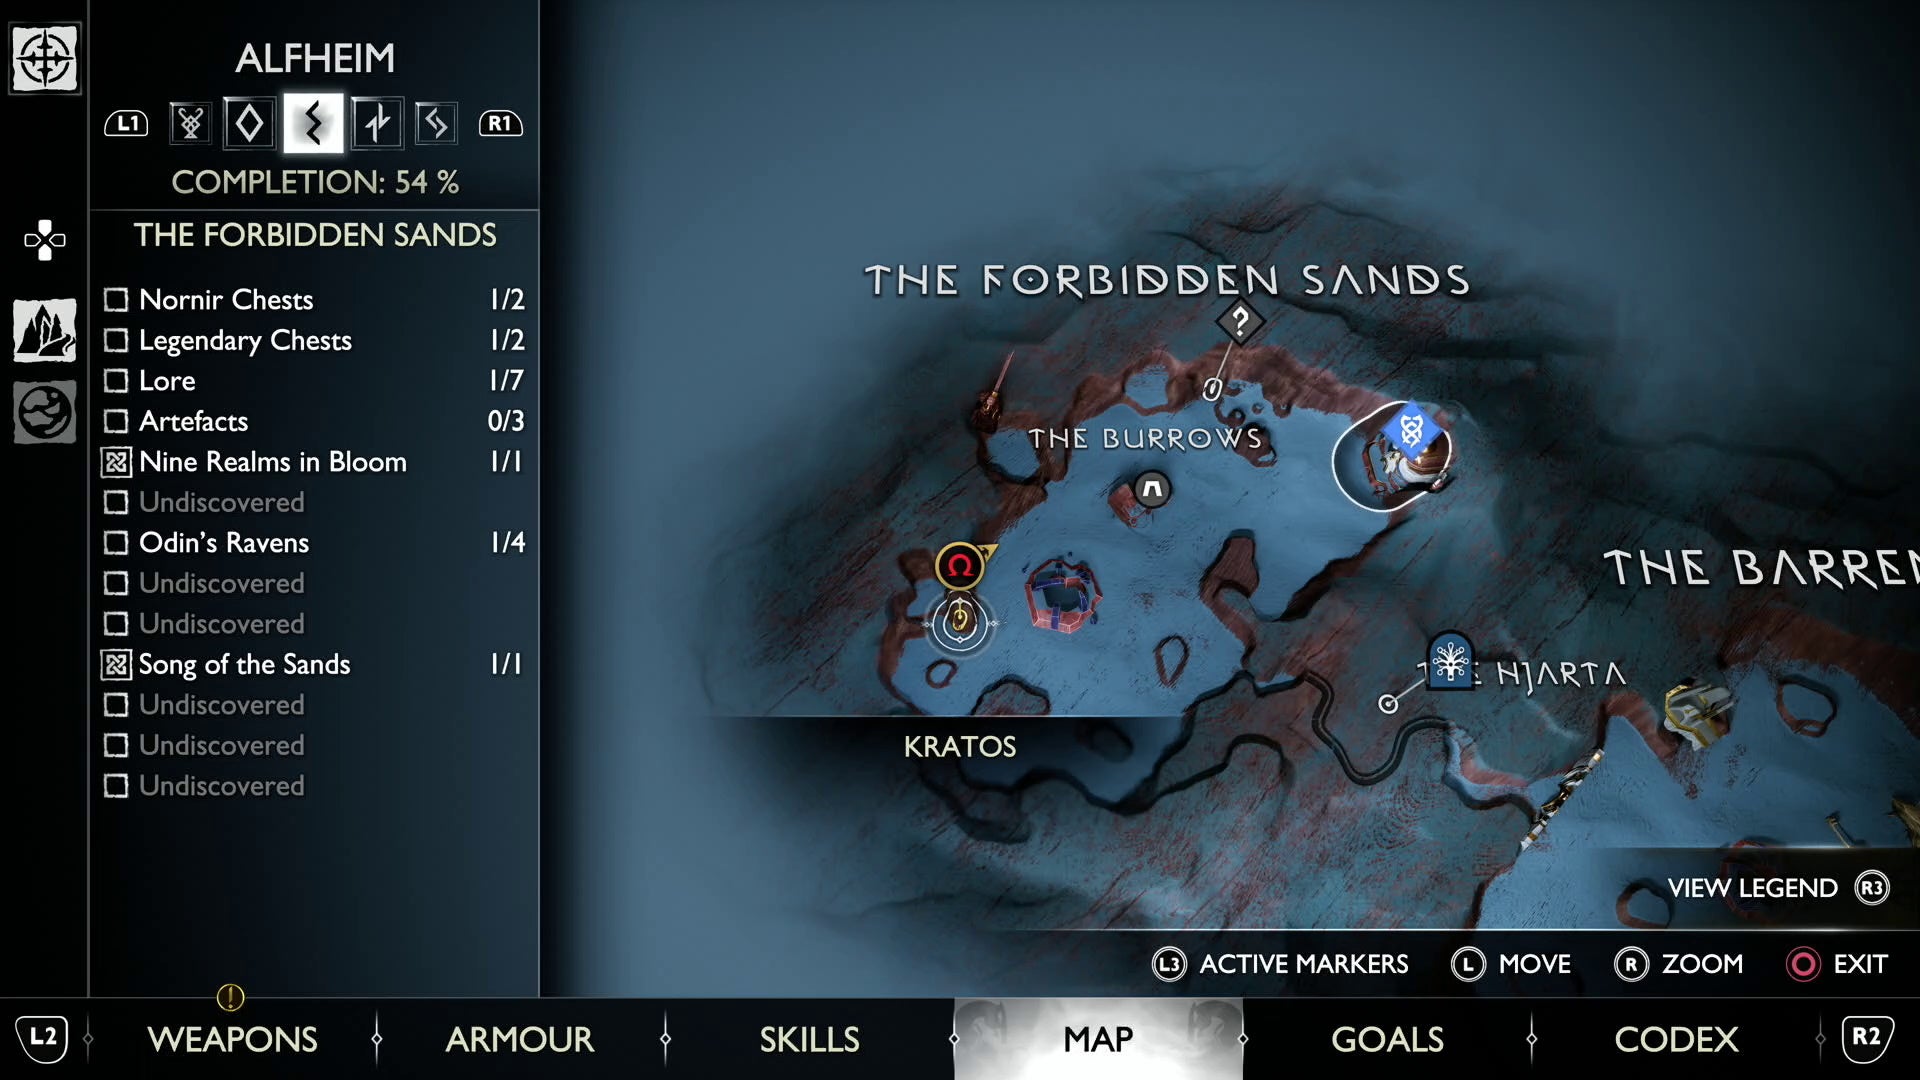
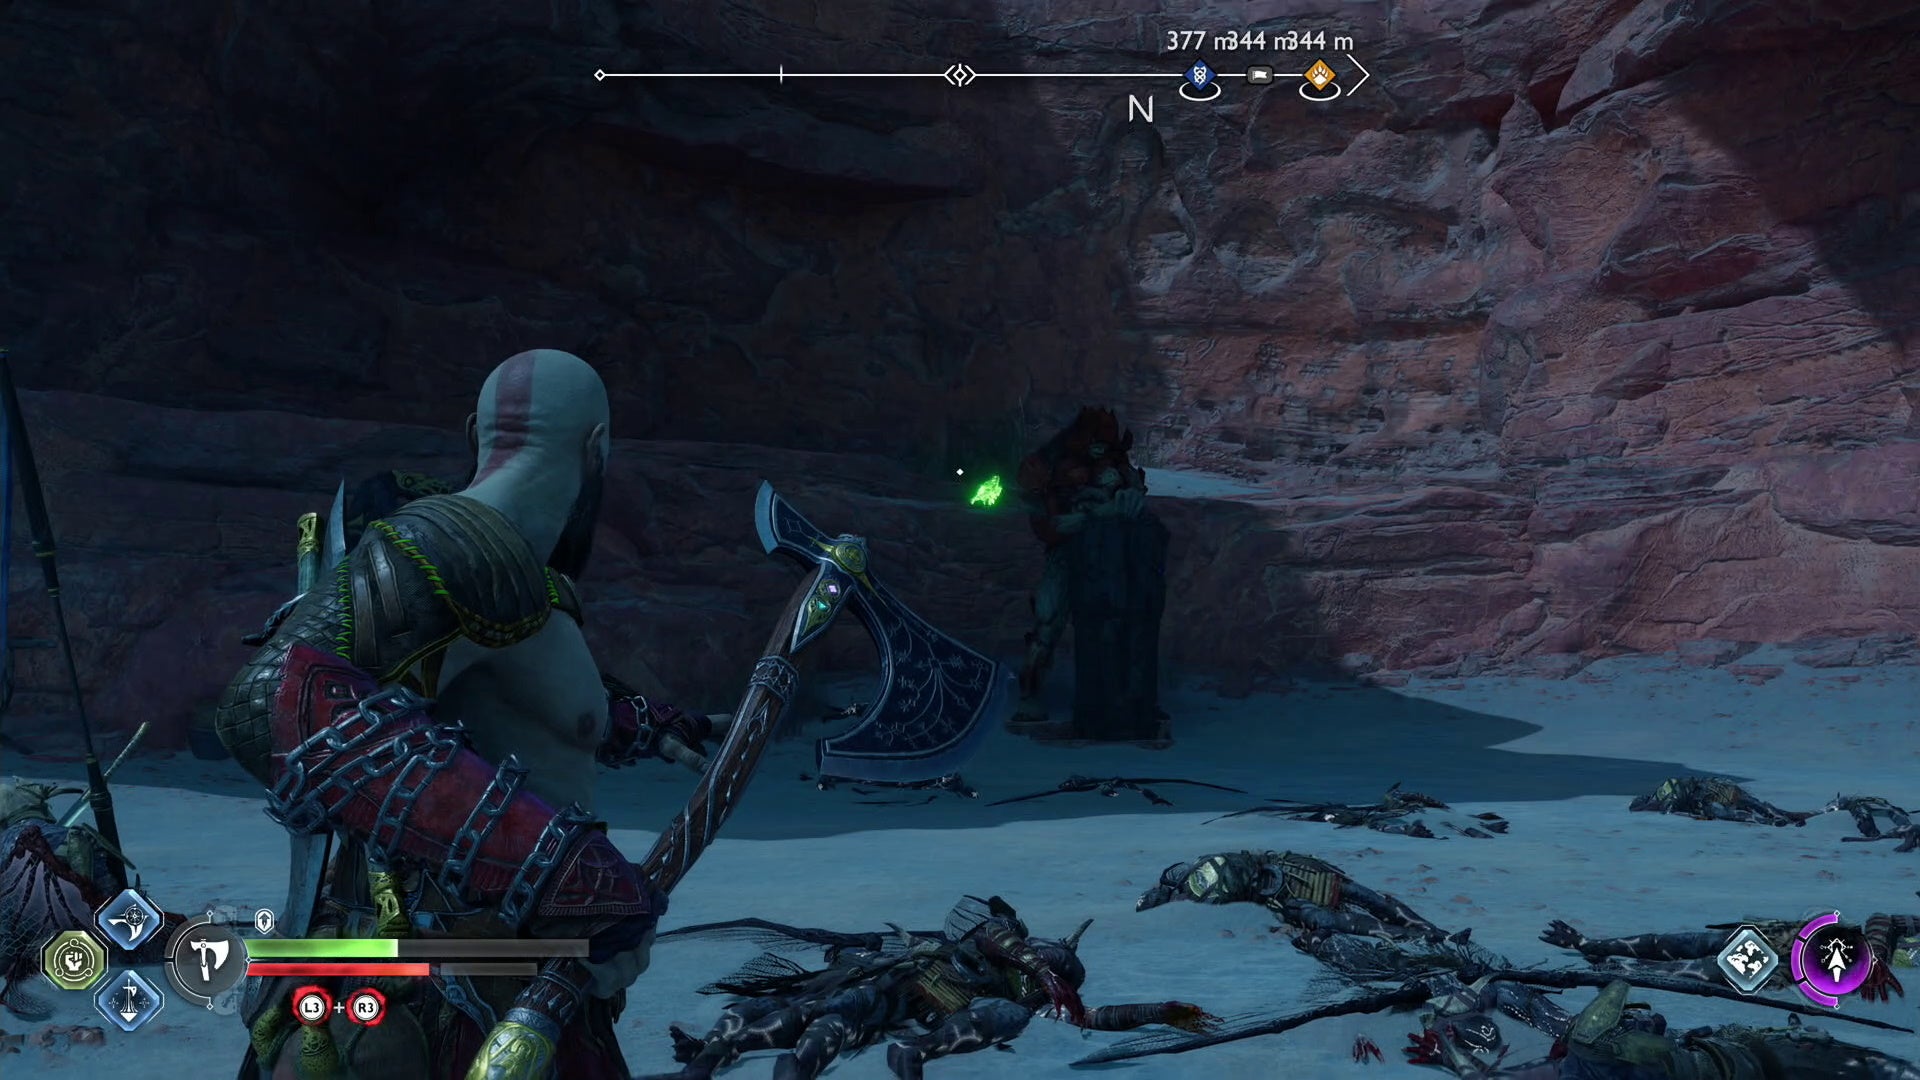
Alfheim The Forbidden Sands Raven location 2 in God of War Ragnarök
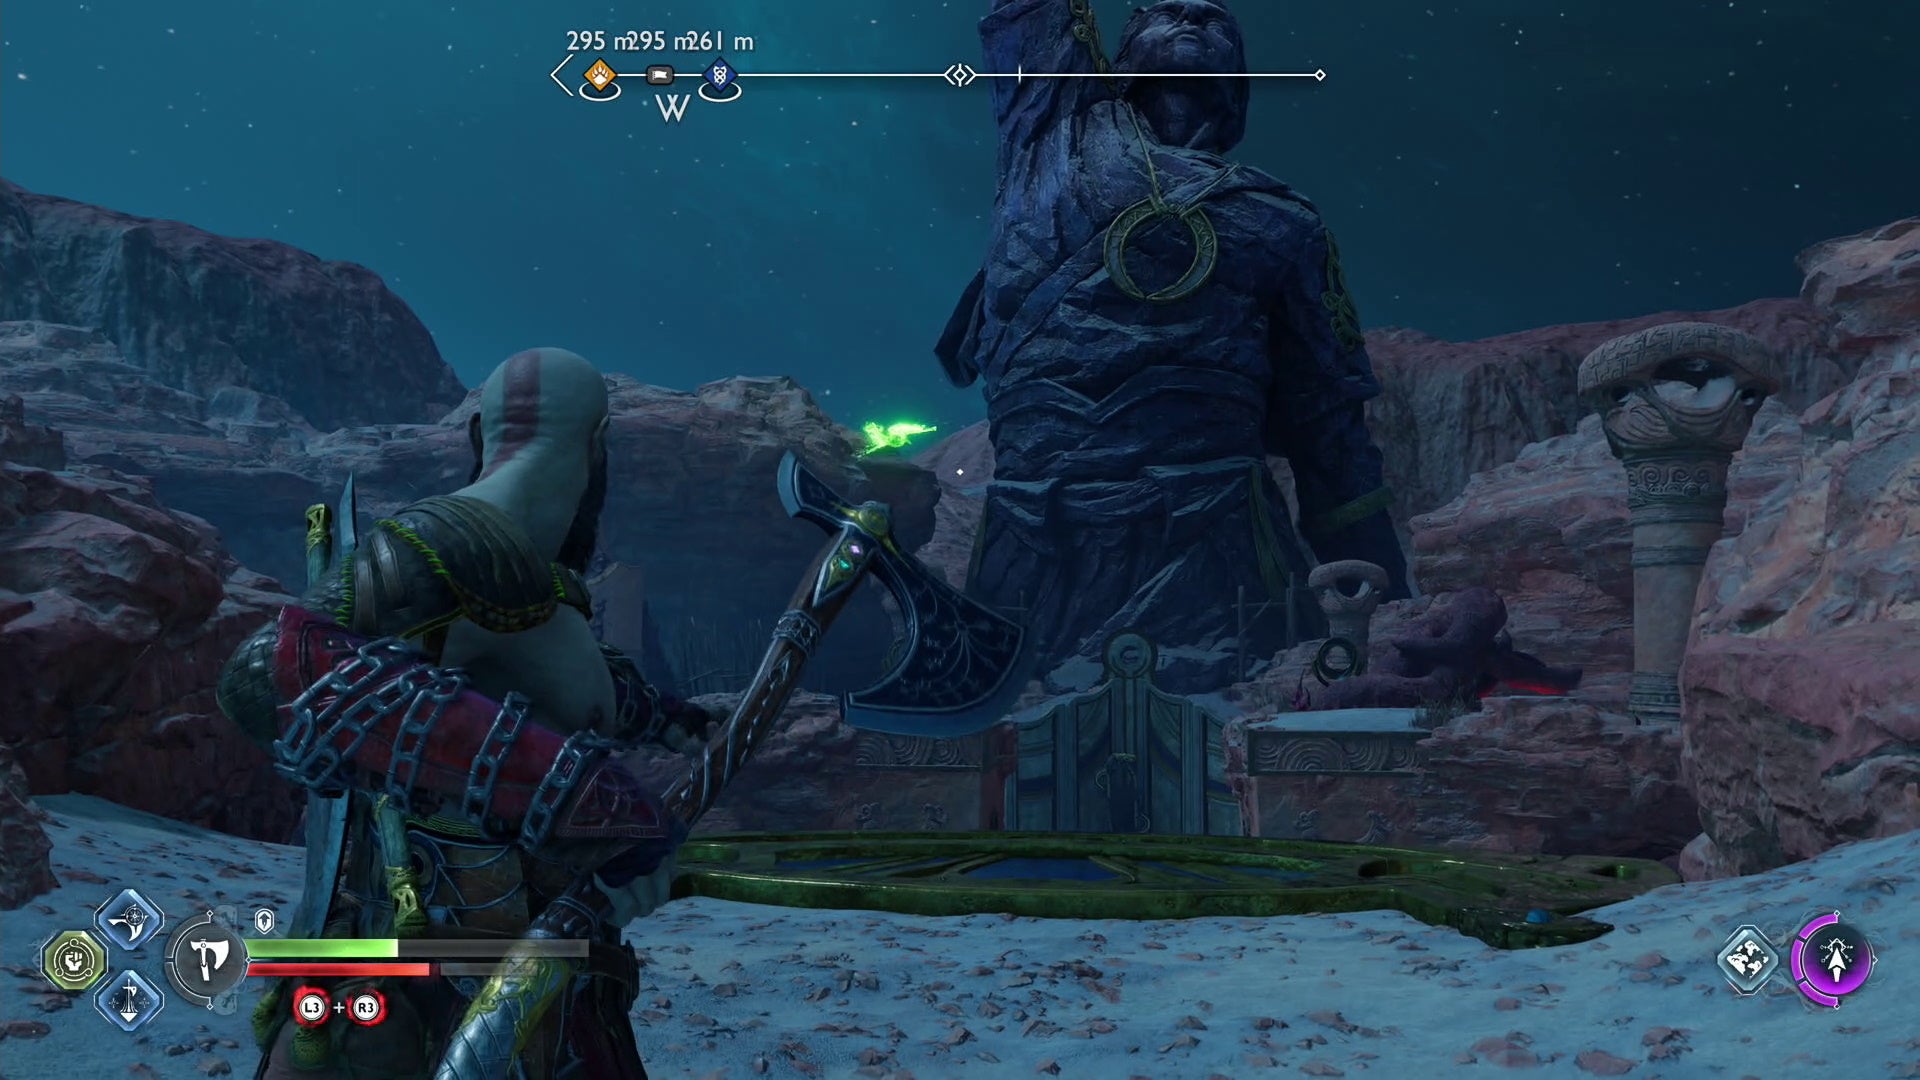
The second Raven in The Forbidden Sands is found flying in a circle in front of Freyrs statue, to the west of The Burrows.
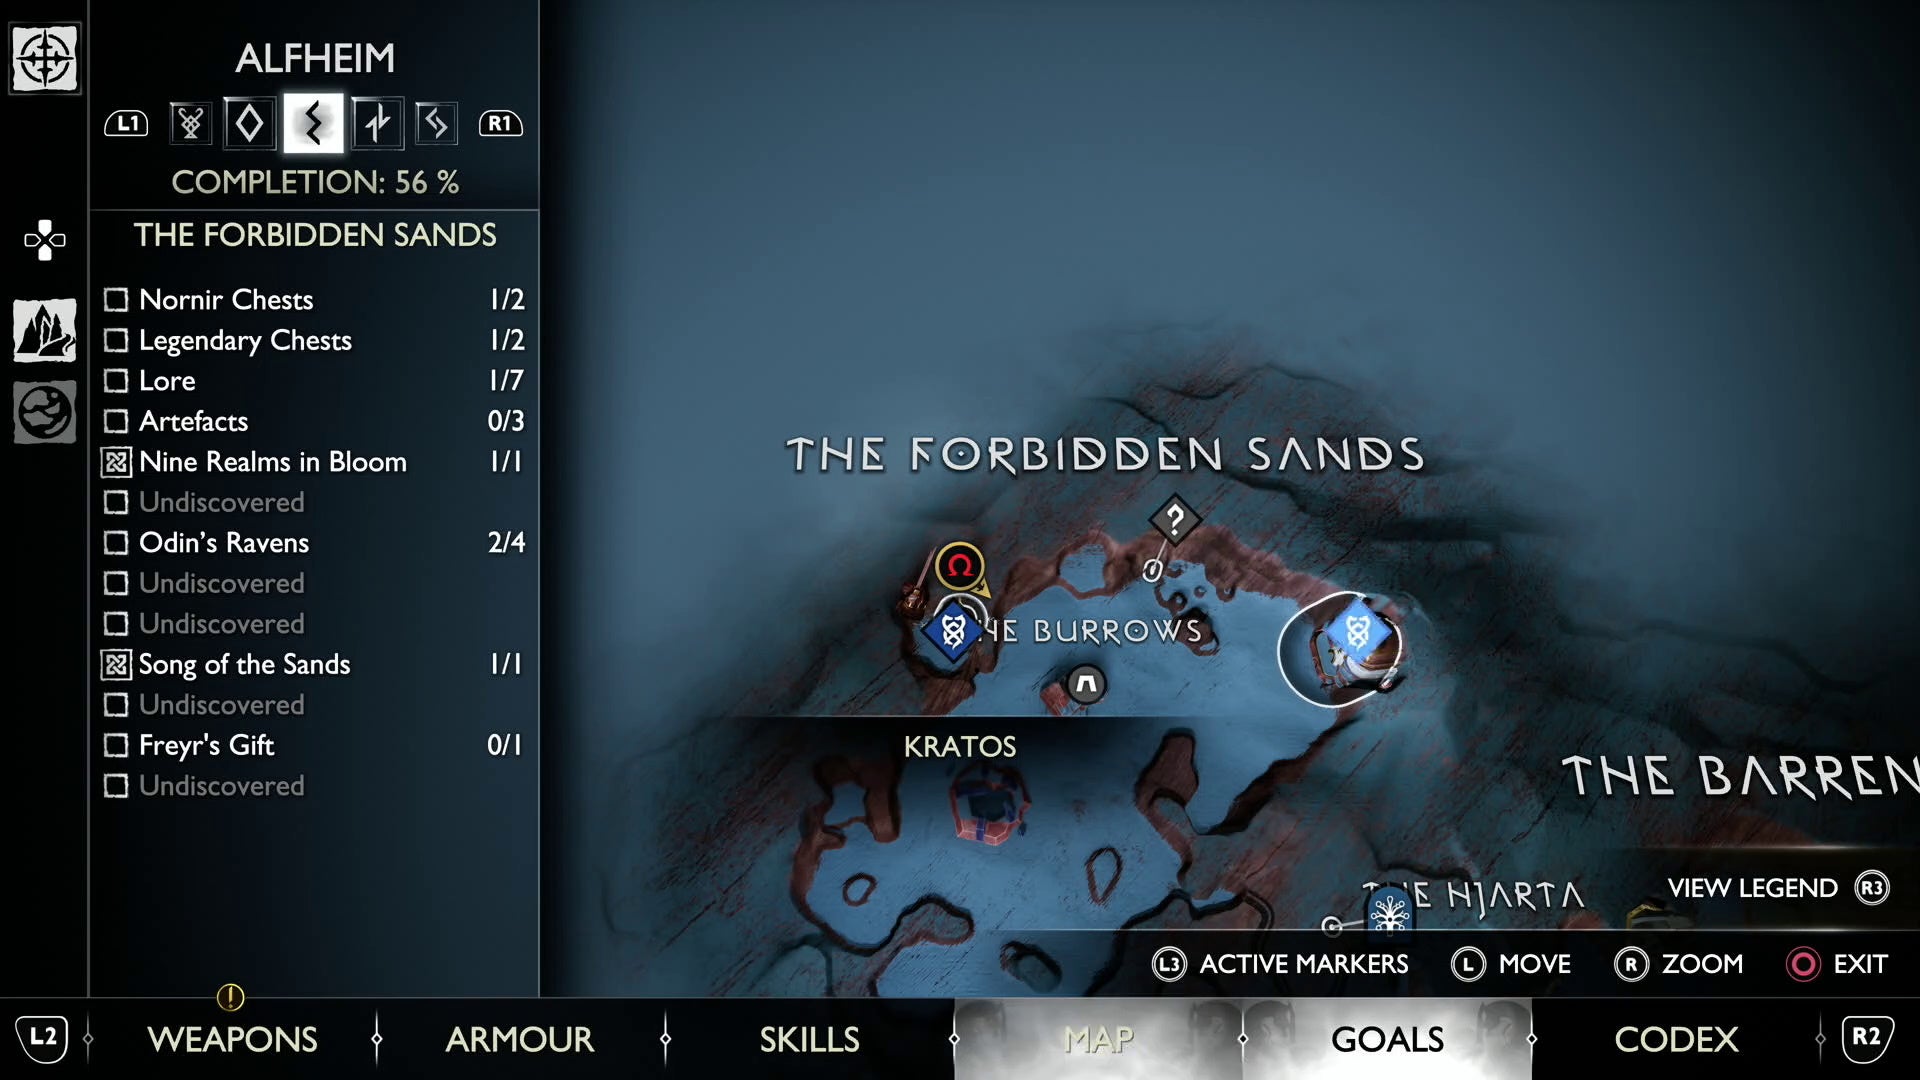
Alfheim The Forbidden Sands Raven location 3 in God of War Ragnarök
This Forbidden Sands Raven is perched on top of the large rock formation where you fight a Frost Phantom. It’s on the right-hand side of the structure, and you’ll have to aim far above the Raven to get the axe to reach it.


Alfheim The Forbidden Sands Raven location 4 in God of War Ragnarök
The last Raven in Alfheim is one of the hardest to find in God of War Ragnarök, as you need to destroy the rubble under the outside entrance to the elven library first to unearth a crawlspace and locate it.
You’ll find the Raven flying around the left-hand side after entering the crawlspace.
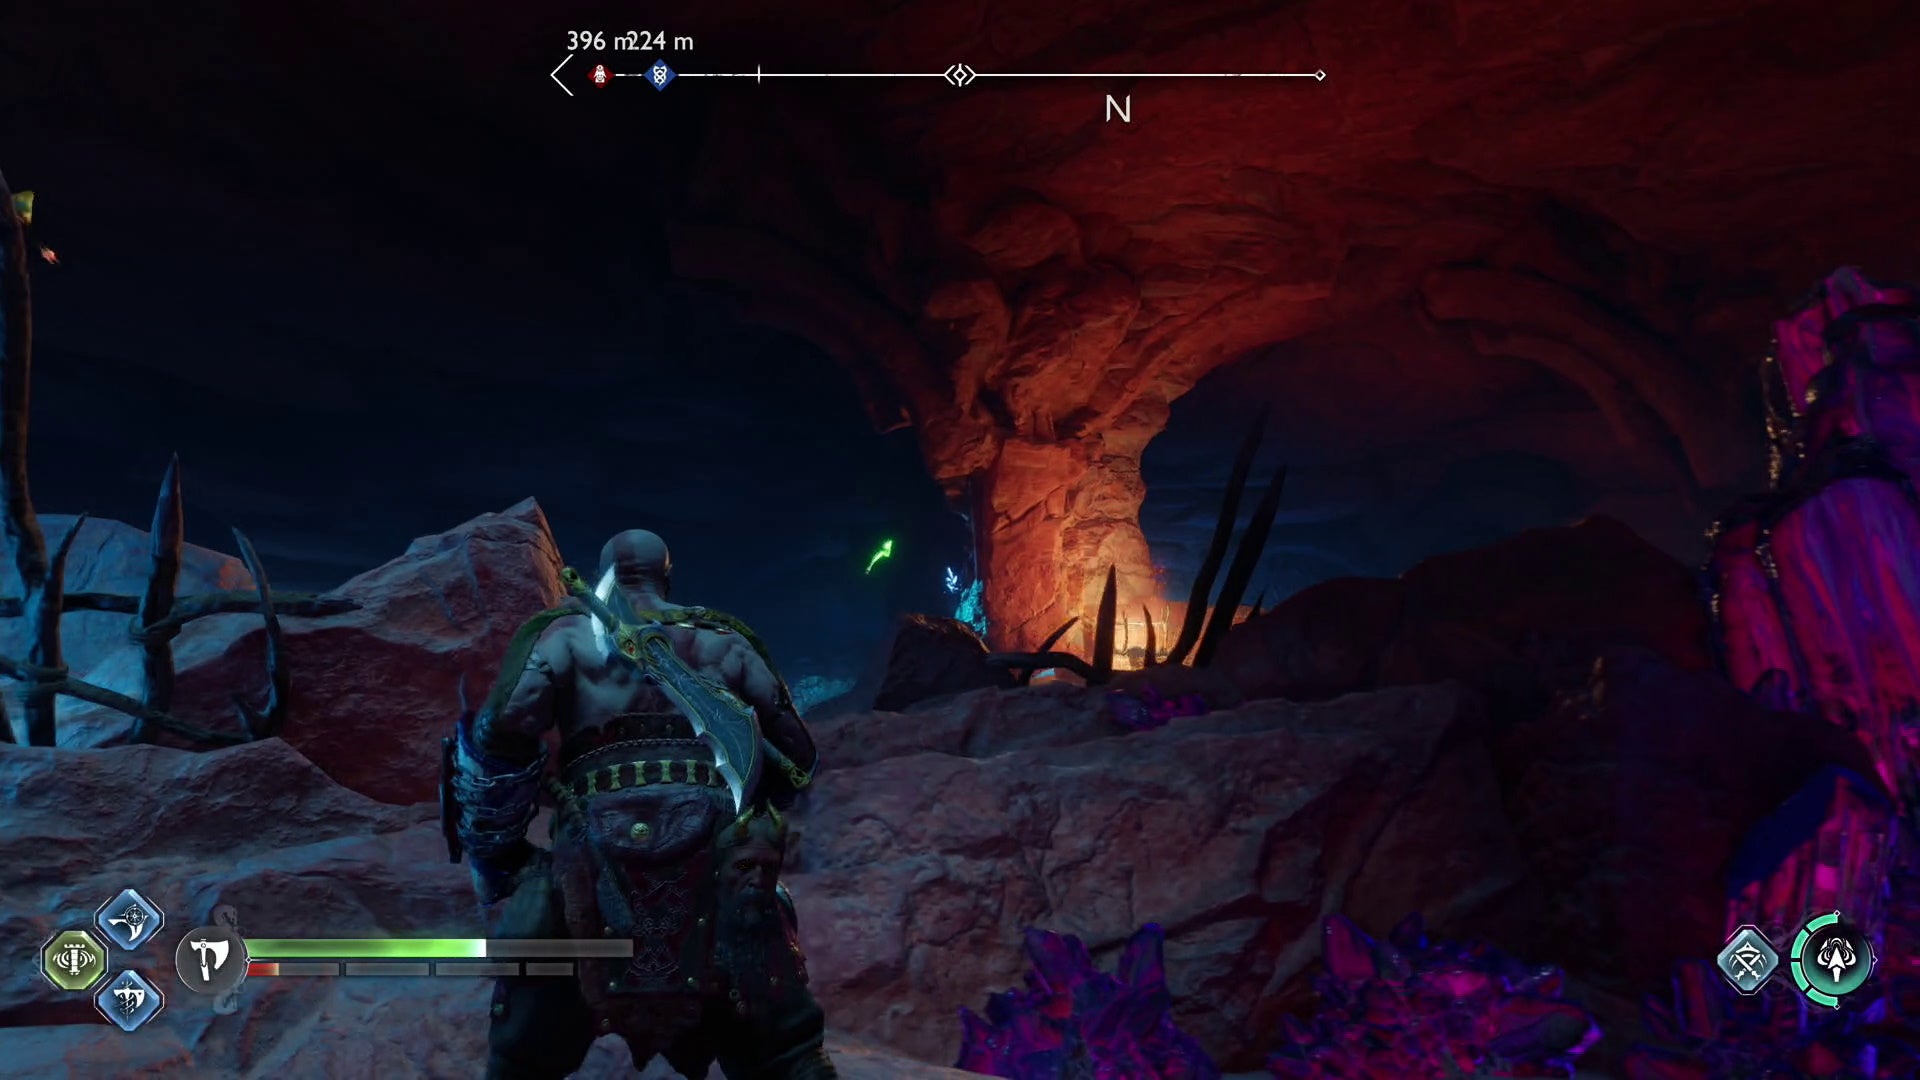
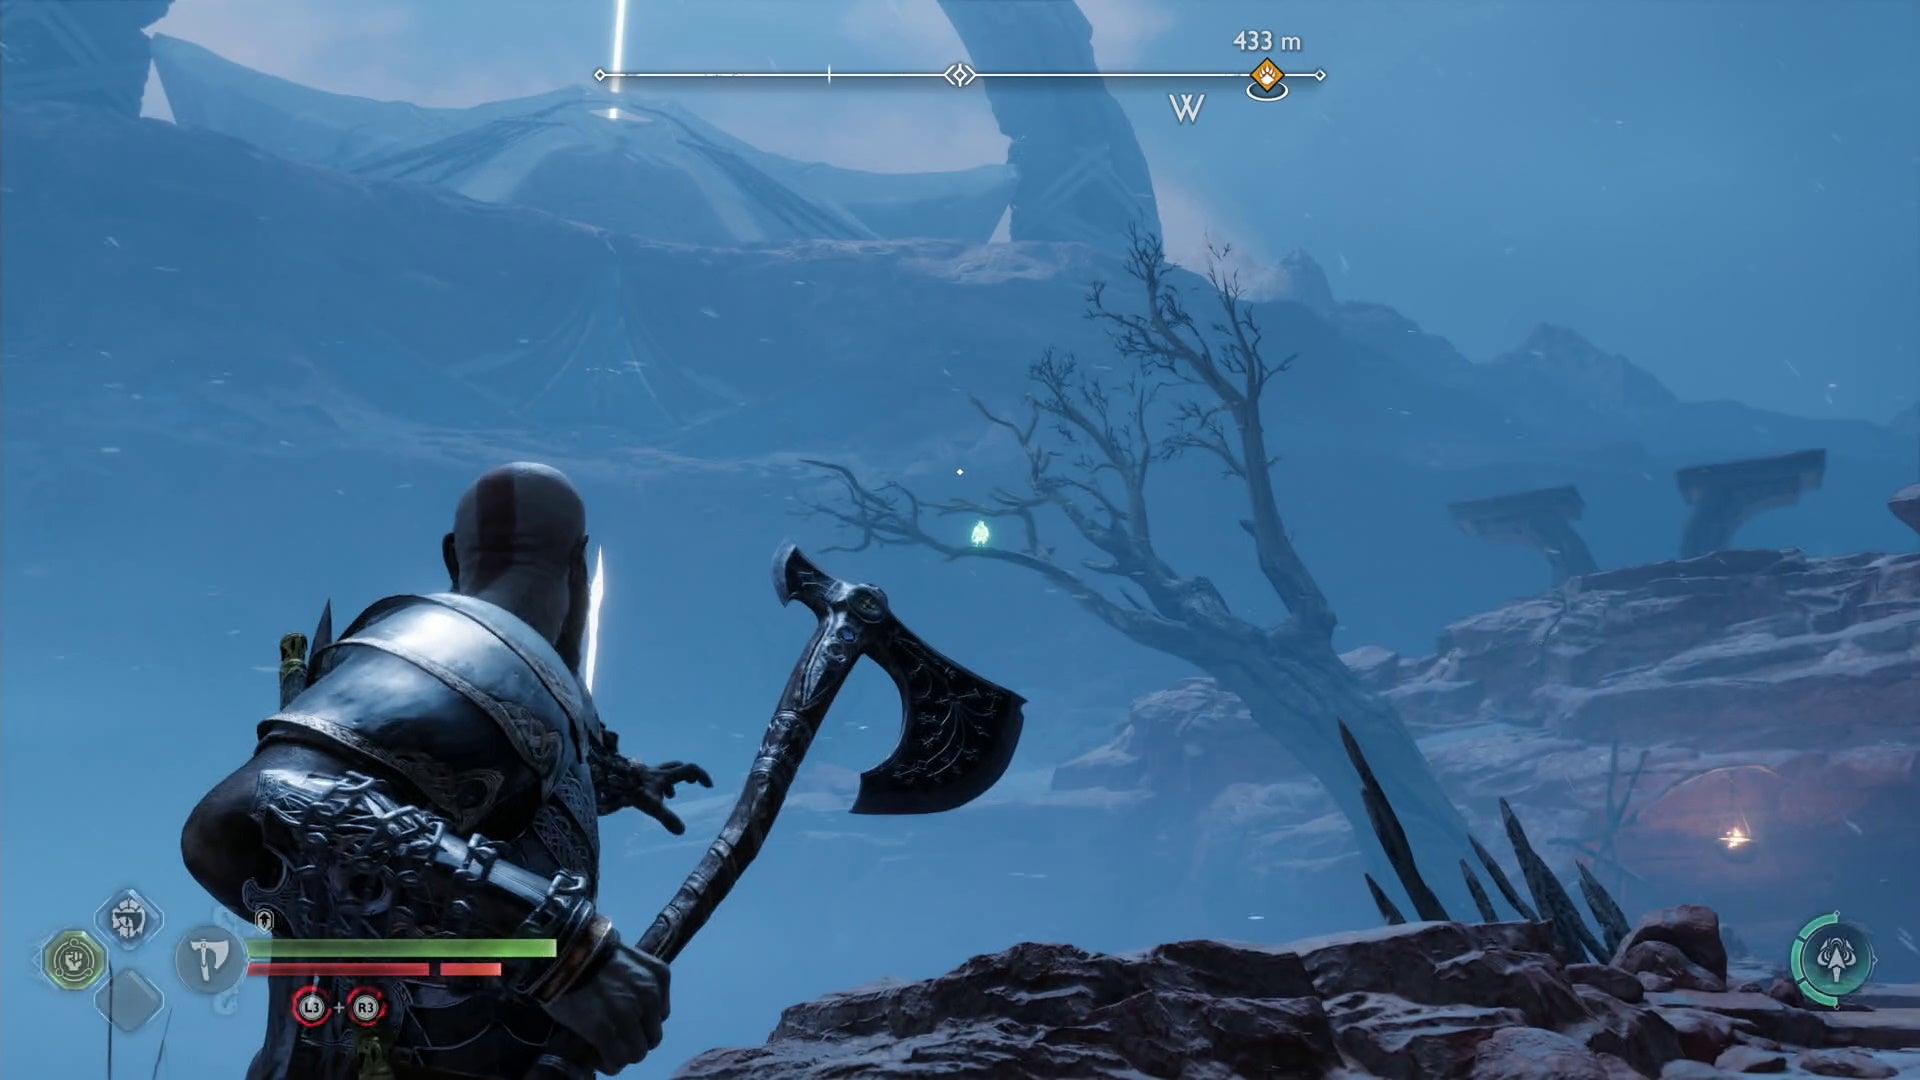
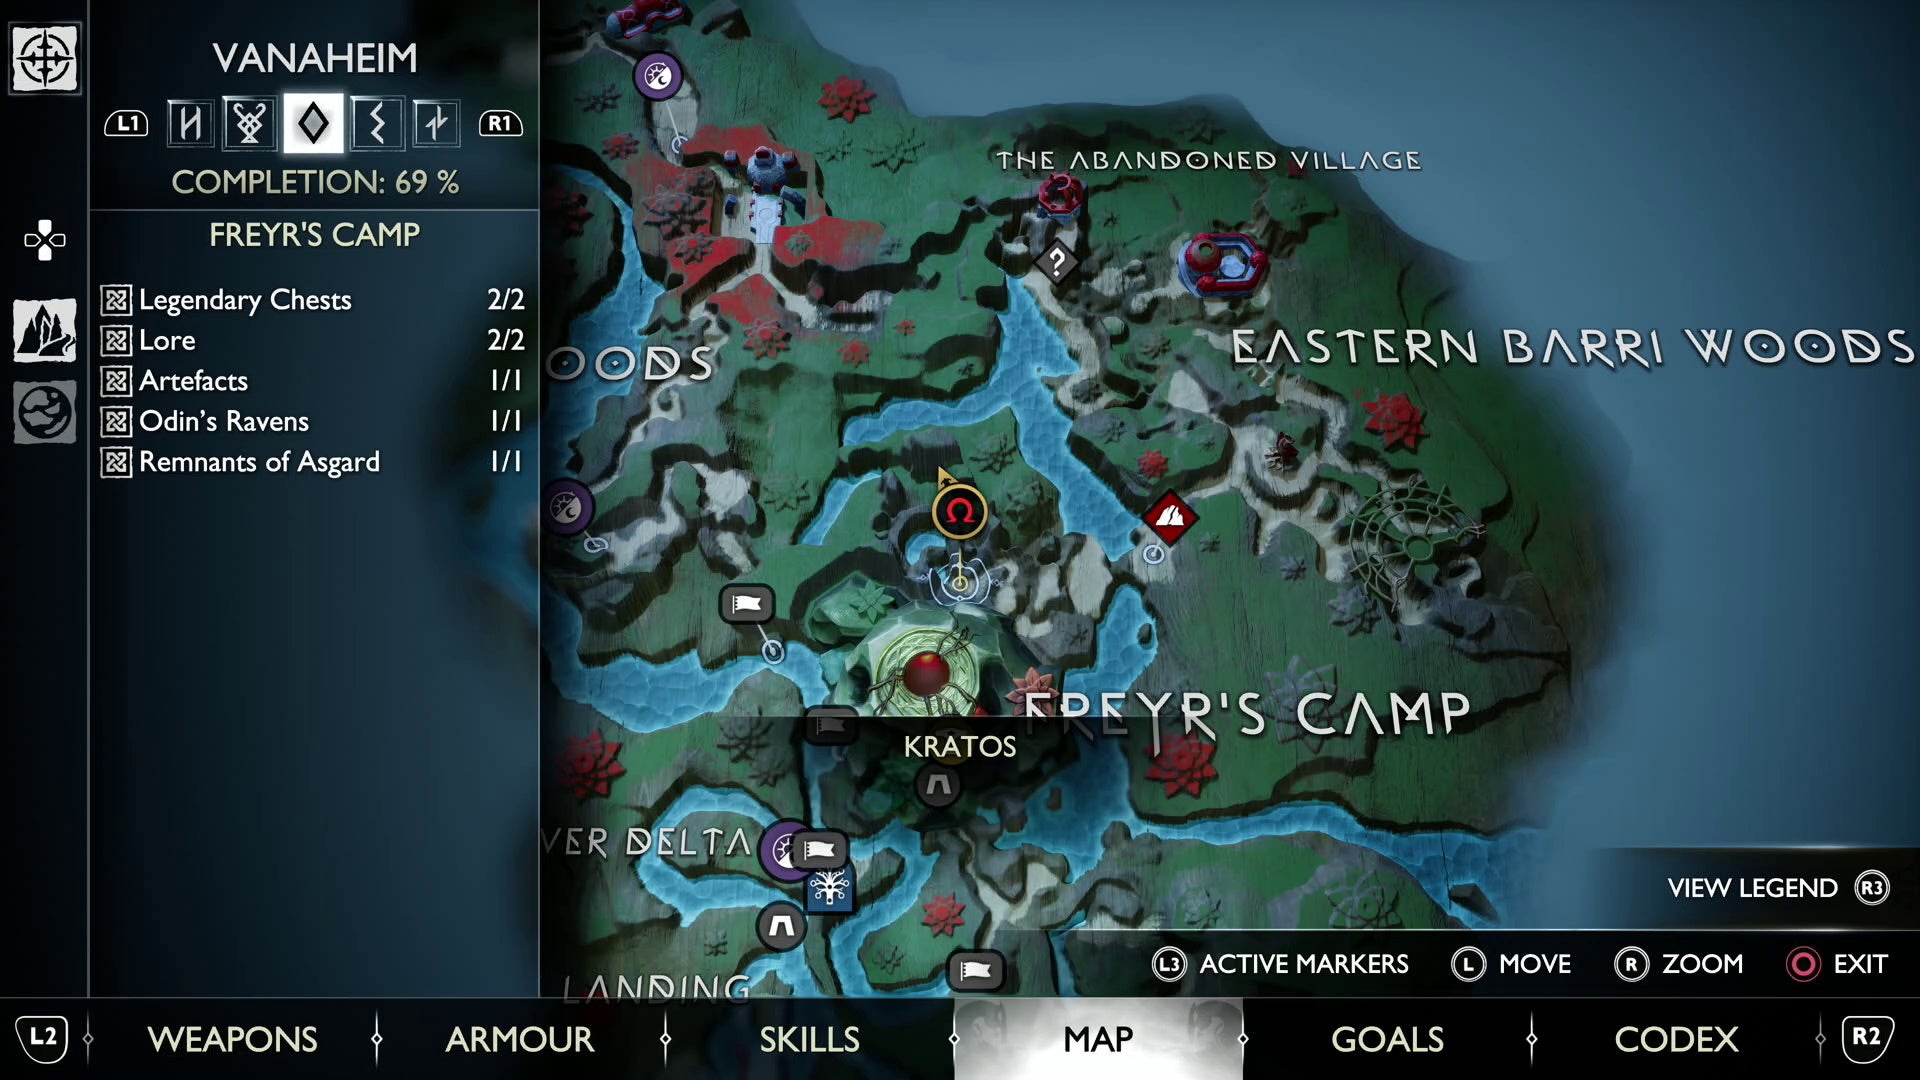
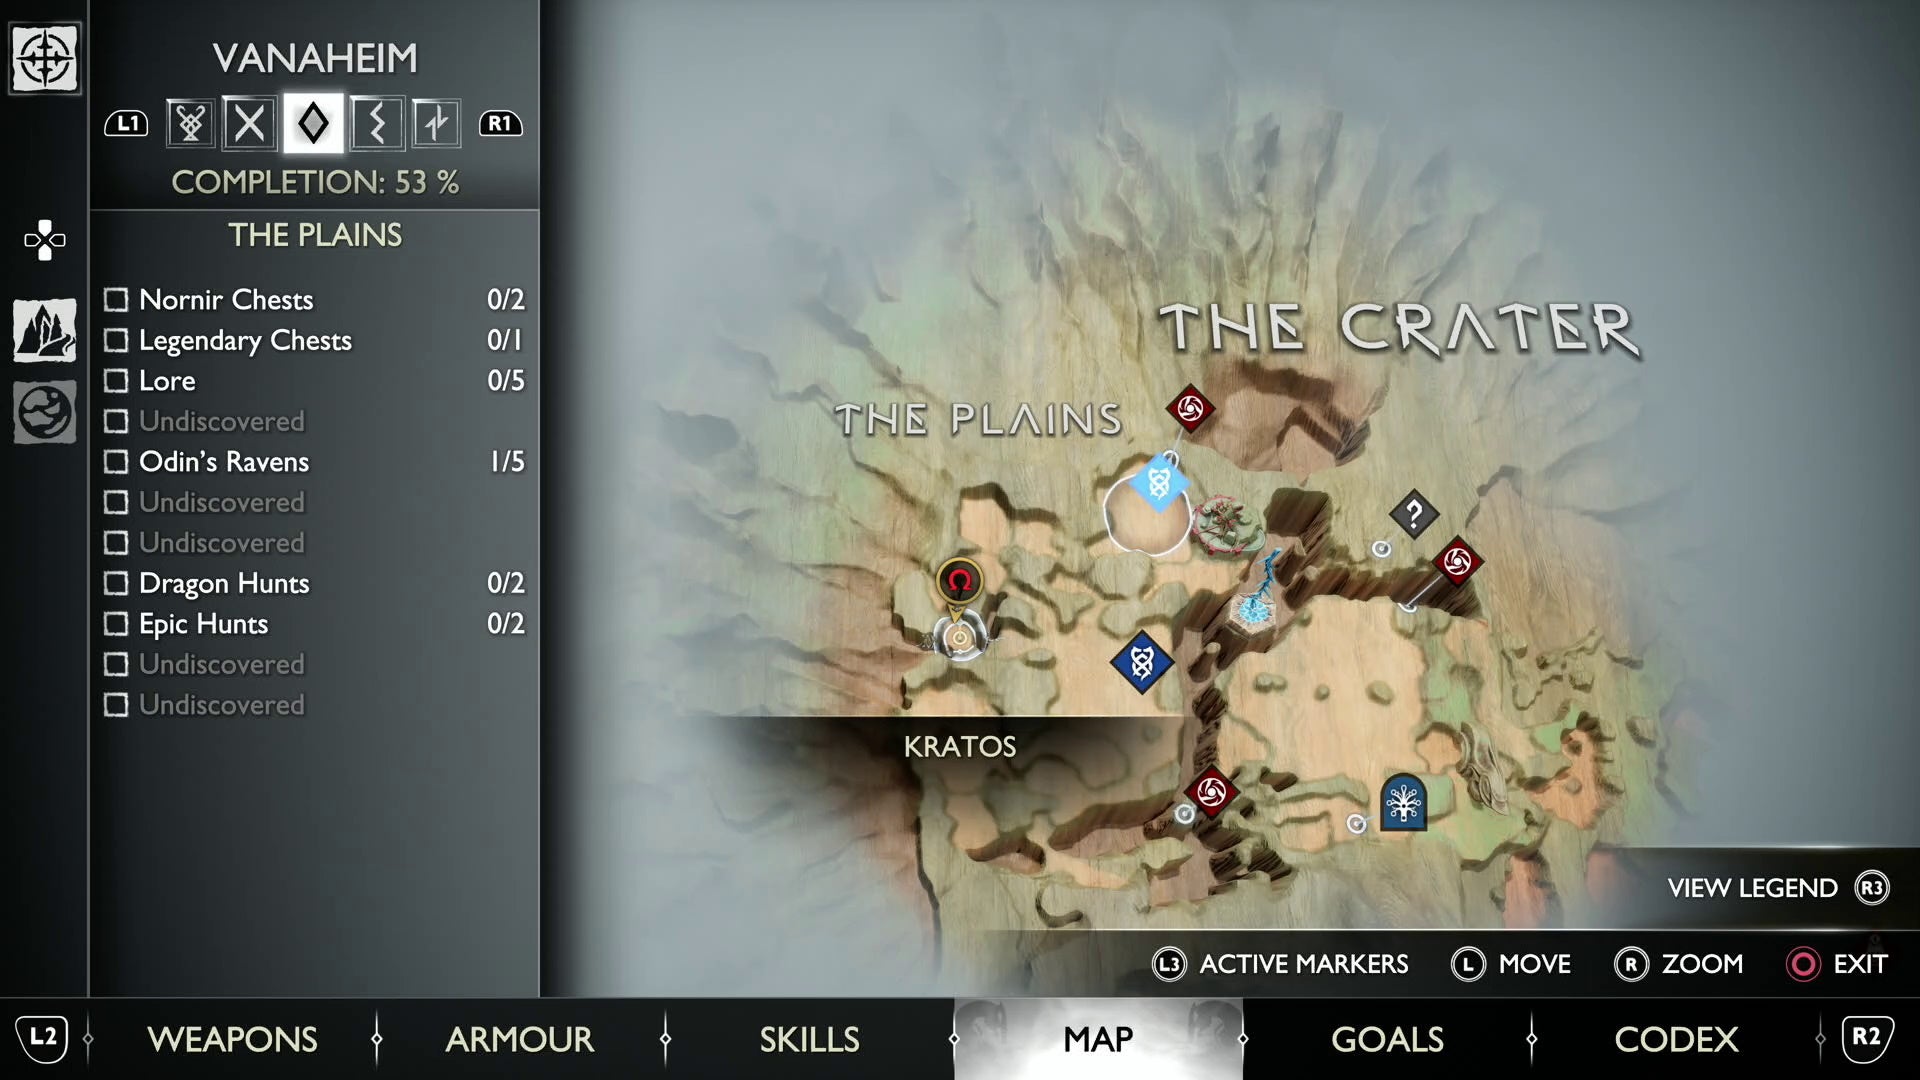
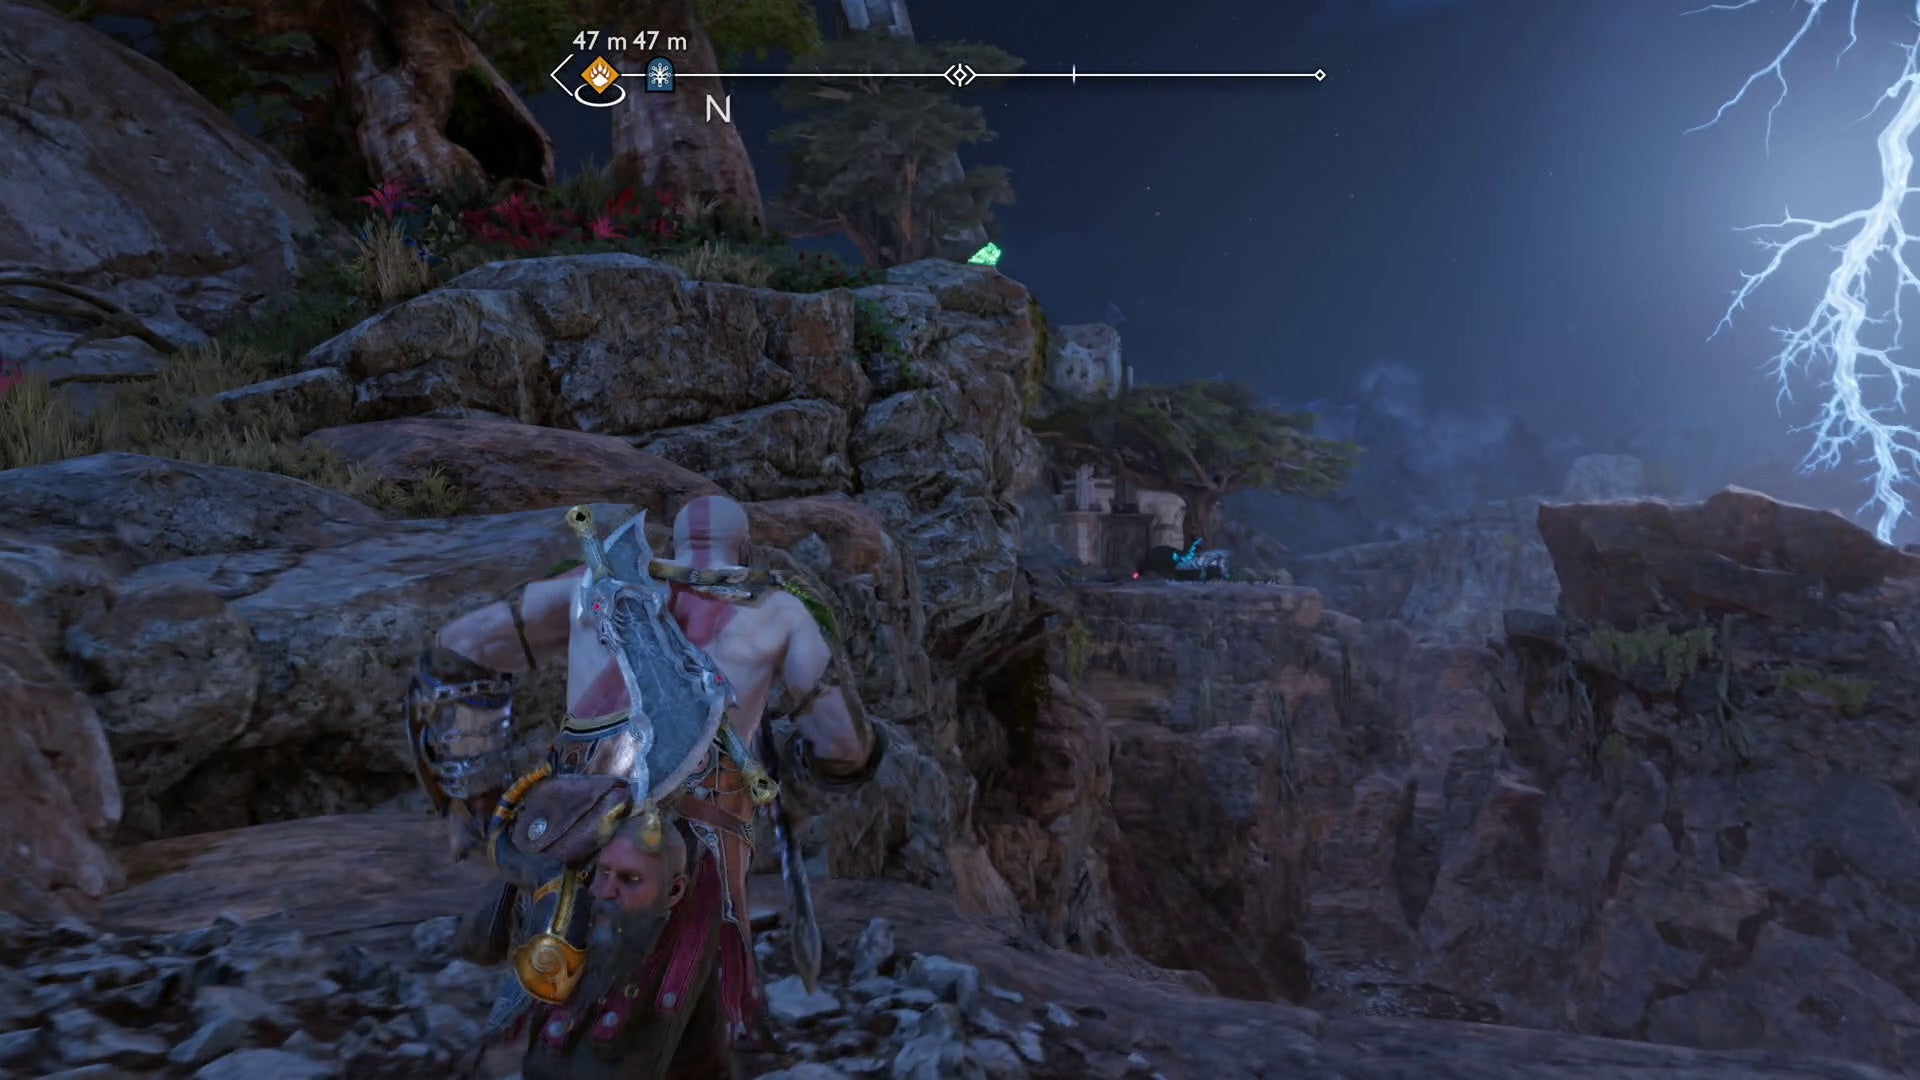
God of War Ragnarök Vanaheim Odin’s Ravens locations explained
There are 15 of Odin’s Ravens to find in Vanaheim, with six available to find on your first trip to the Vanir Realm, but you’ll have to wait until you return to Vanaheim as part of the story to access the other nine locations.
Here’s where to find all Ravens in Vanaheim:
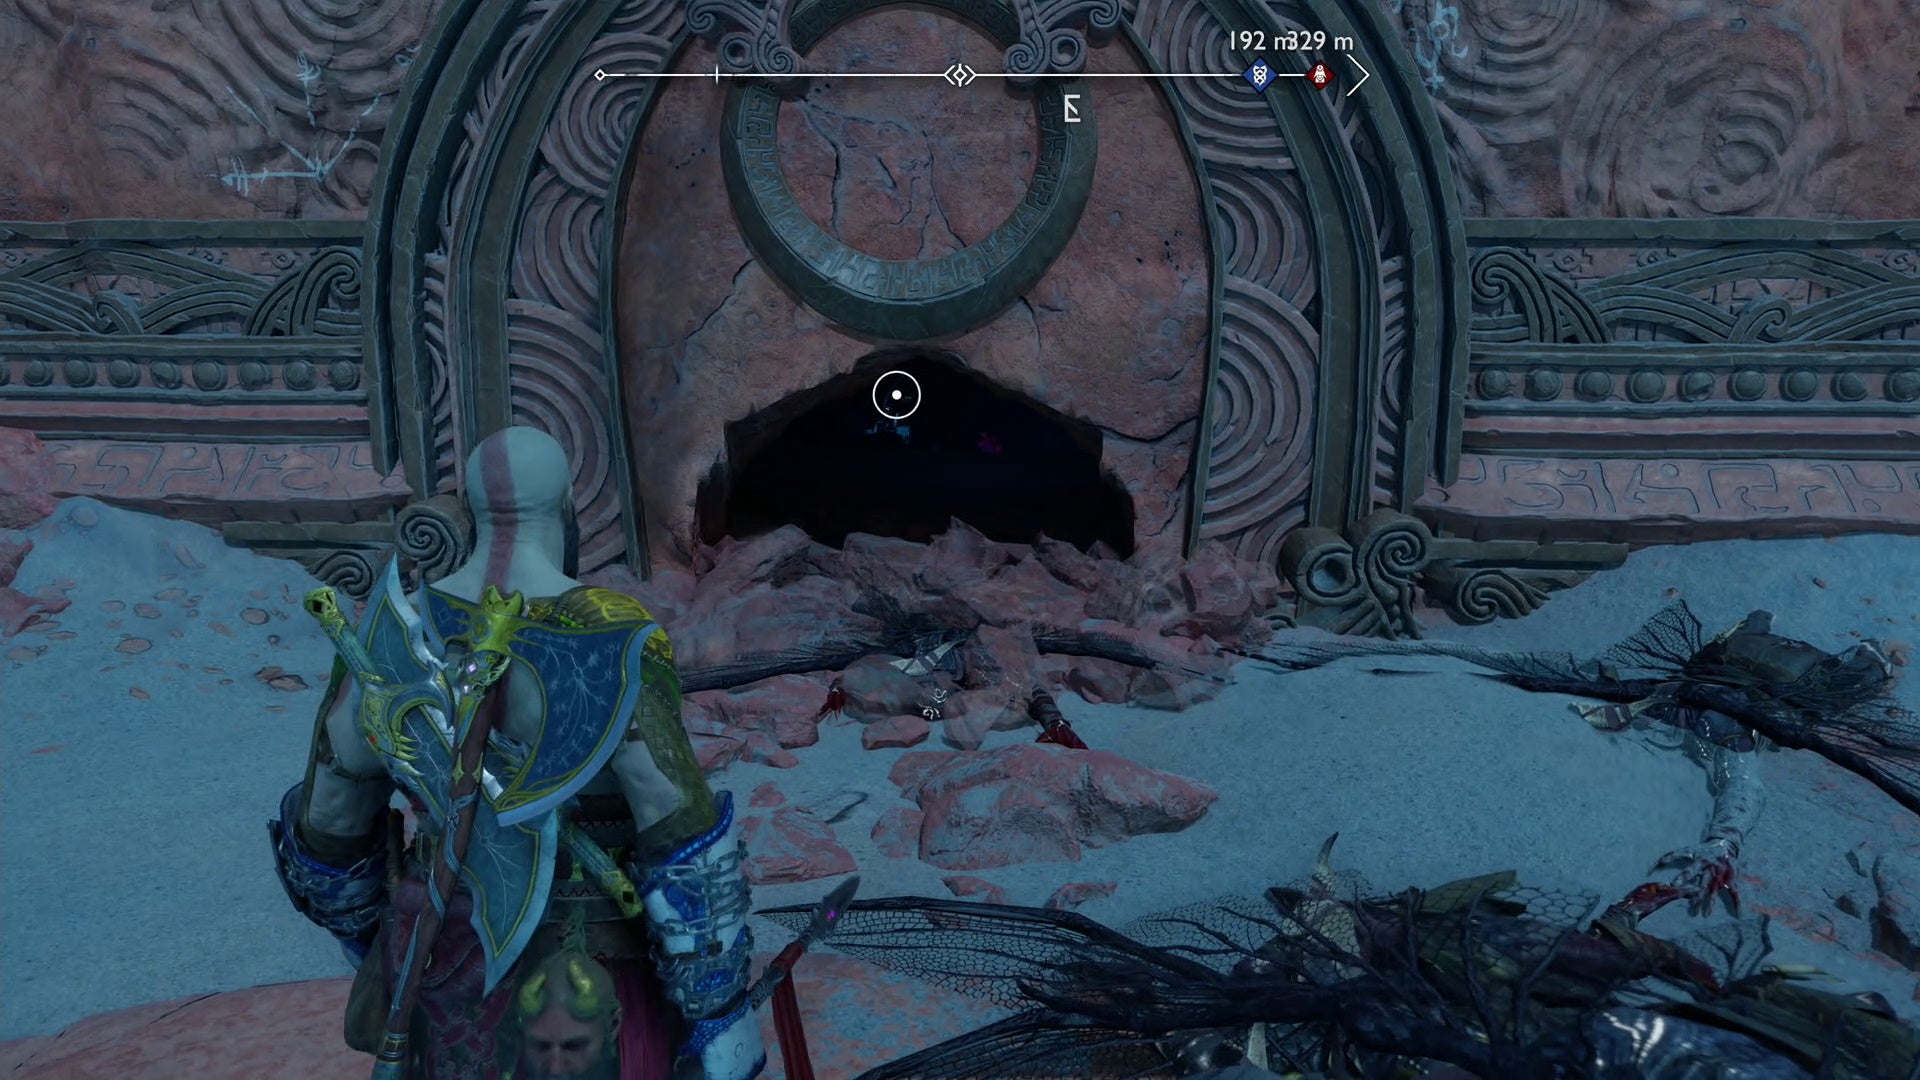
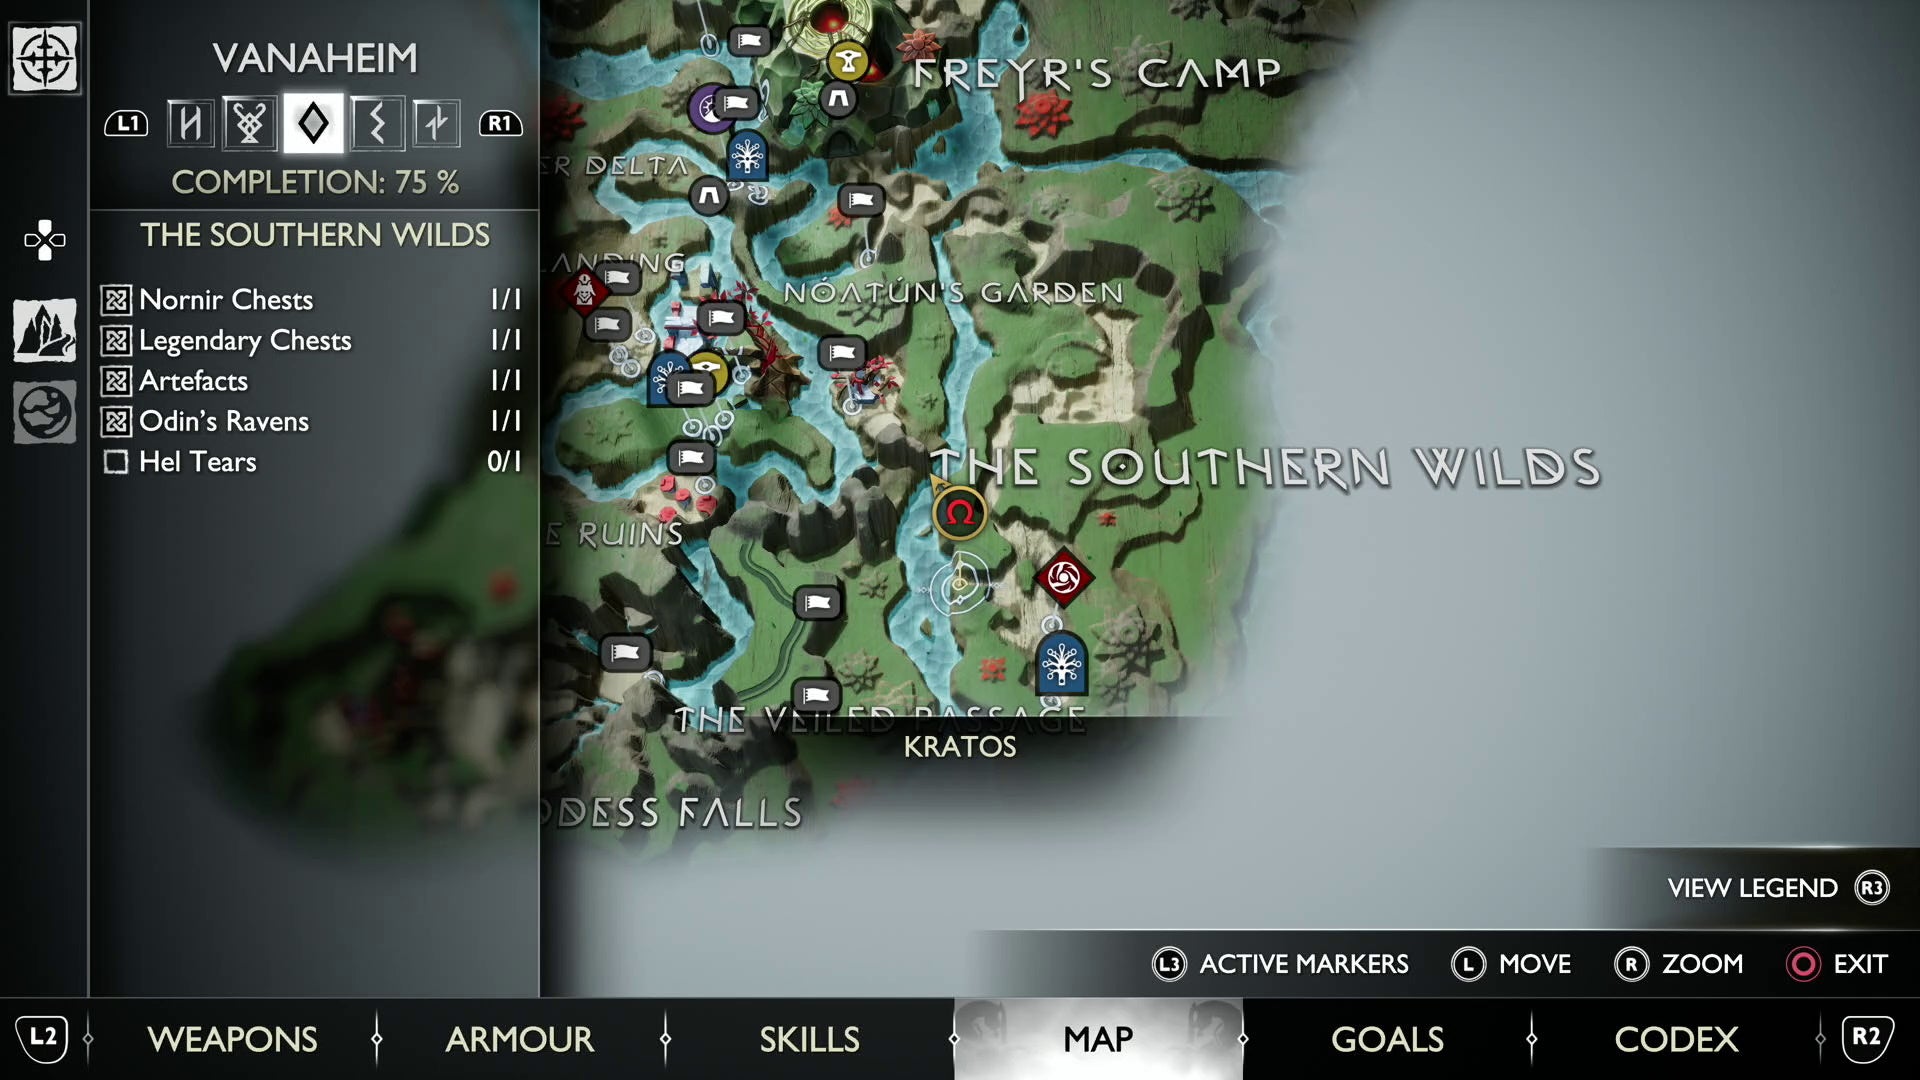
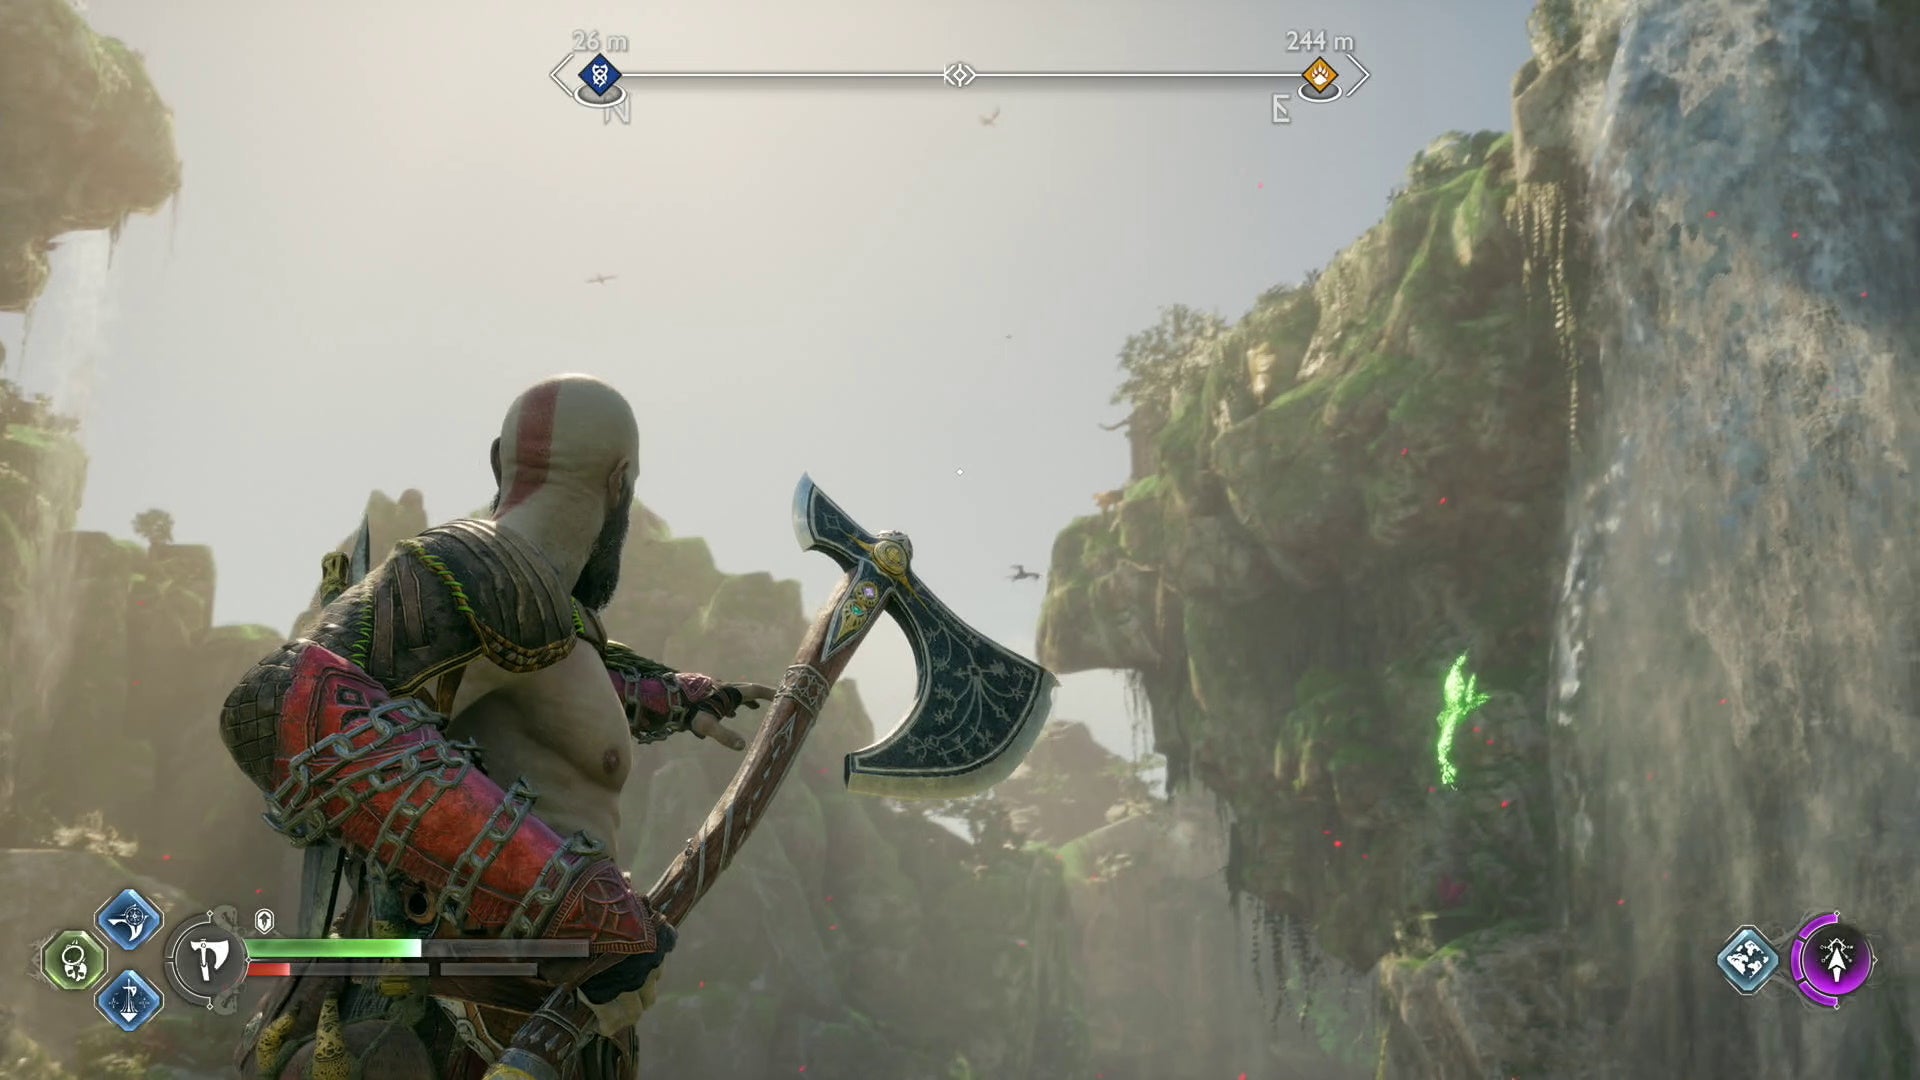
Vanaheim Southern Wilds Raven location in God of War Ragnarök
This Southern Wilds Raven is located near the start of the Southern Wilds, on the left-hand side of the path, flying around in a circle above the river.
Vanaheim The Abandoned Village Raven location in God of War Ragnarök
The Abandoned Village Raven is perched on top of a statue inside a tree knot, found by exploring the main circular building where you can swing to multiple levels.
It’s on the top level, to the right after entering through the crack in the wall.
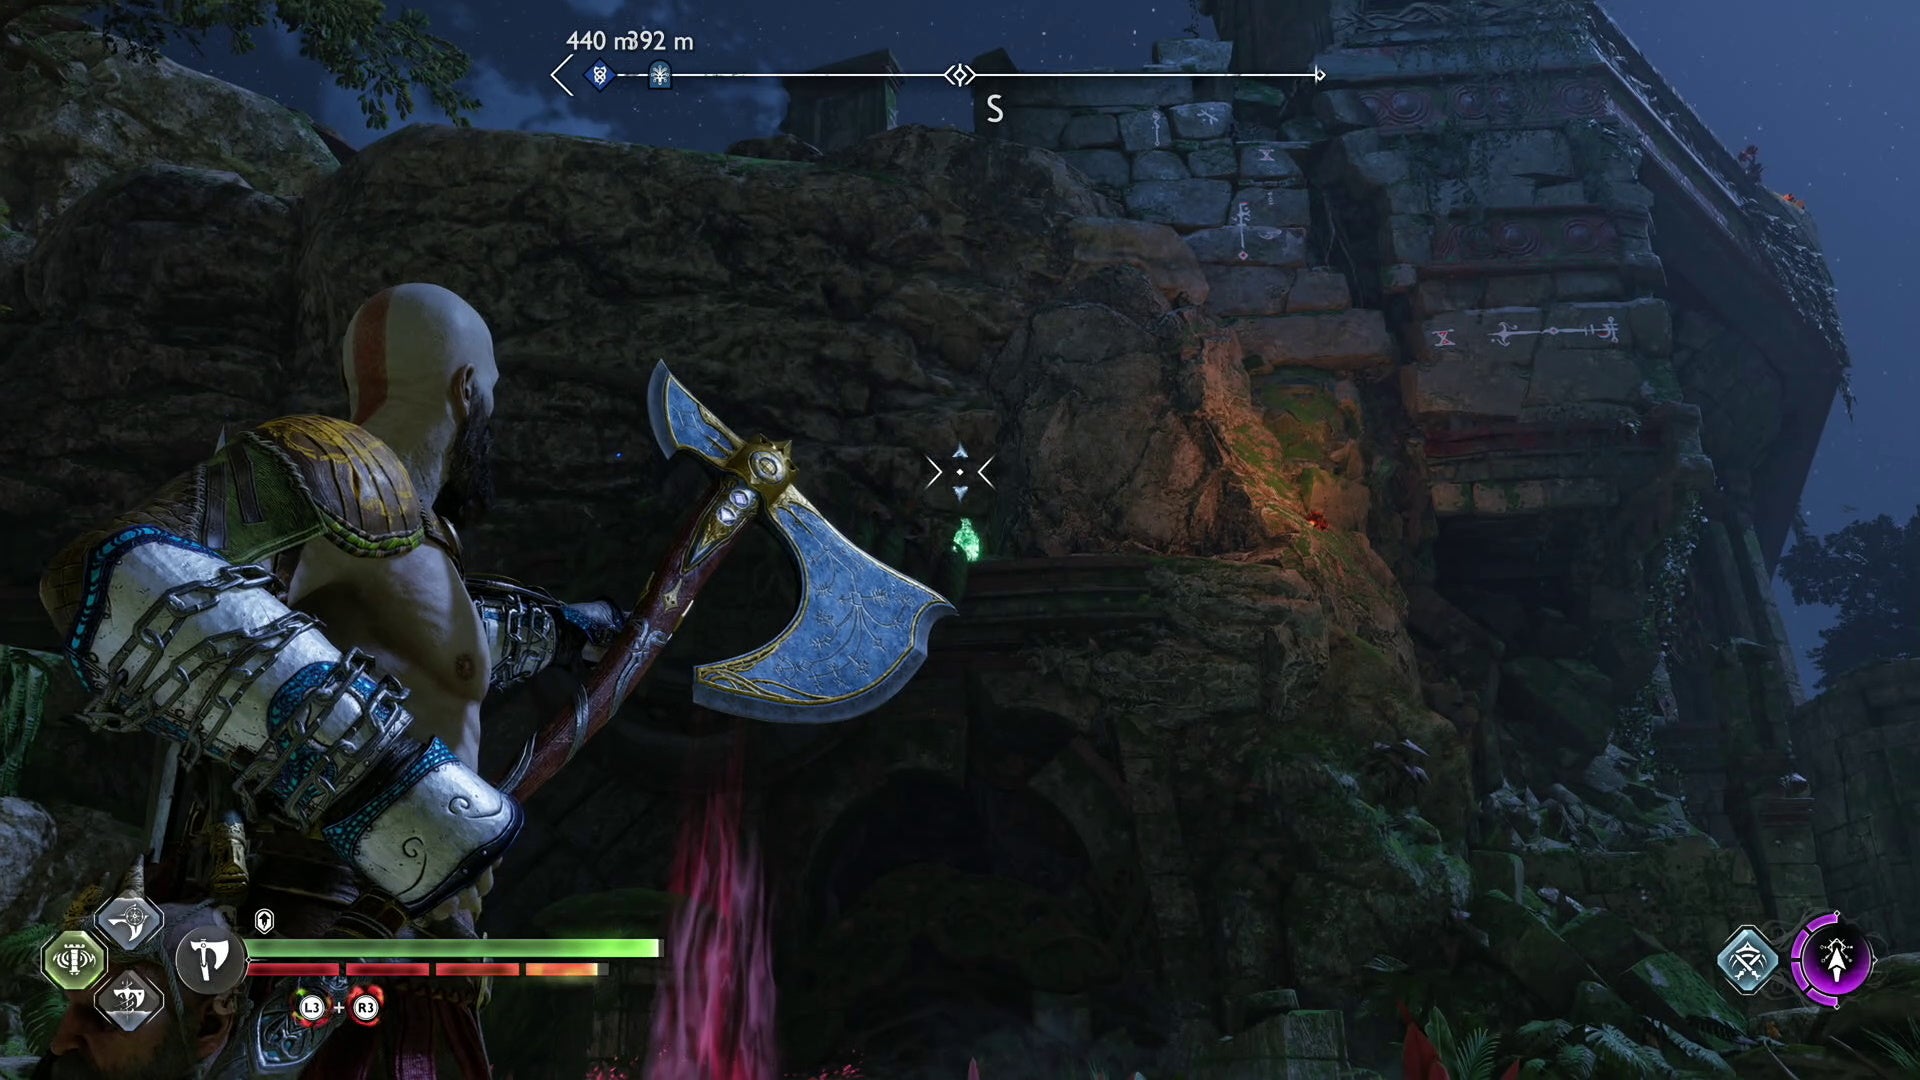
Vanaheim River Delta Raven location 1 in God of War Ragnarök
The first River Delta Raven is found perched to the left of the Legendary Chest in the Pilgrim’s Landing area, but you’ll need to solve the environmental puzzle involving the red bramble and Sigil Arrows first to gain access to the platform with the Legendary Chest.
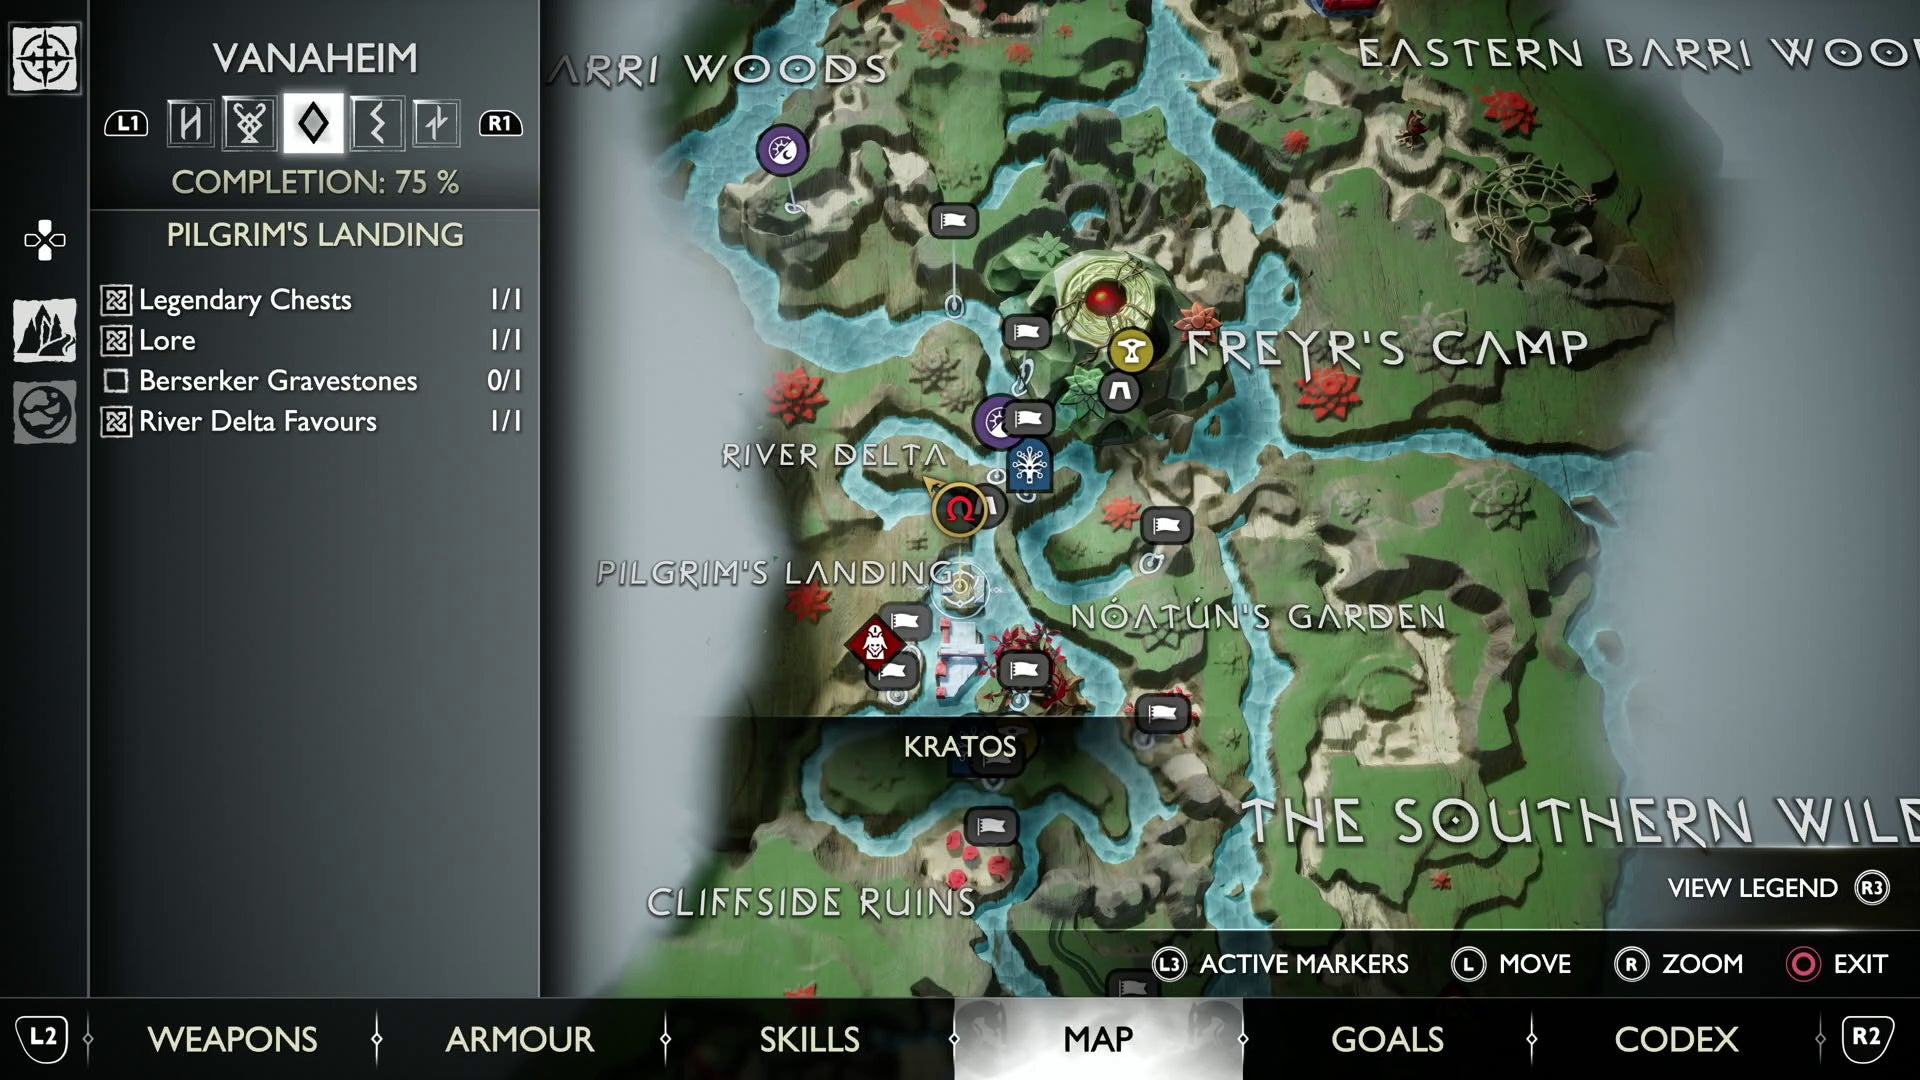
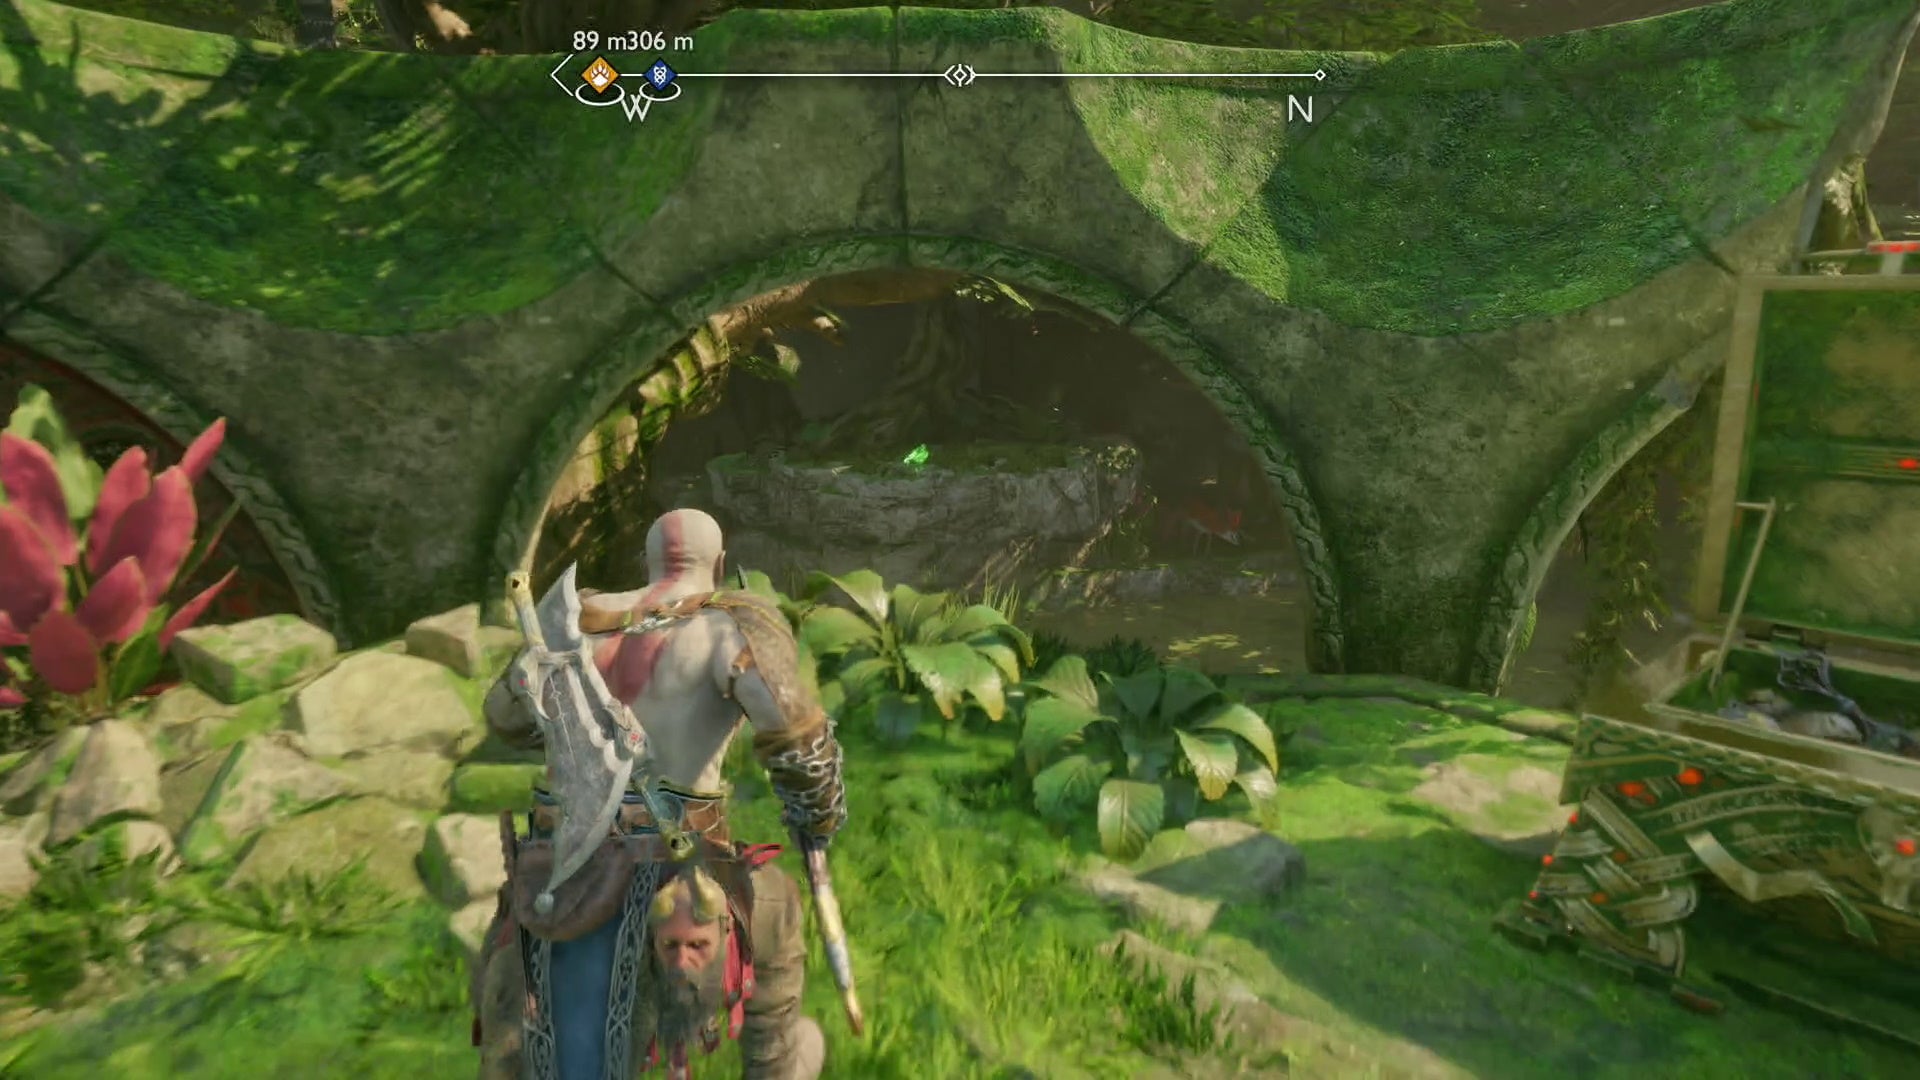
Vanaheim The Veiled Passage Raven location in God of War Ragnarök
The Veiled Passage Raven is located near the top of the area, perched beside some skeletons hanging from the roof.
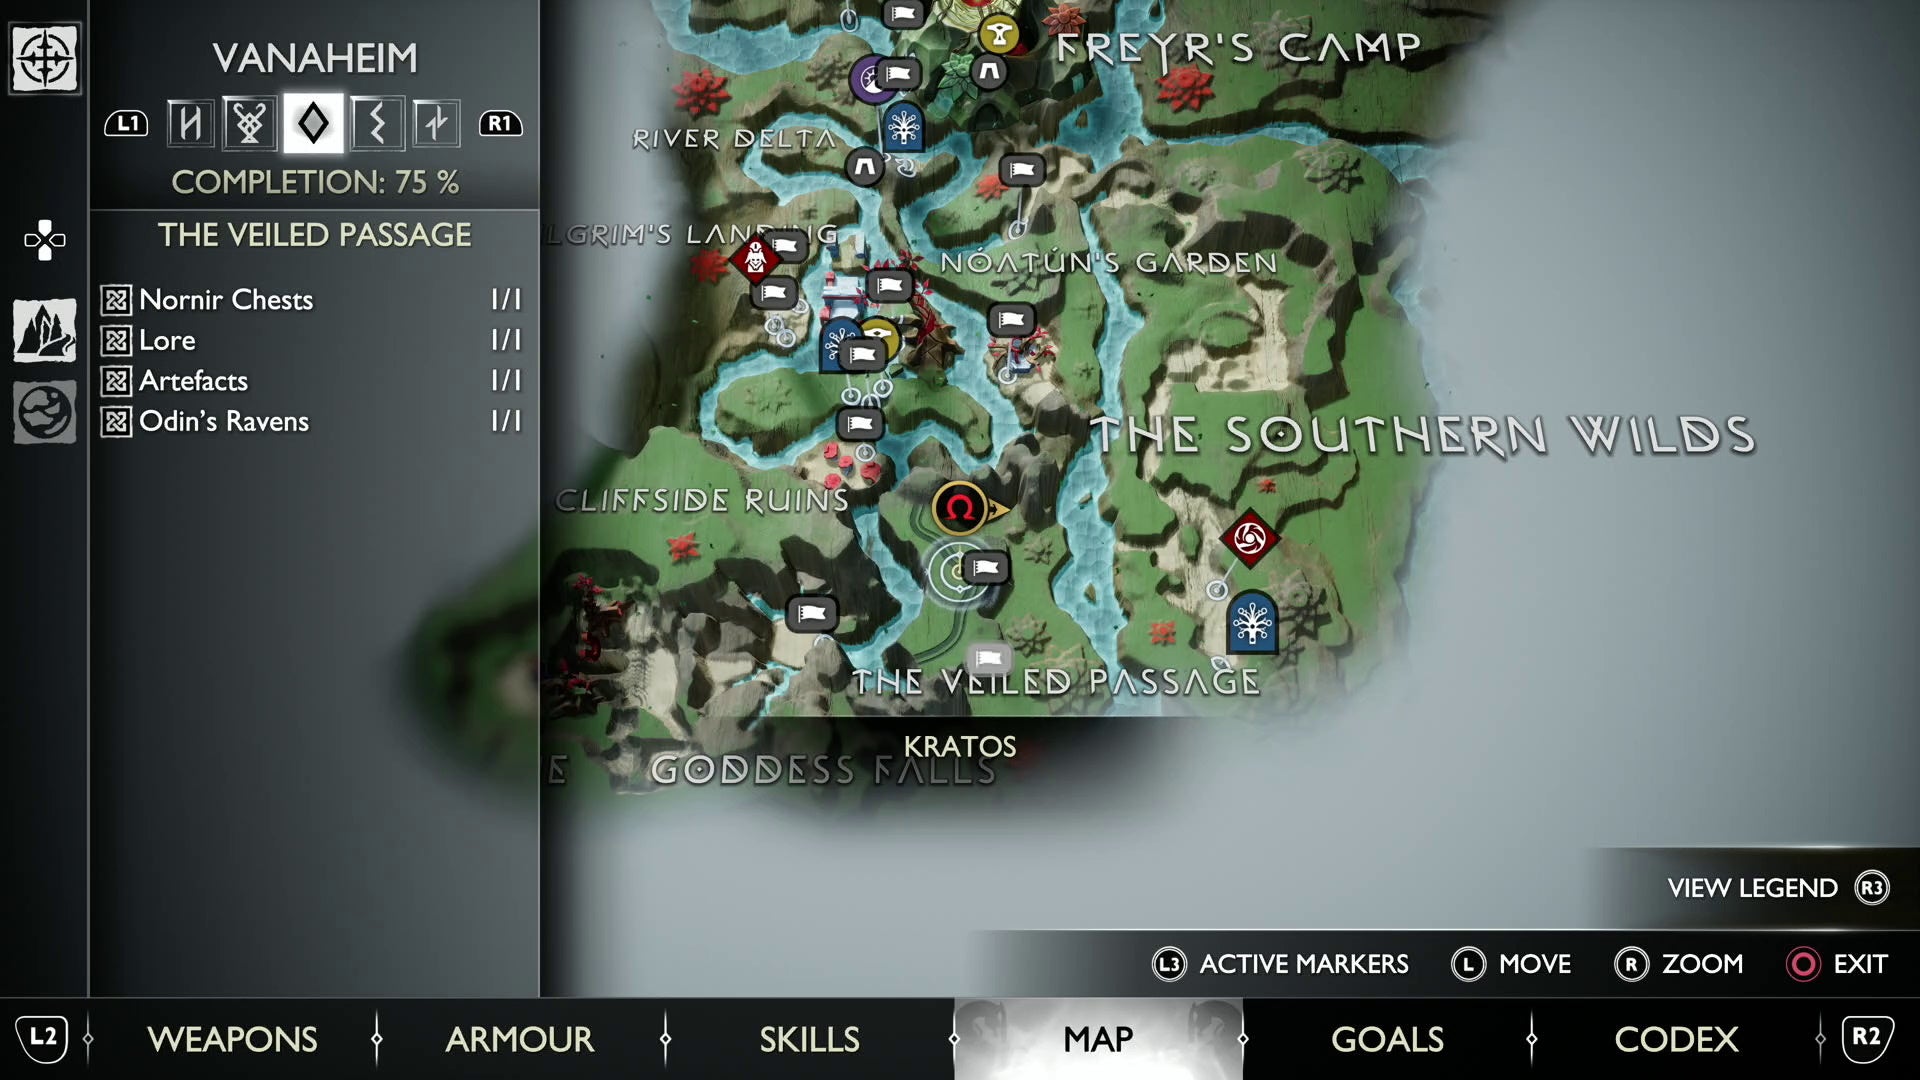

Vanaheim River Delta Raven location 2 in God of War Ragnarök
The second Raven on the River Delta is perched on top of a tree root above the river. To hit it, you have to find a way across the raised bridge by ascending the Veiled Passage and taking the golden chain down. You’ll see the Raven down from the lore marker.
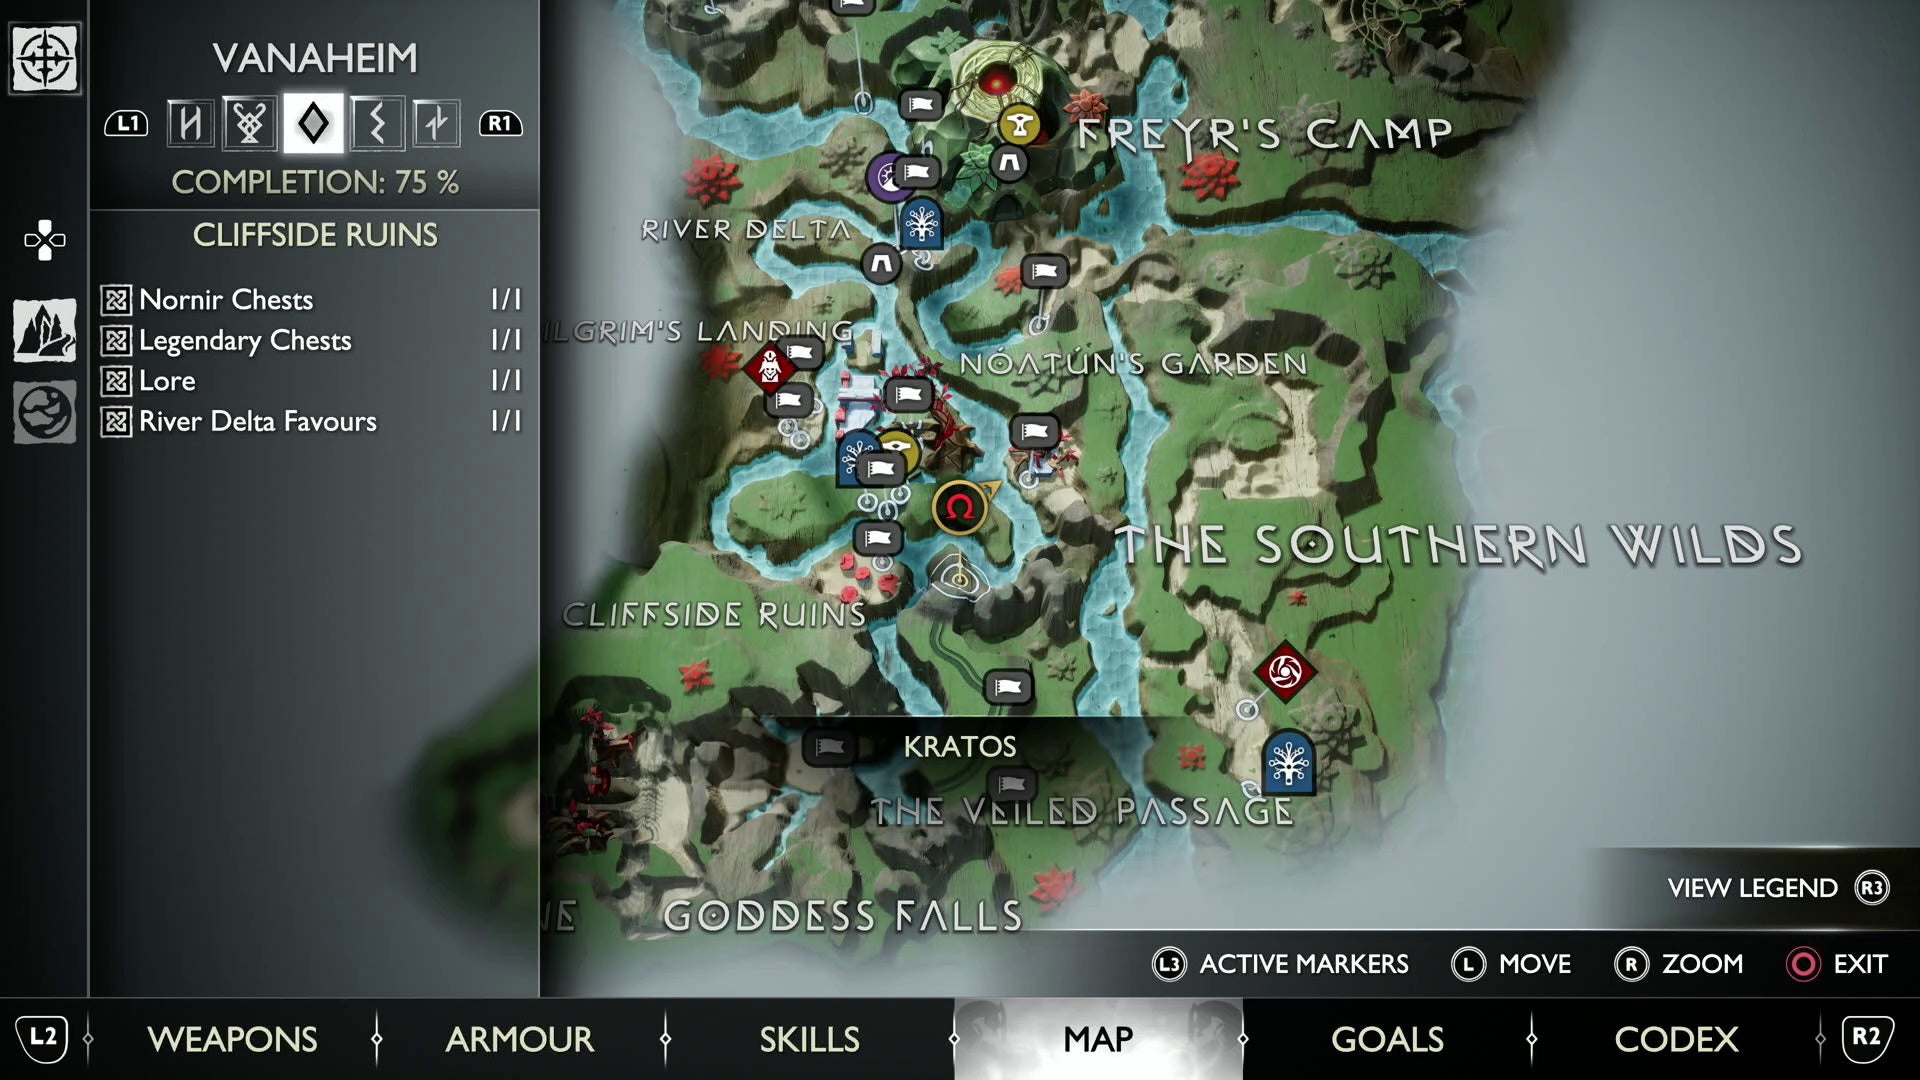
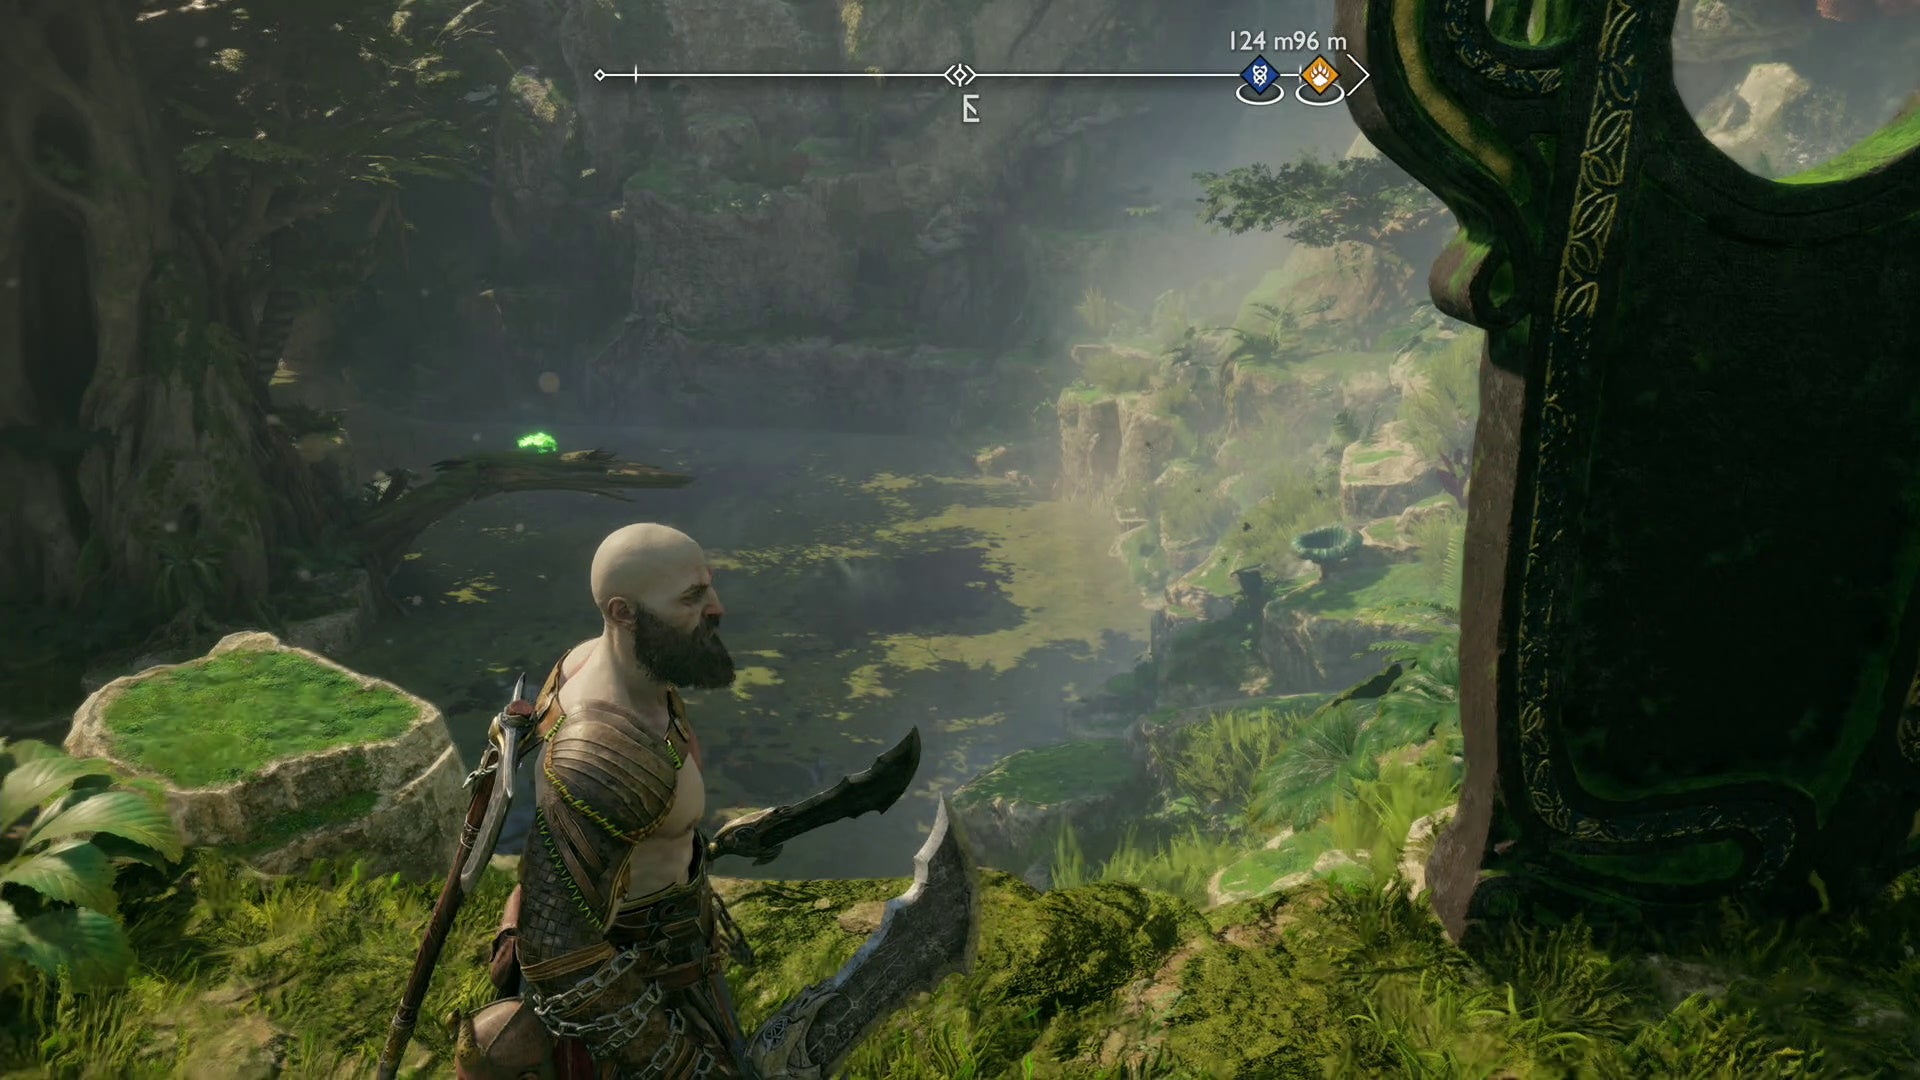
Vanaheim Goddess Falls Raven location in God of War Ragnarök
The Goddess Falls Raven is found flying around in a circle near the triple waterfall where you dock the boat, Climb up to one of the ledges above to get a better shot at the Raven.
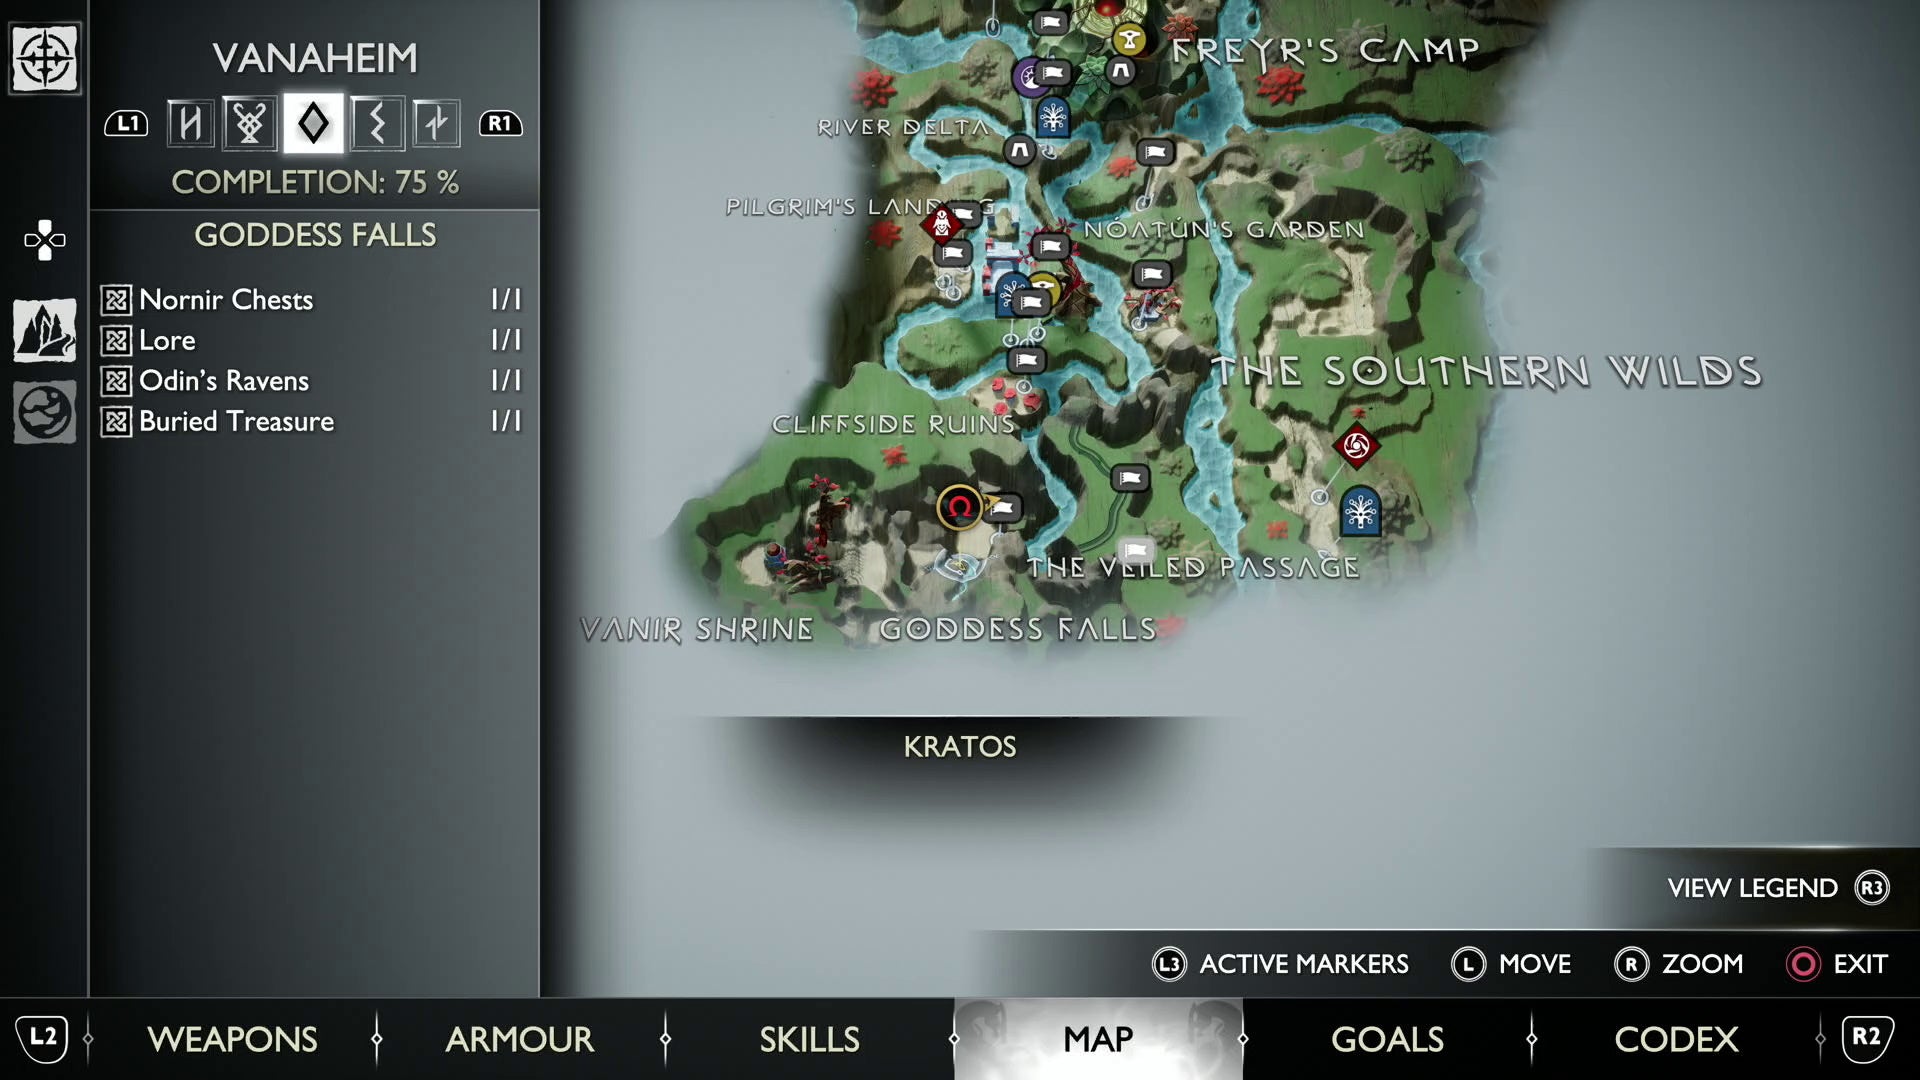
That’s it for the first batch of Ravens in Vanaheim, so don’t read any further in this section until you return to Vanaheim as part of the story – or you’ll see spoilers in the pictures and text!
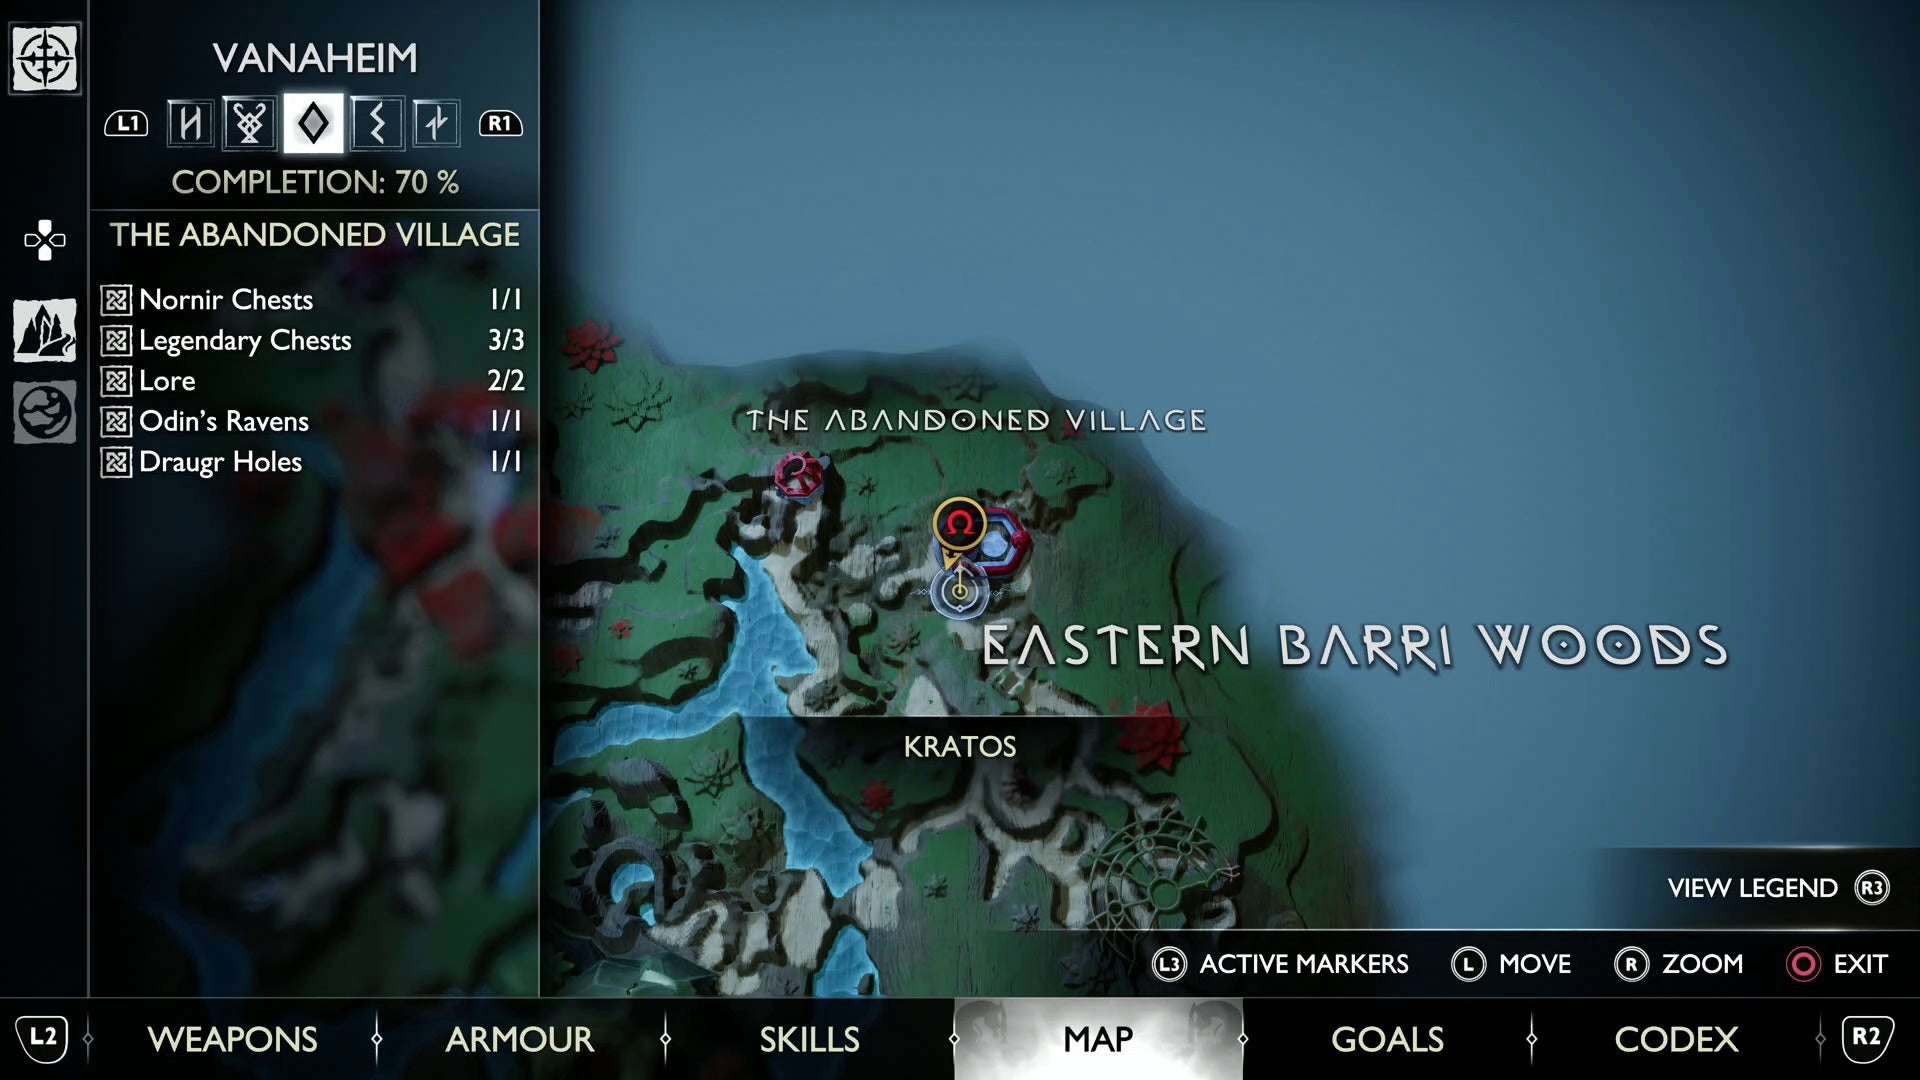
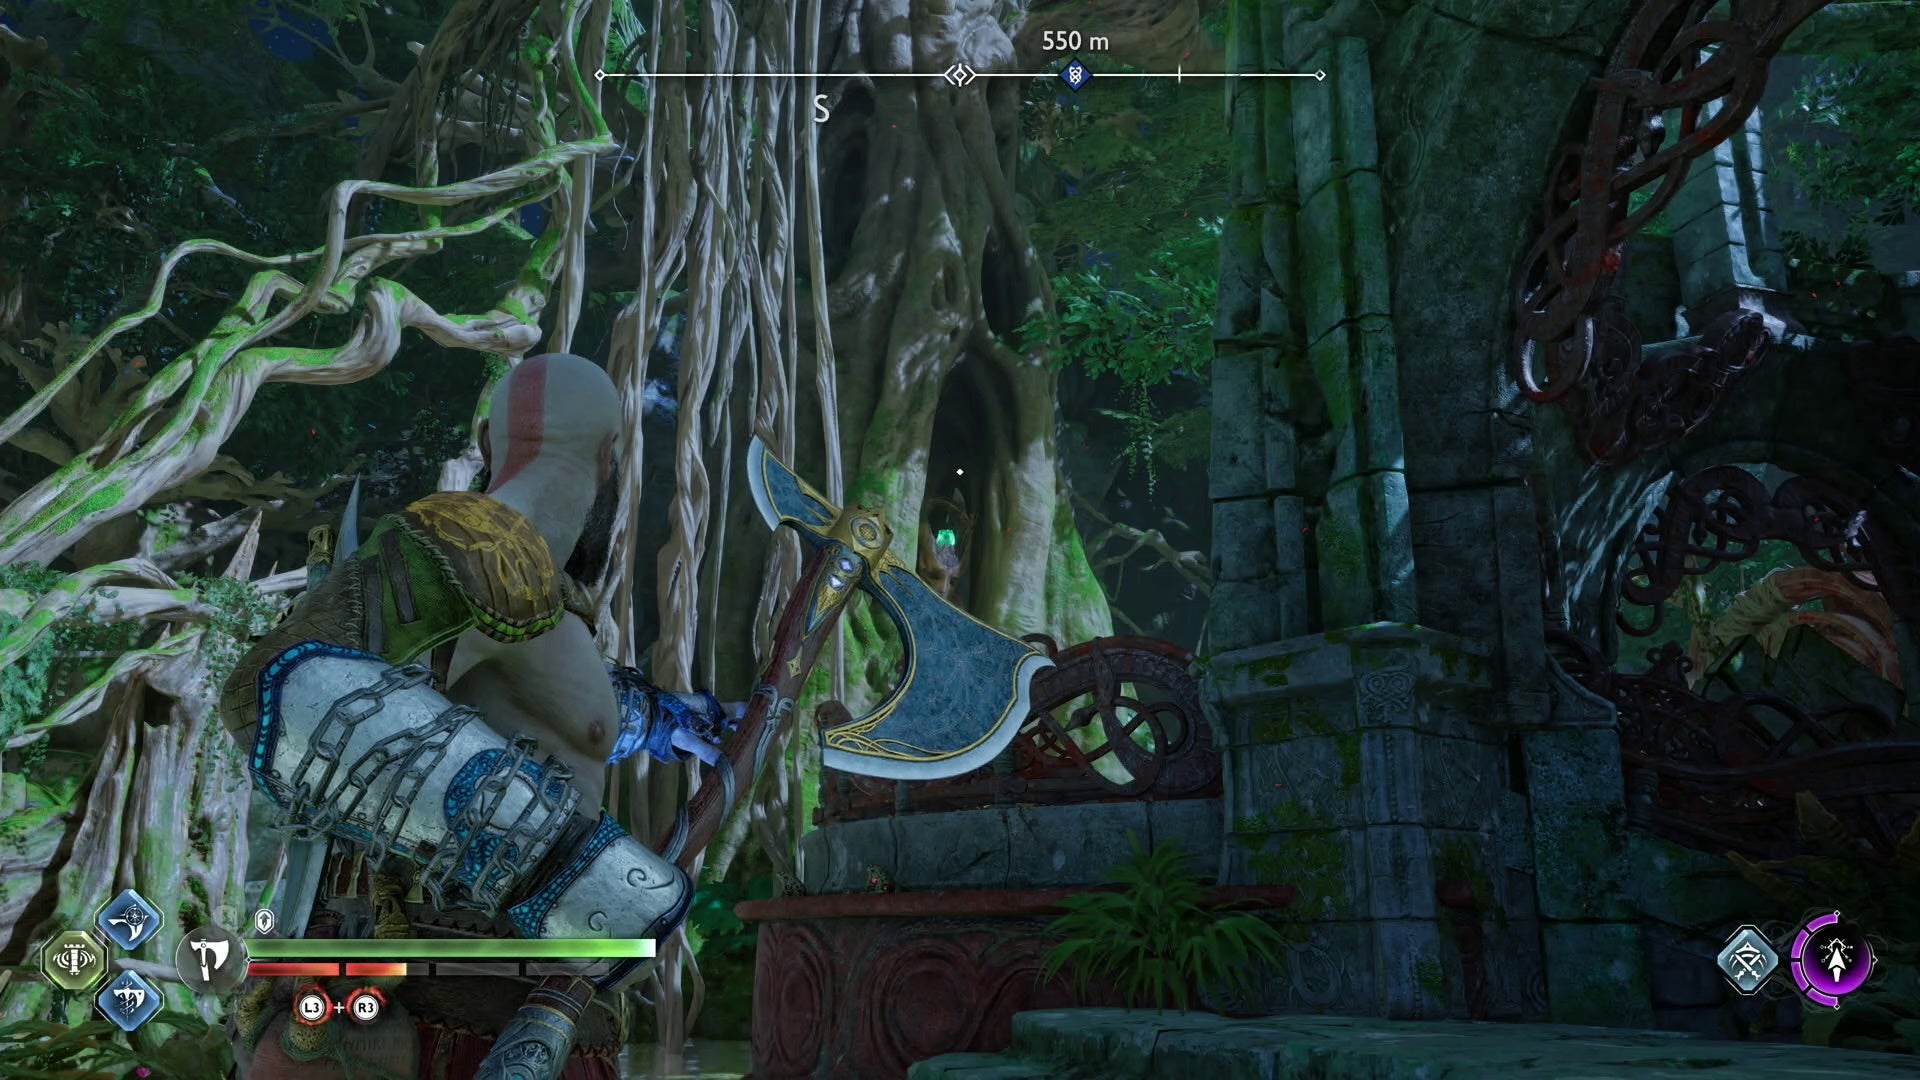
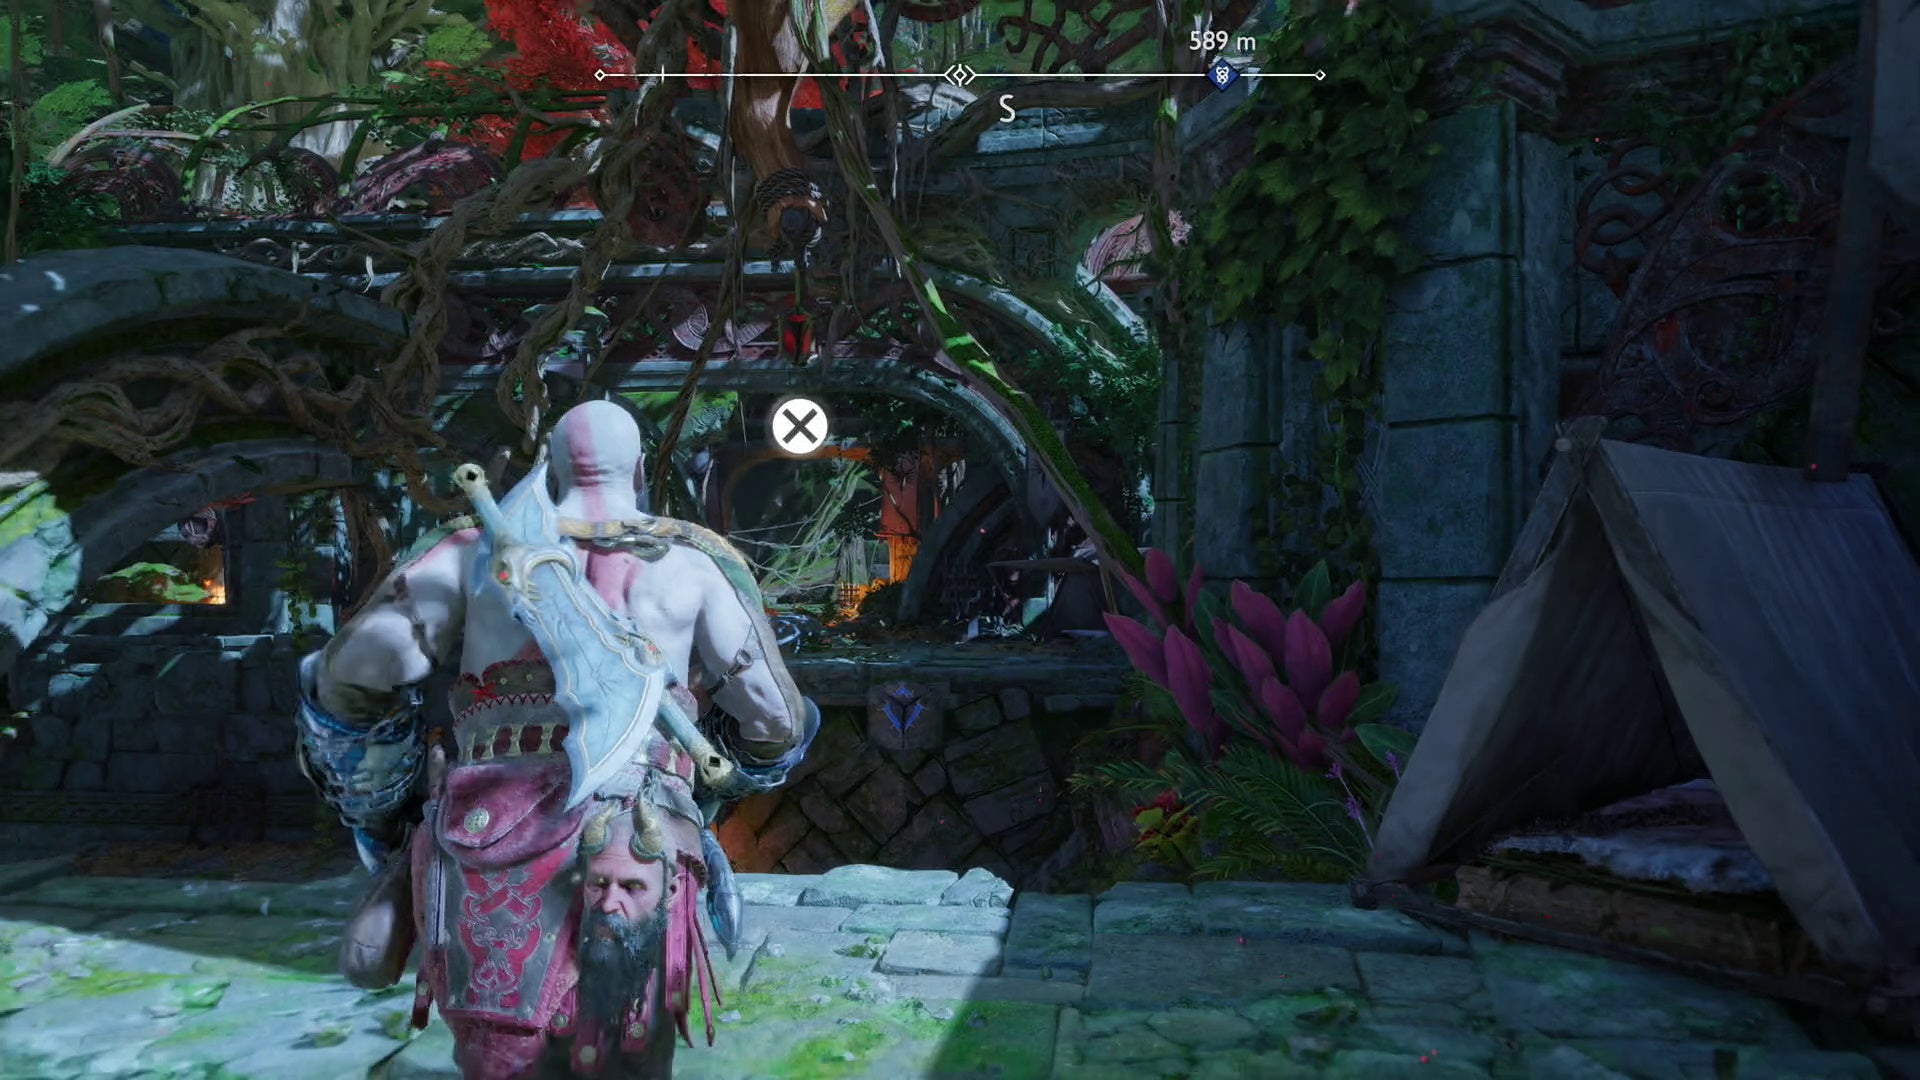
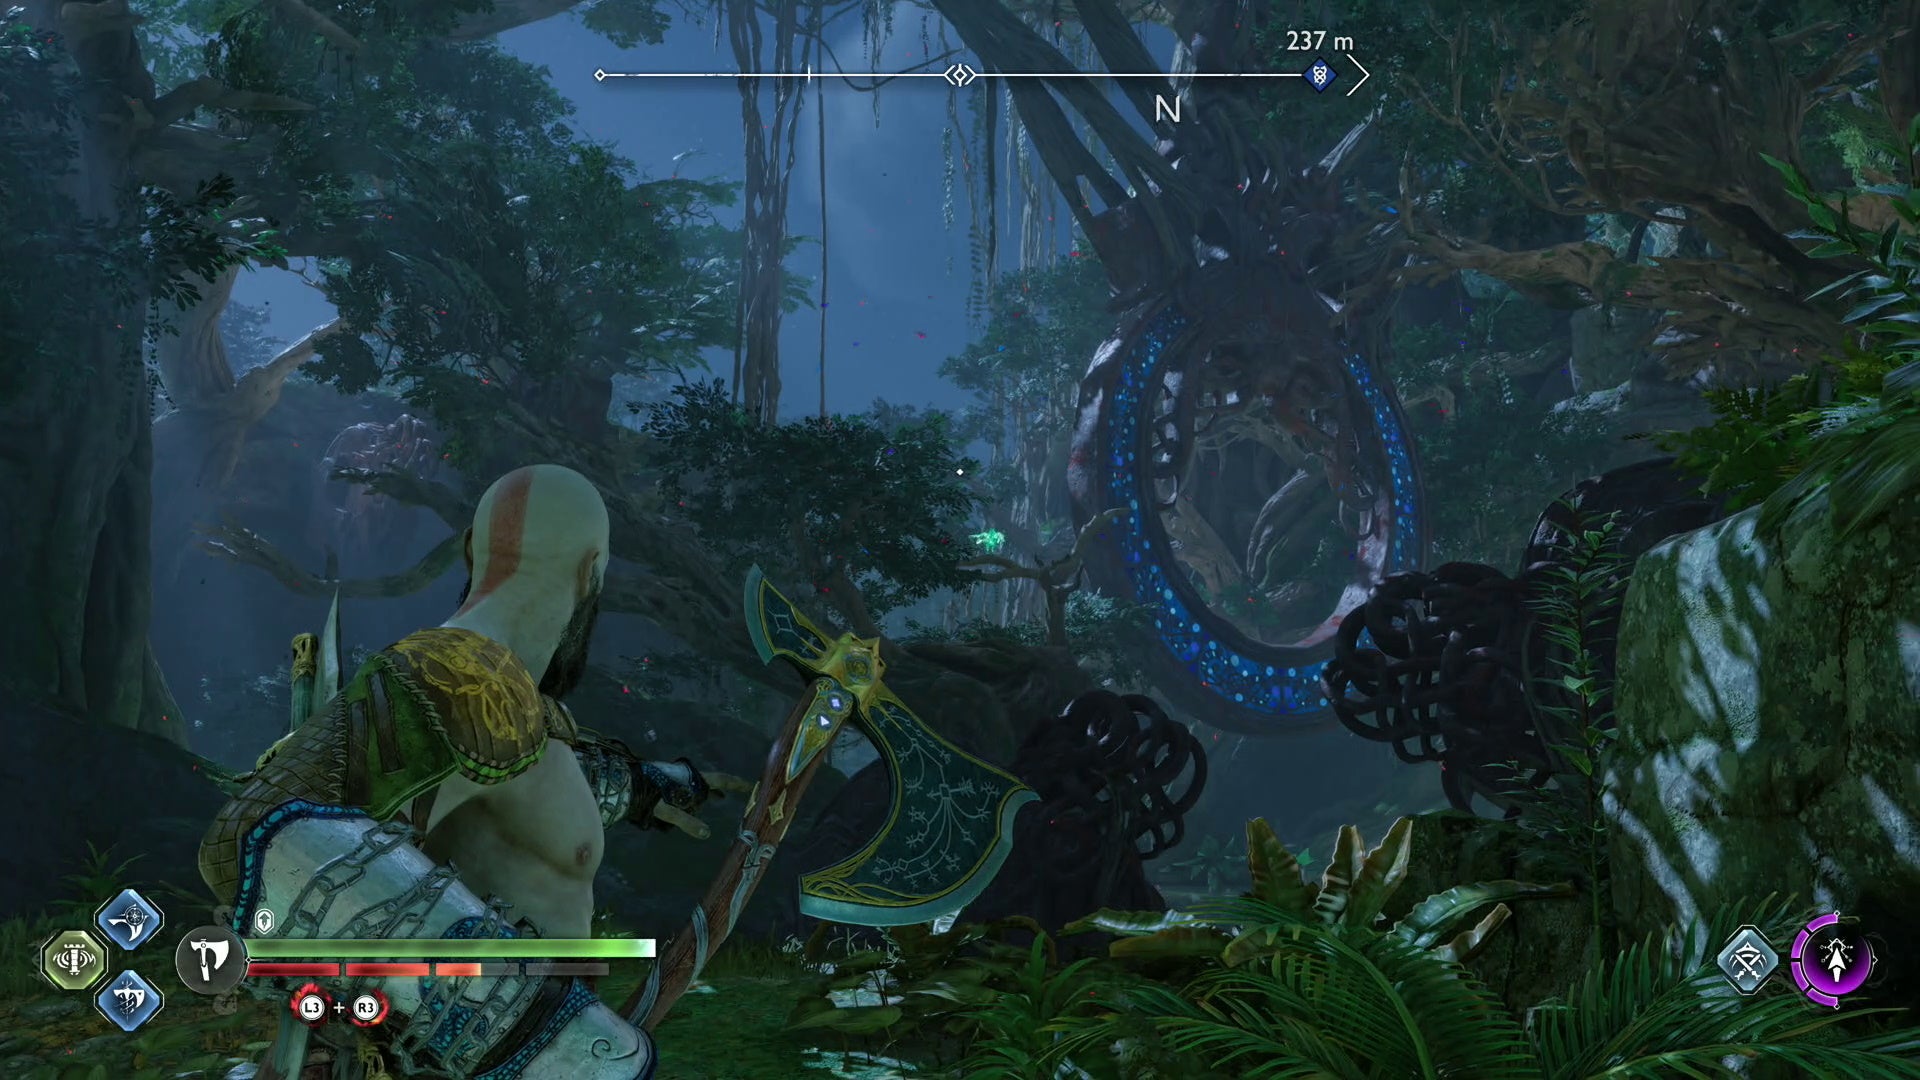
Vanaheim Eastern Barri Woods Raven location in God of War Ragnarök
You can only get this Raven after revisiting Vanaheim as part of the story, which doesn’t happen until quite late in the game.
The Raven is perched inside the knot of a tree, down the short path from the Nornir Chest up the spiral stairs.
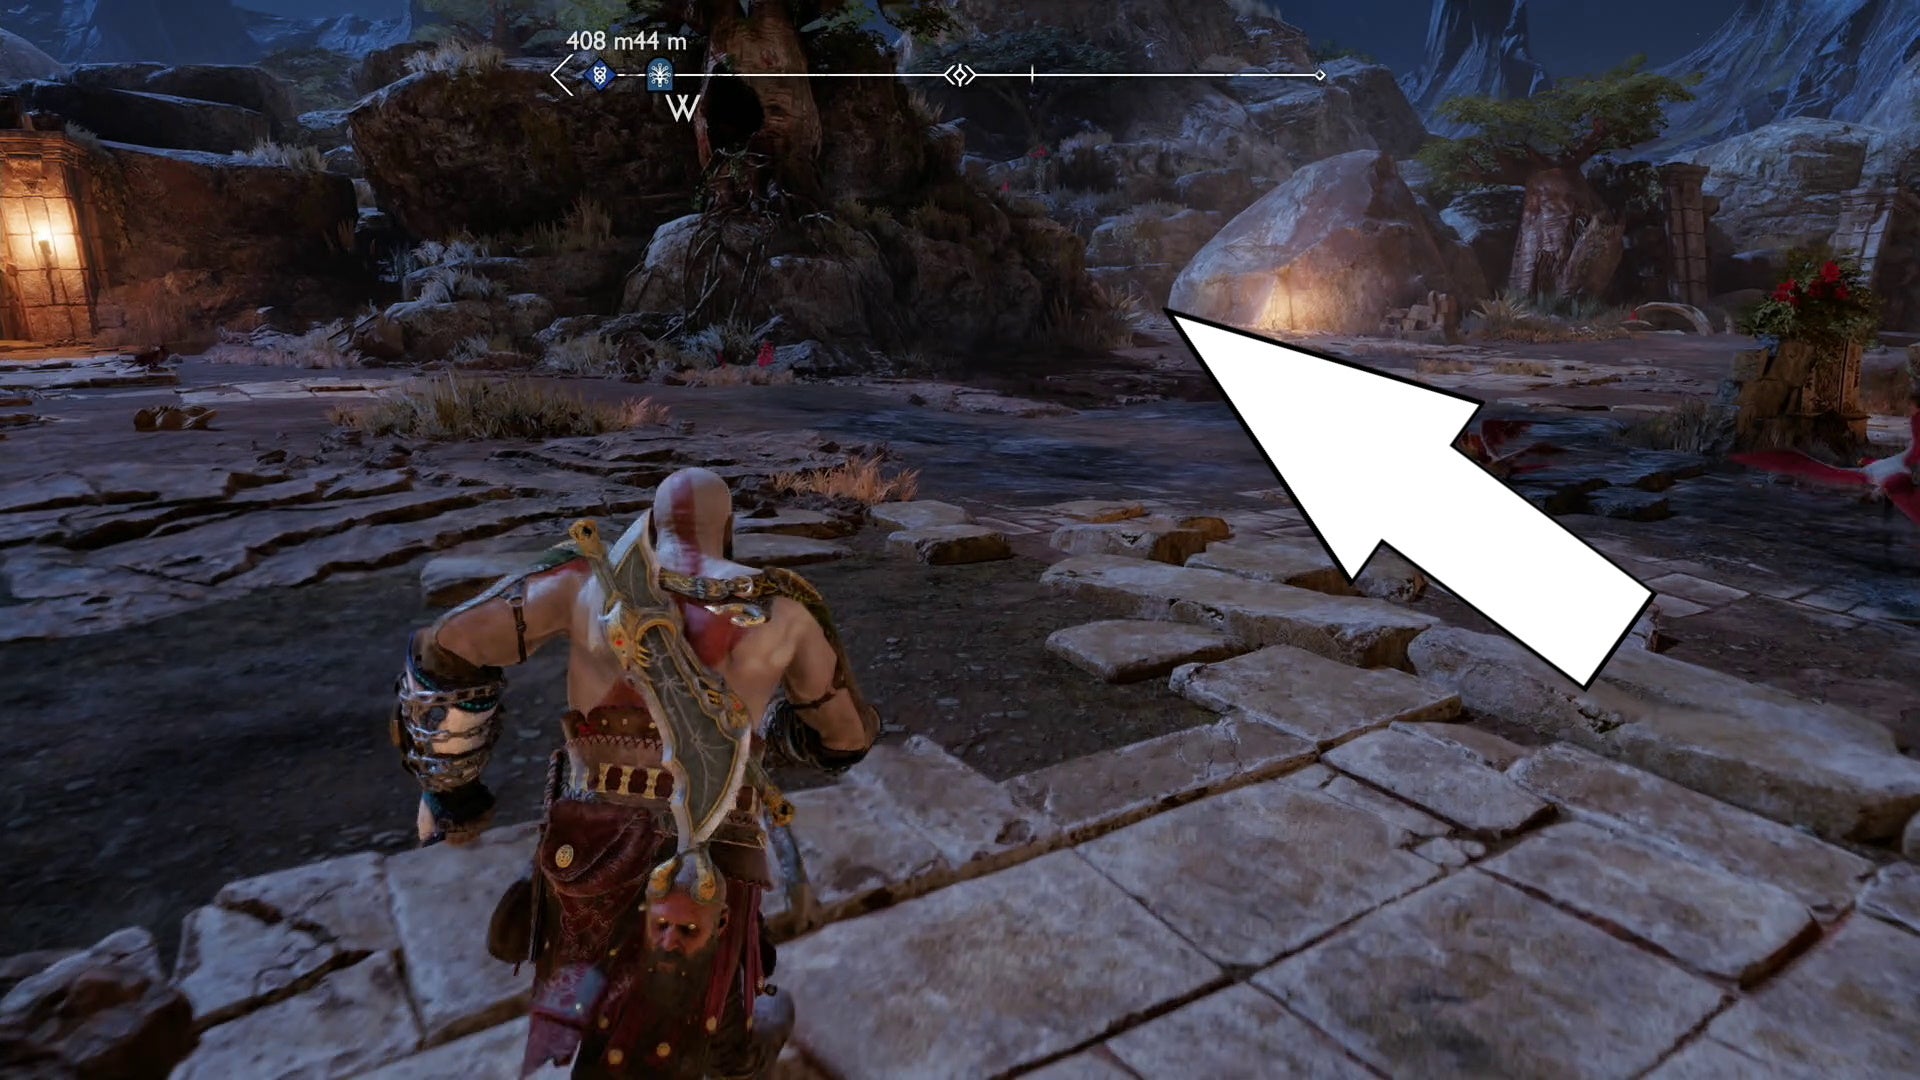
Vanaheim Freyrs Camp Raven location in God of War Ragnarök
The area name is a little misleading, as the Raven at Freyrs Camp isn’t actually close to the camp itself, but north of it, through the doors on the right-hand side of the actual Freyrs campsite and shop area.
You might be able to find it in the day too, but we found the Raven at night, perched on a small tree above a pond by a large blue circle structure. The path is on the left-hand side after exiting the crawlspace that leads to this area.
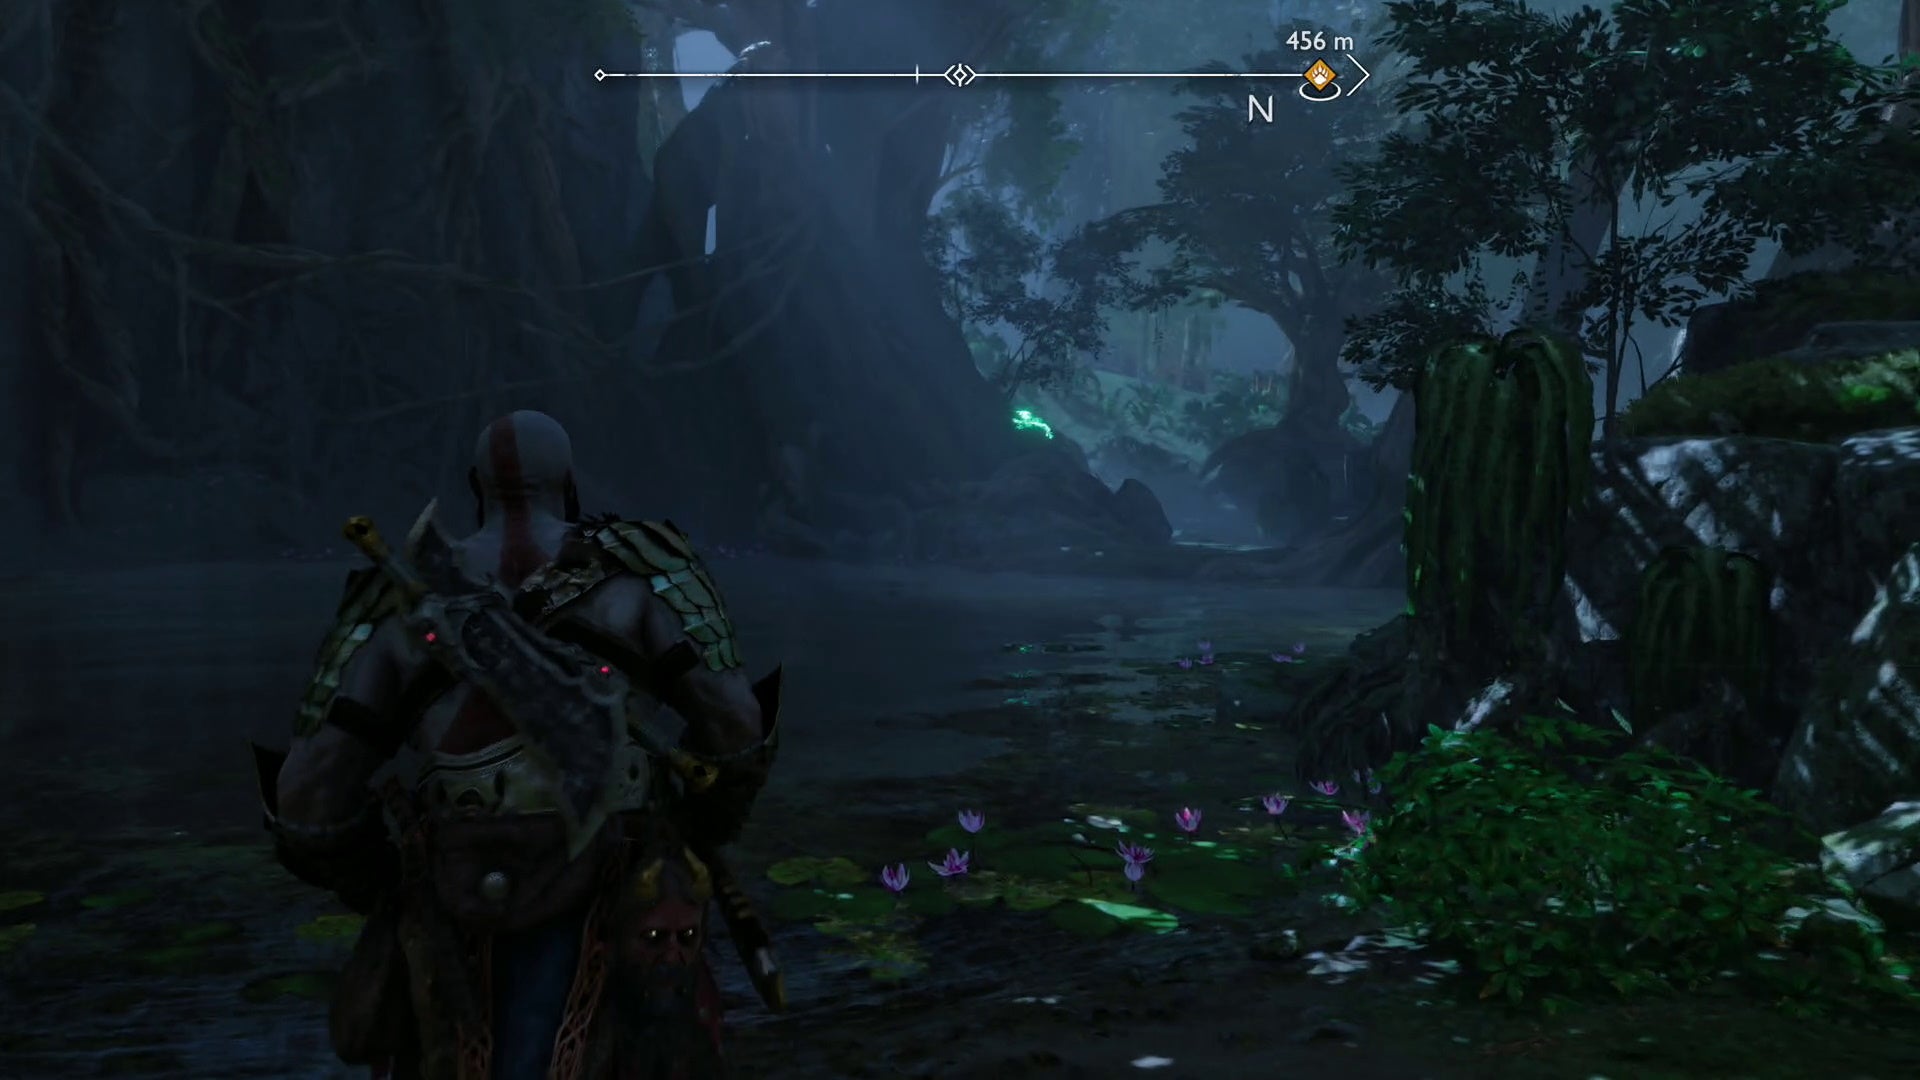
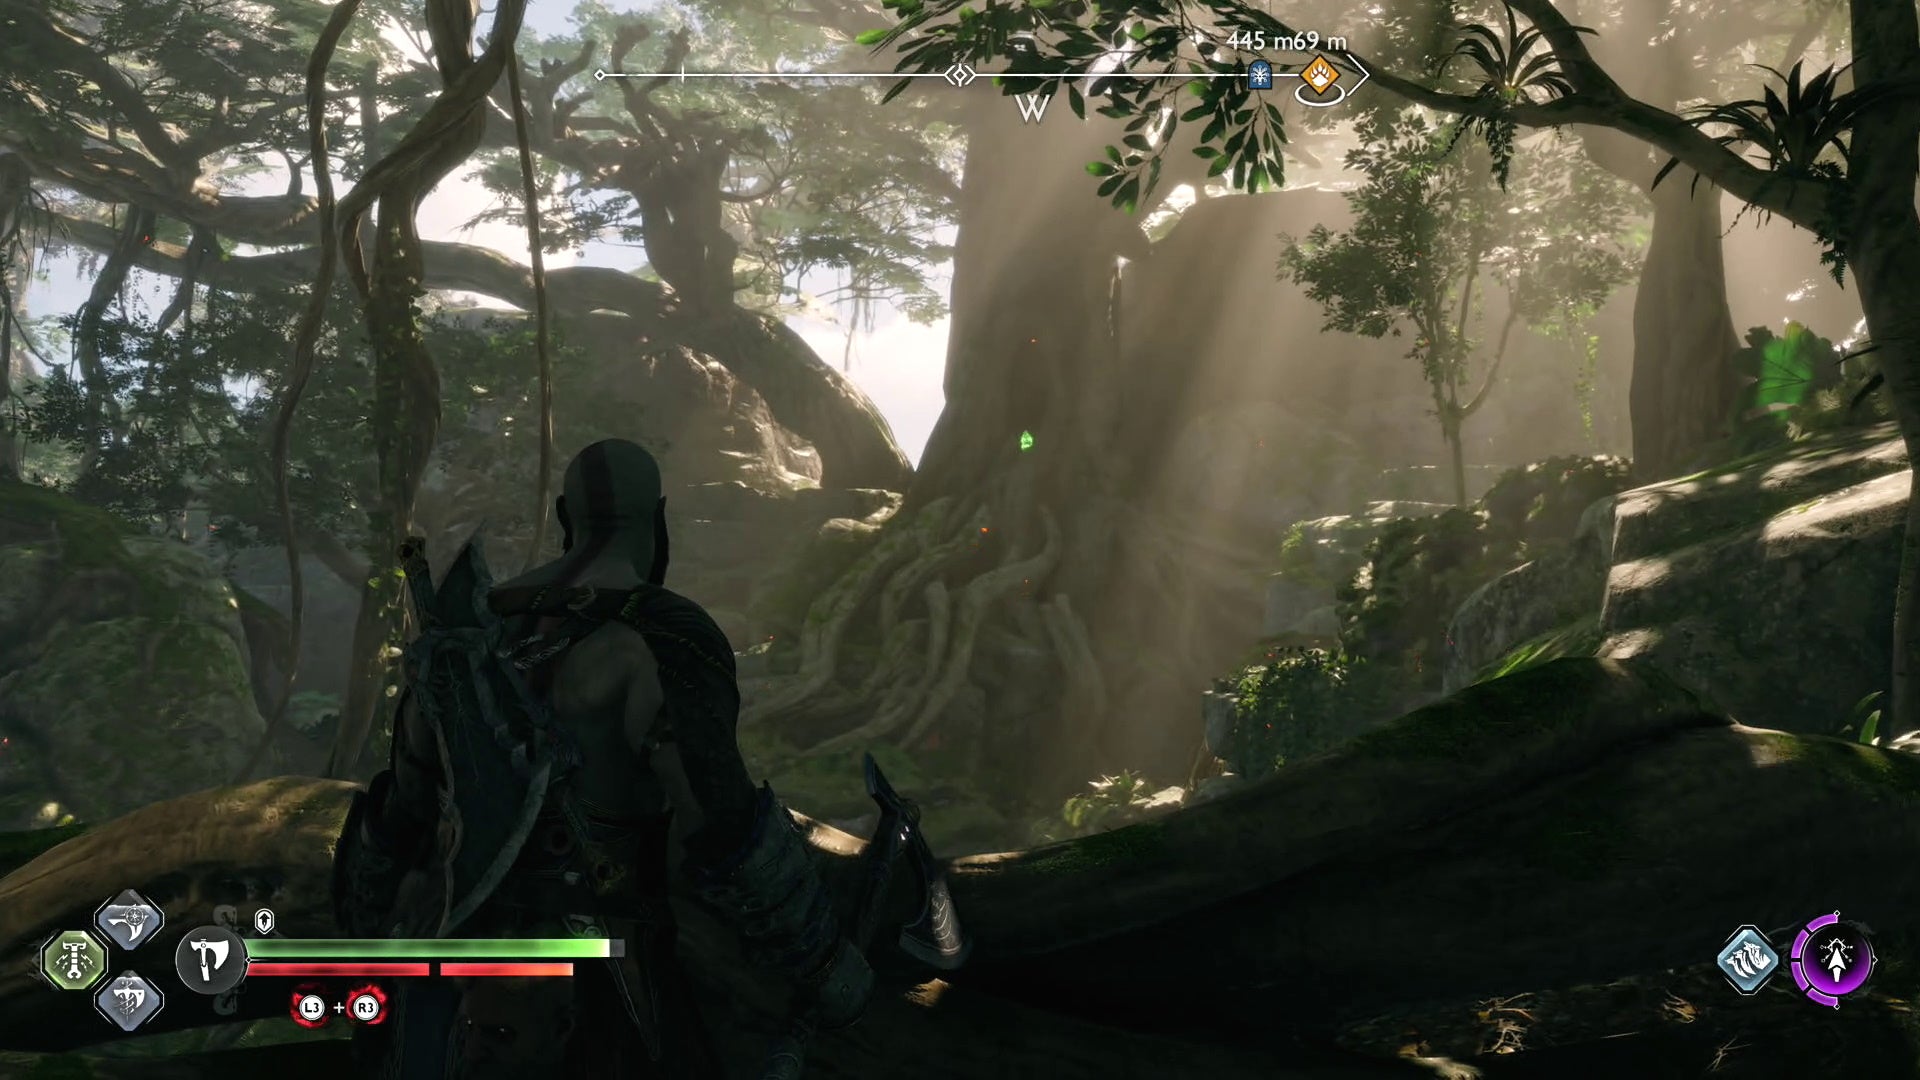
Vanaheim The Jungle Raven location in God of War Ragnarök
You’ll be able to see this Jungle Raven in the crater area of Vanaheim, but to access it, you’ll have to bring water back to the valley by completing the ‘Return of the River’ Favour picked up in The Jungle area to be able to take your boat to it.
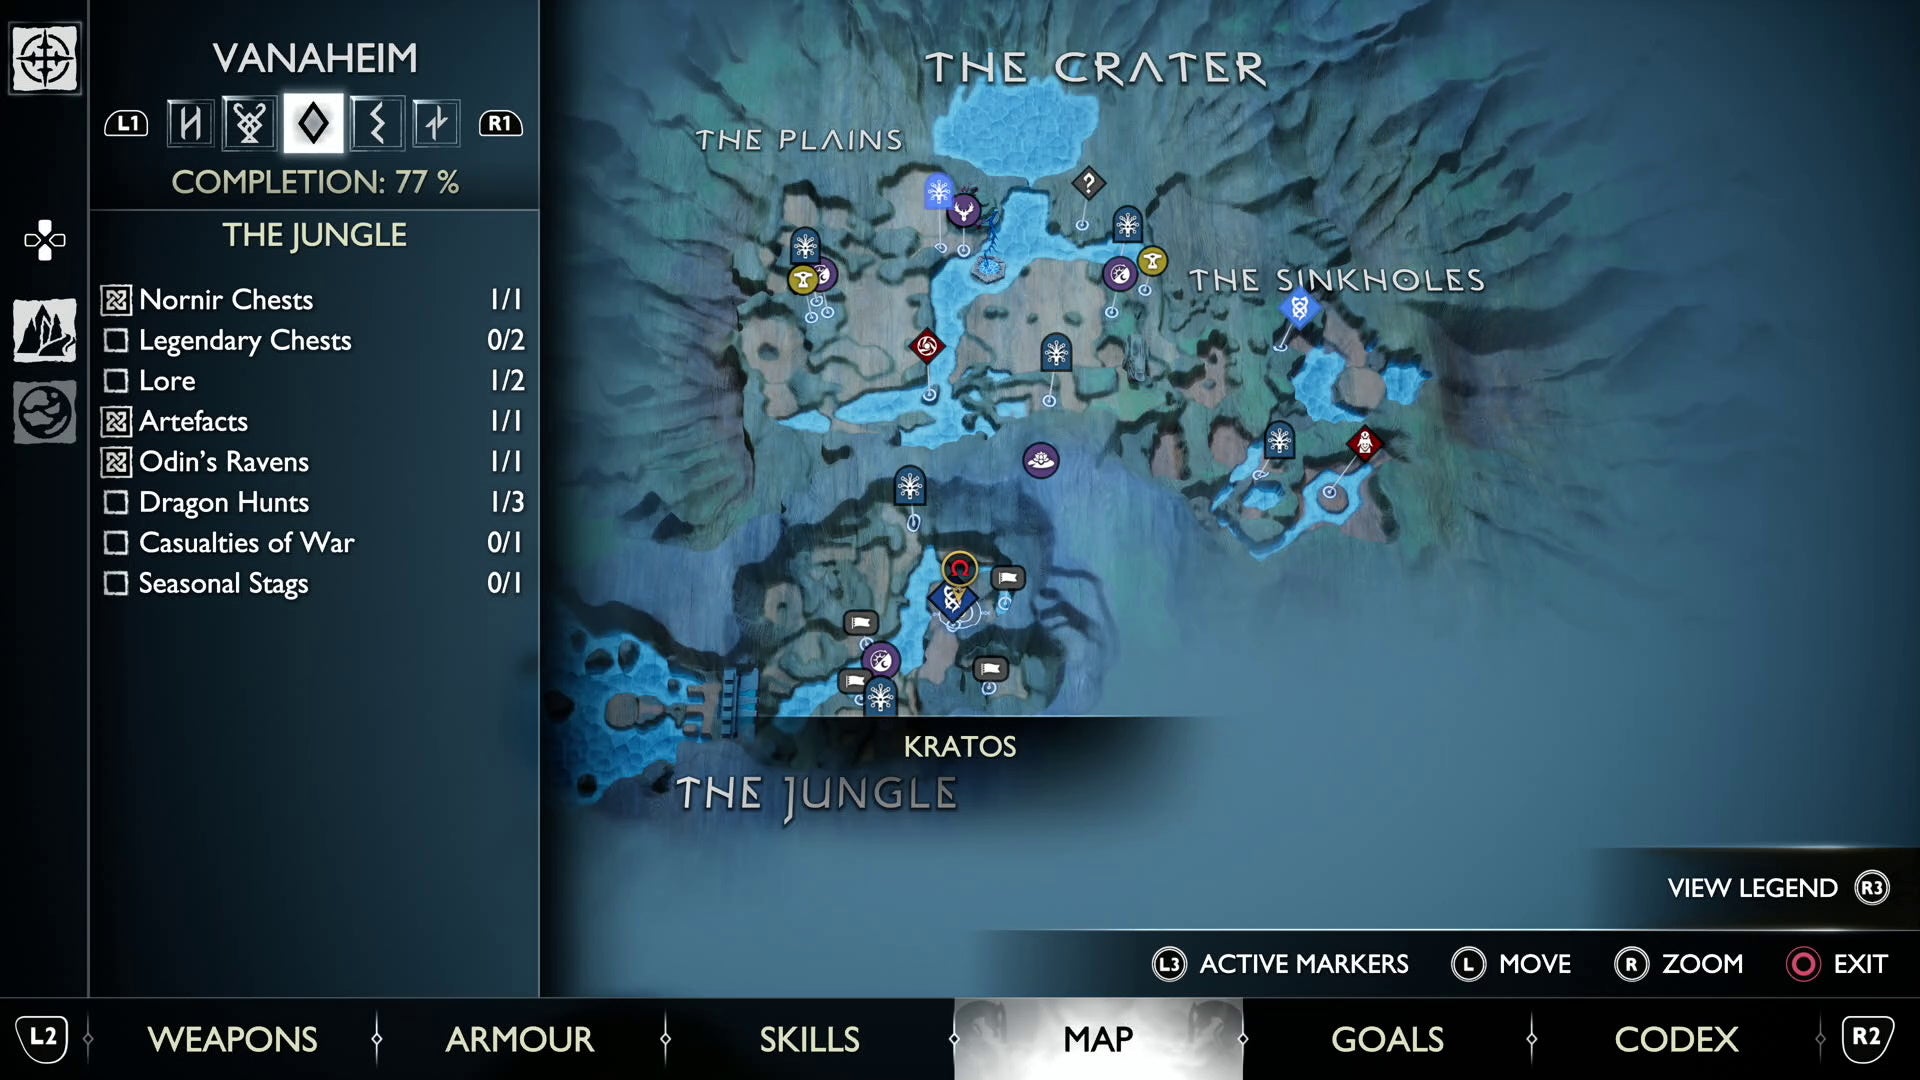
Vanaheim The Plains Raven location 1 in God of War Ragnarök
Once you restore water to the crater by completing the ‘Return of the River’ Favour in The Jungle Area of the crater in Vanaheim, you can get this Plains Raven by taking the boat to the left at the entrance to The Jungle. Jump down to the area after docking the boat and kill the Dreki before trying to get the Raven on the other side of the gap.
Vanaheim The Plains Raven location 2 in God of War Ragnarök
This second Plains Raven in the crater area of Vanaheim is located down a small gap in the northeastern area of The Plains. In the area just down and northwest of the Mystic Gateway.
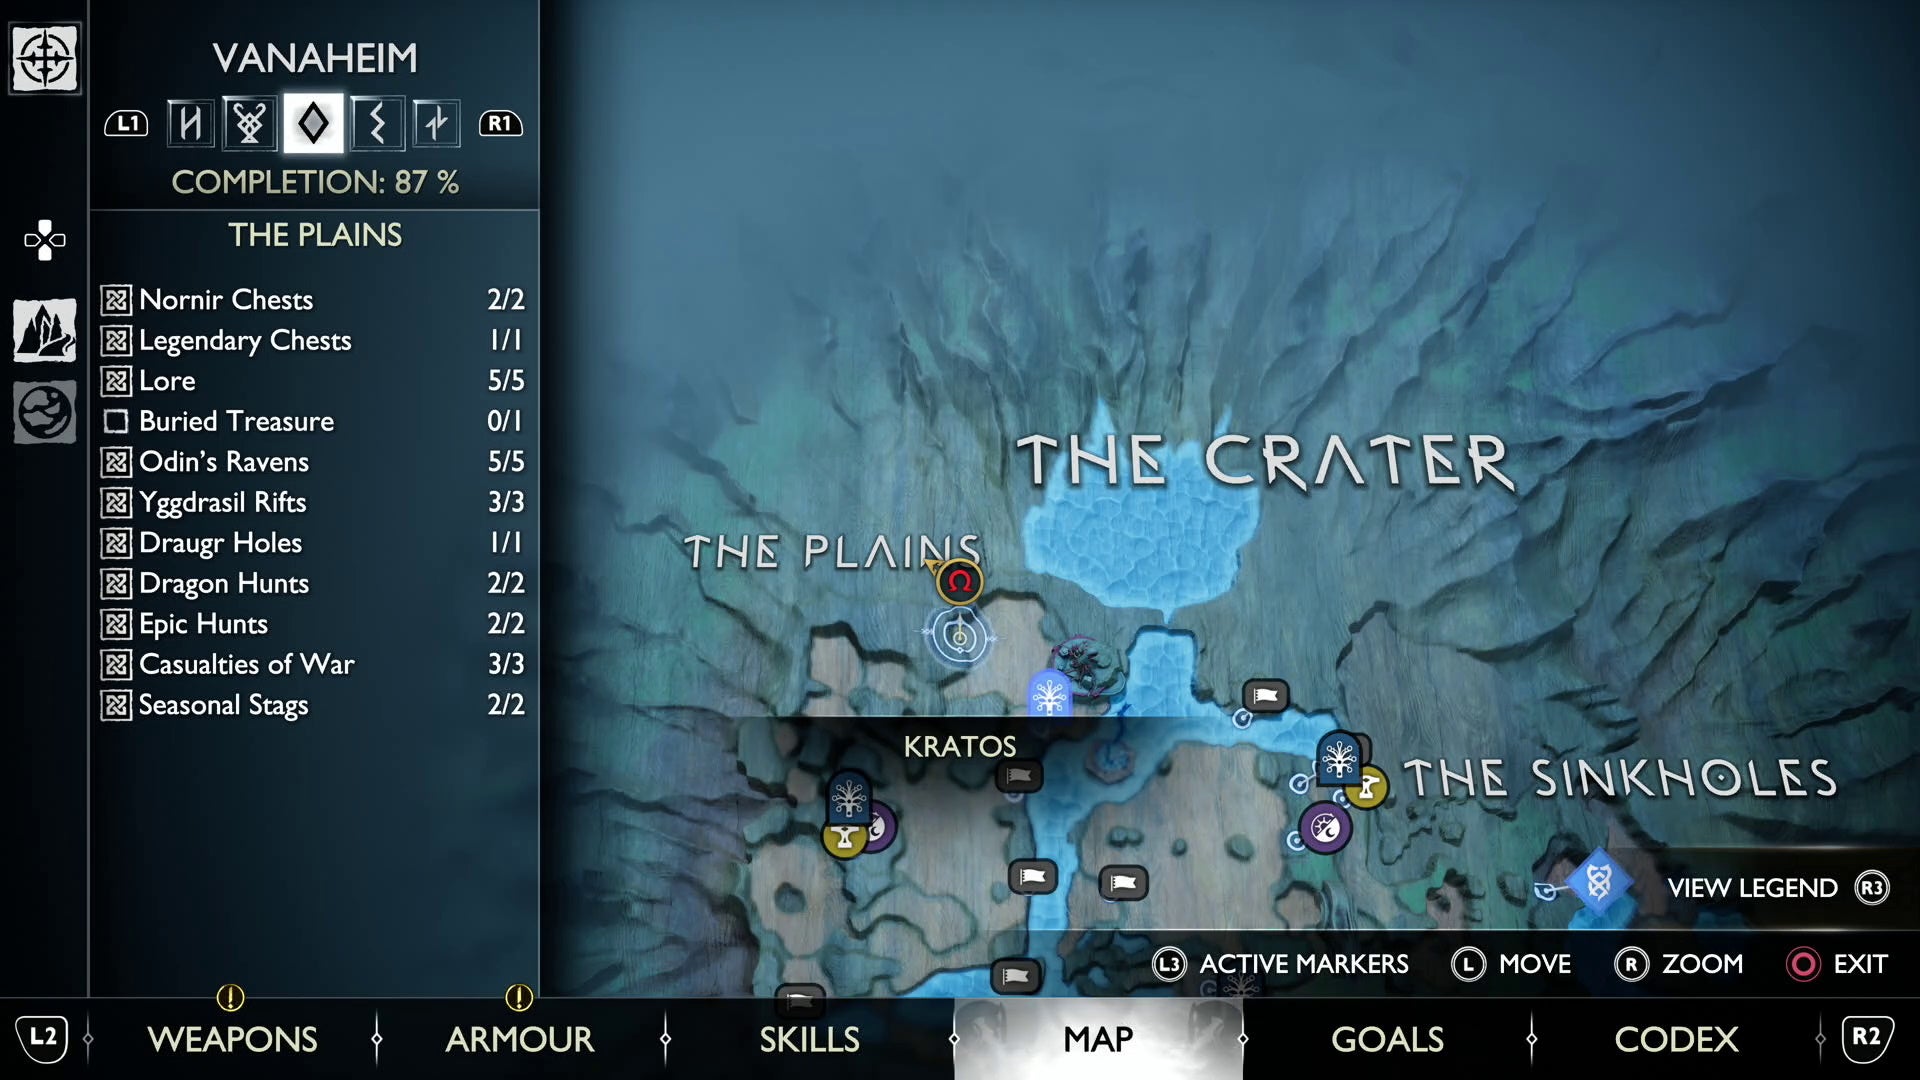
The Raven is perched inside the gap, which is to the right of the crack in the cliff that you can crawl through.
Vanaheim The Plains Raven location 3 in God of War Ragnarök
The third Plains Raven located in the northwestern area of The Plains in the carter of Vanaheim, opposite the poisoned gate that leads to a Nornir Chest.
The Raven is perched in the gap below the red chest that you can jump to.
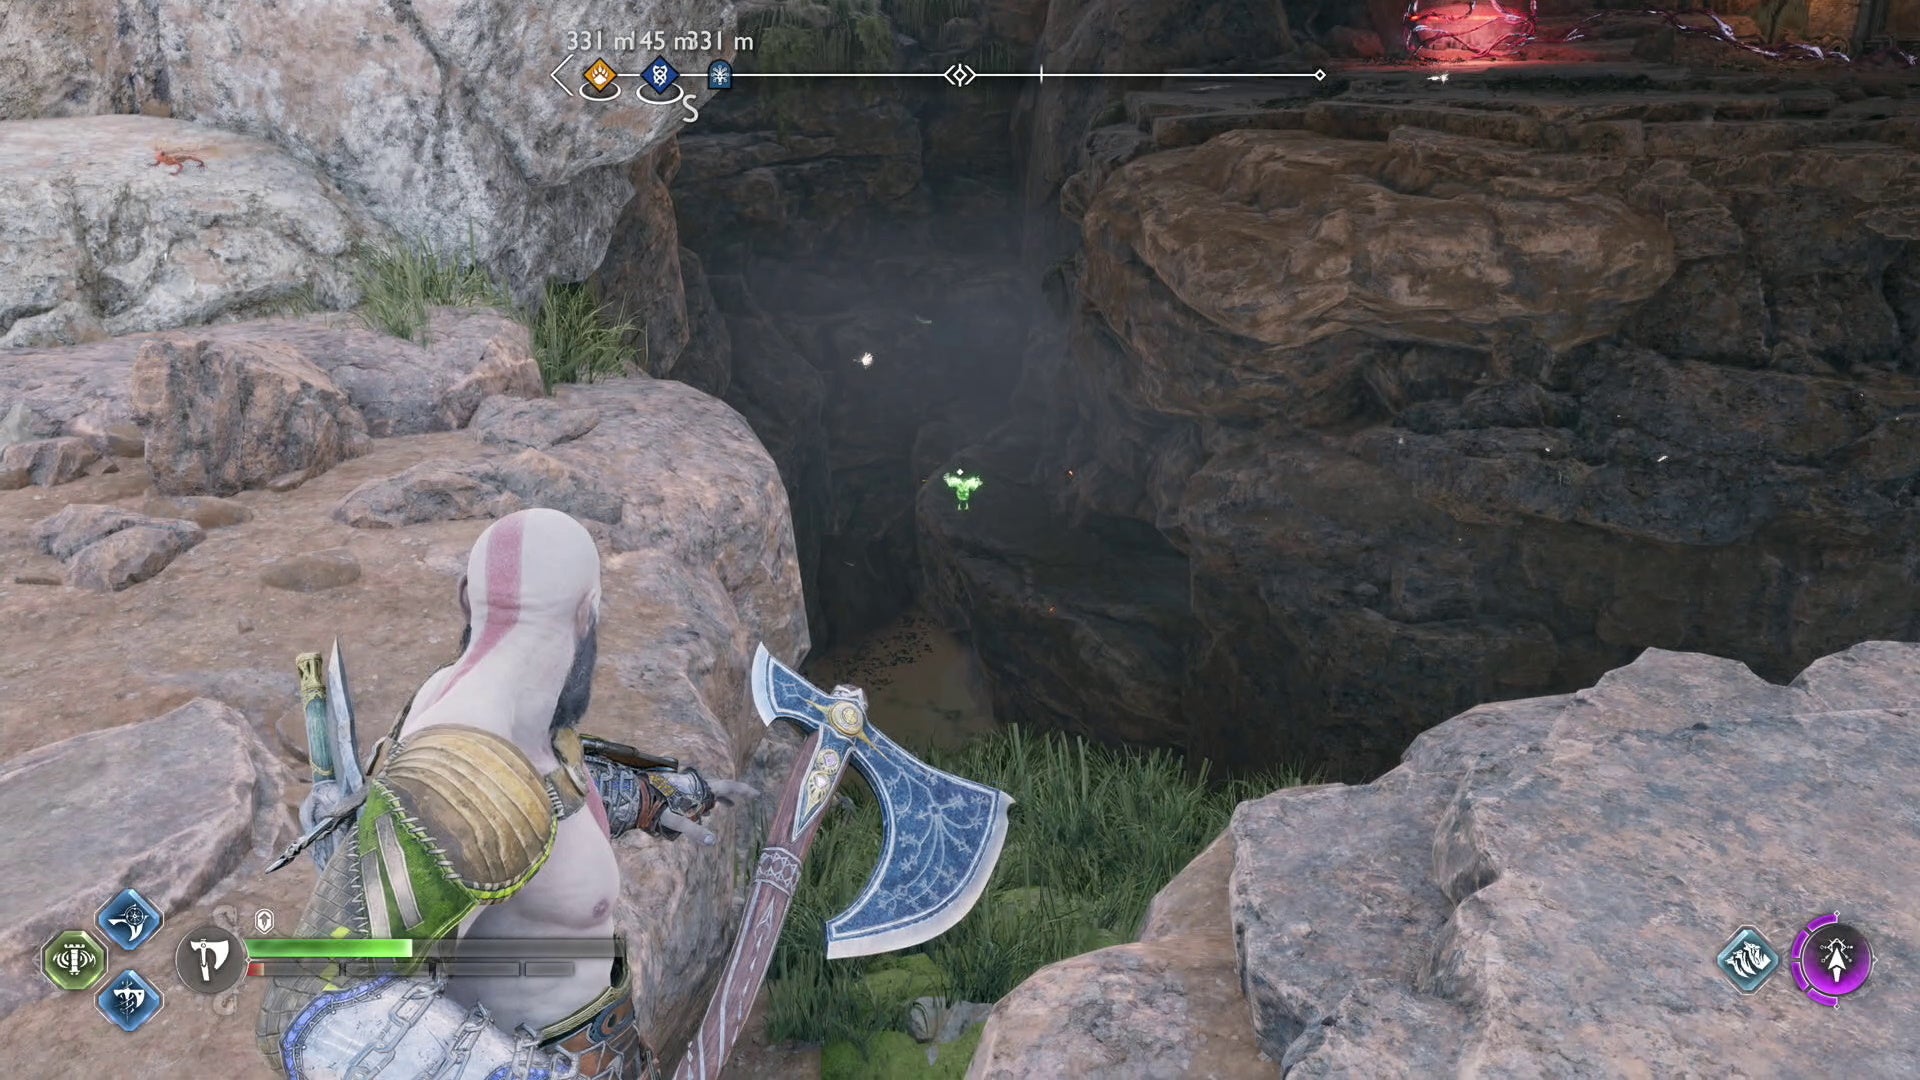
Vanaheim The Plains Raven location 4 in God of War Ragnarök
The fourth of Odin’s Ravens in The Plains area of the crater in Vanaheim is perched on top of a cliff in the middle of The Plains. You can see if looking to the west of the frozen lightning bolt in the middle.
Vanaheim The Plains Raven location 5 in God of War Ragnarök
The last Plains Raven in the crater area of Vanaheim is easily spotted if looking at the chest of forgotten materials across from the shop in the eastern area of The Plains.
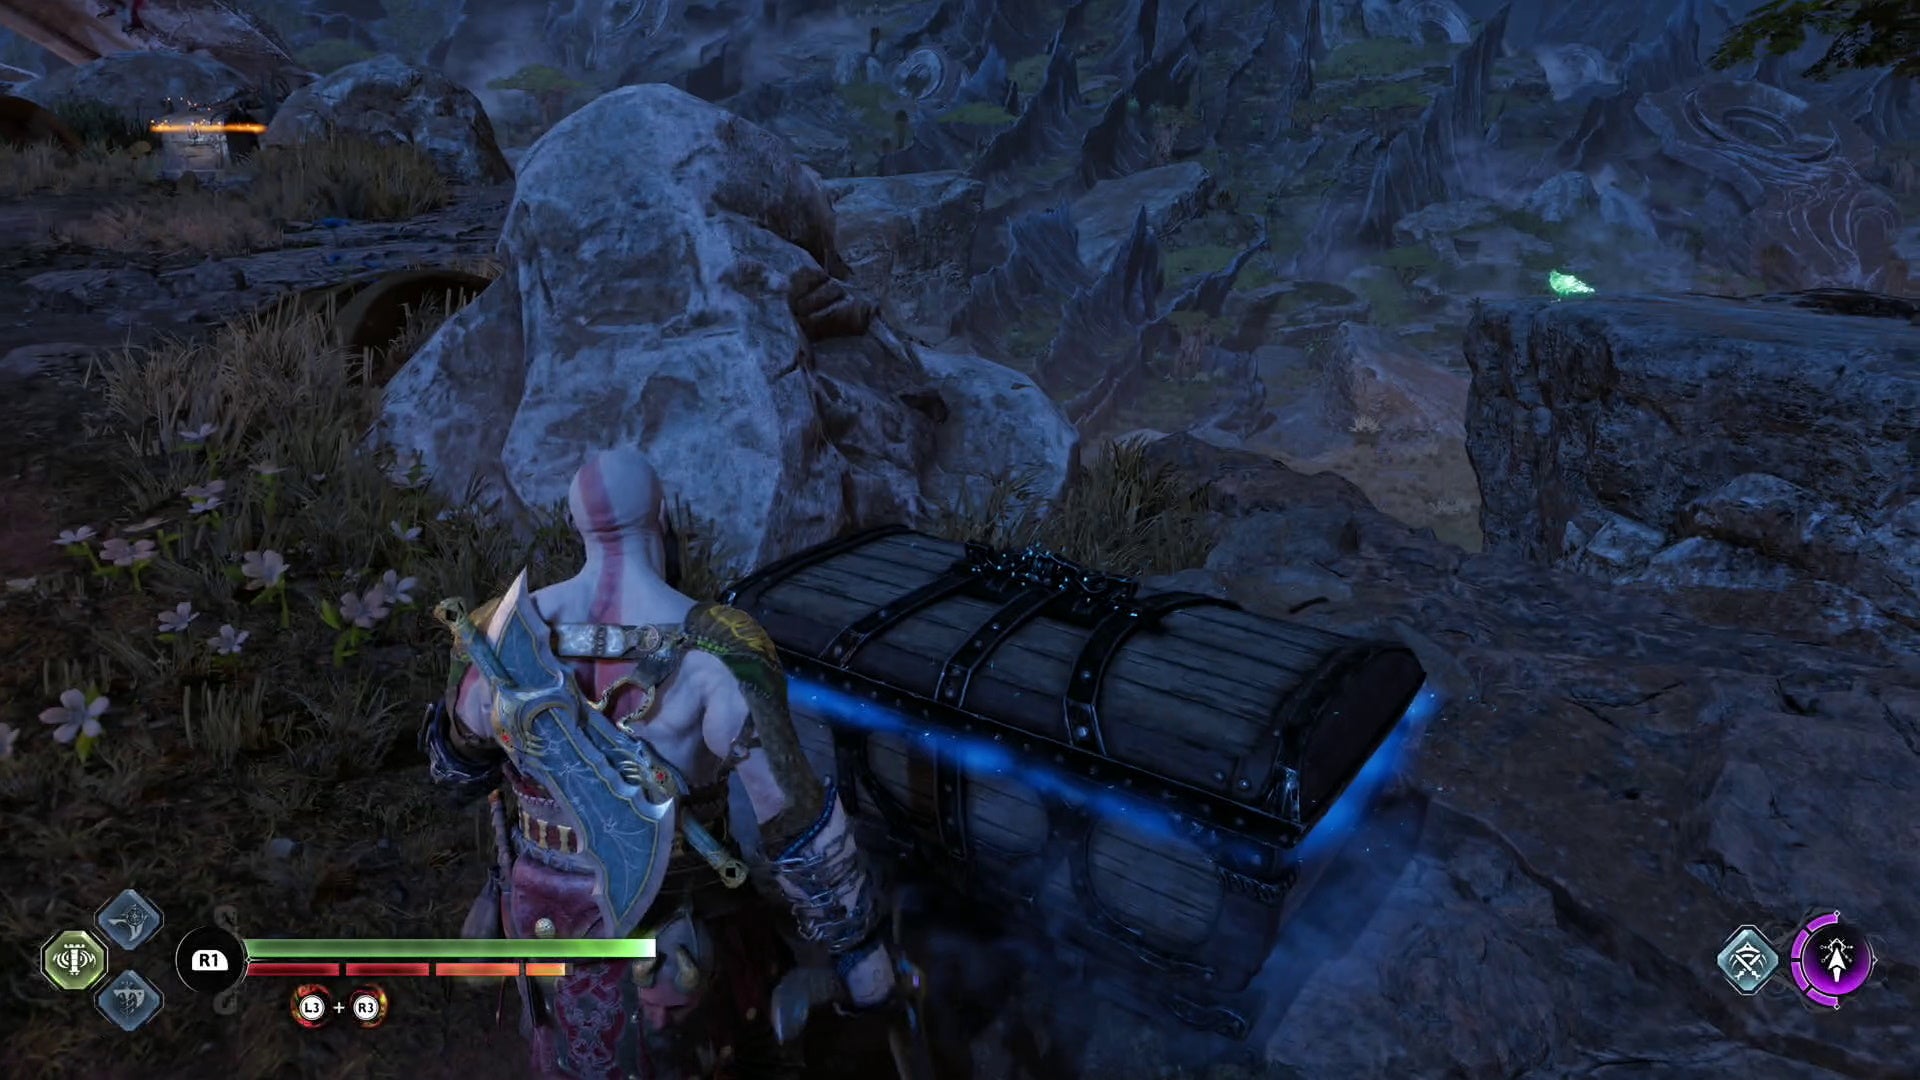
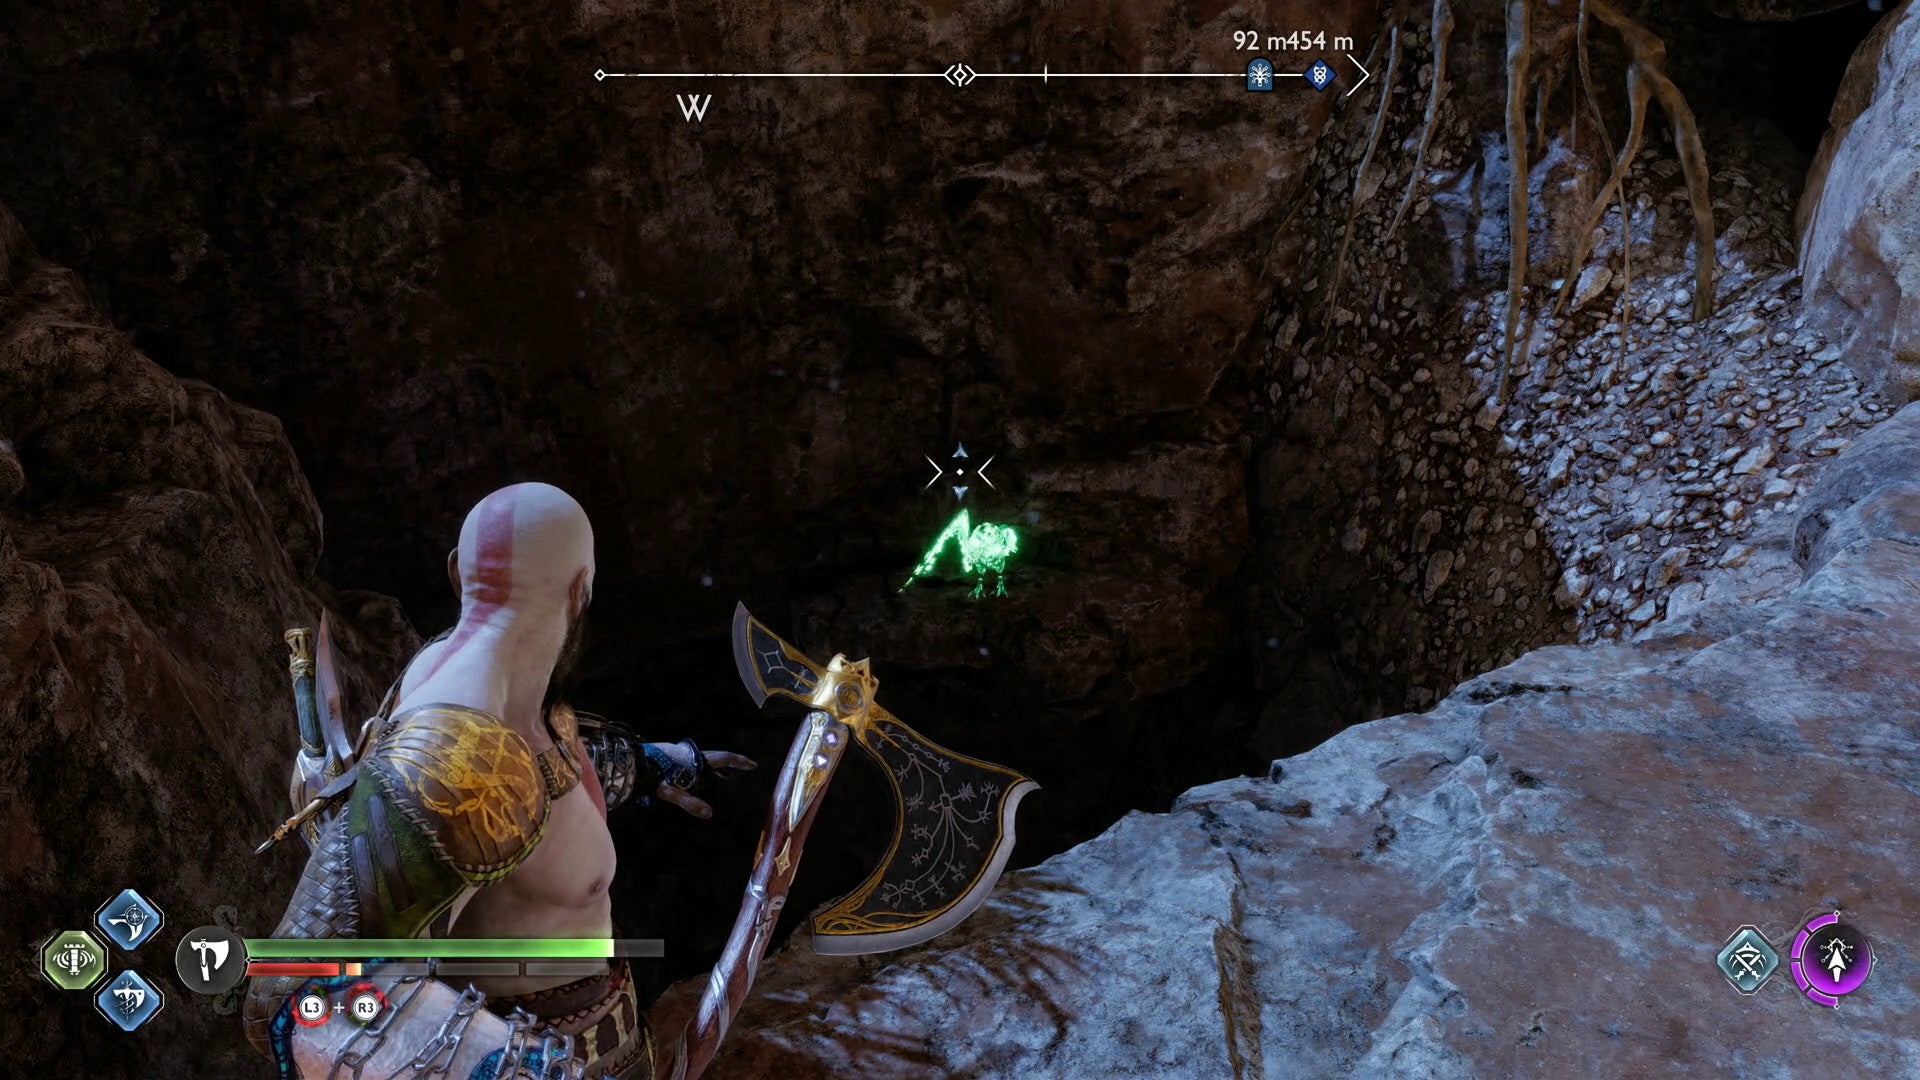
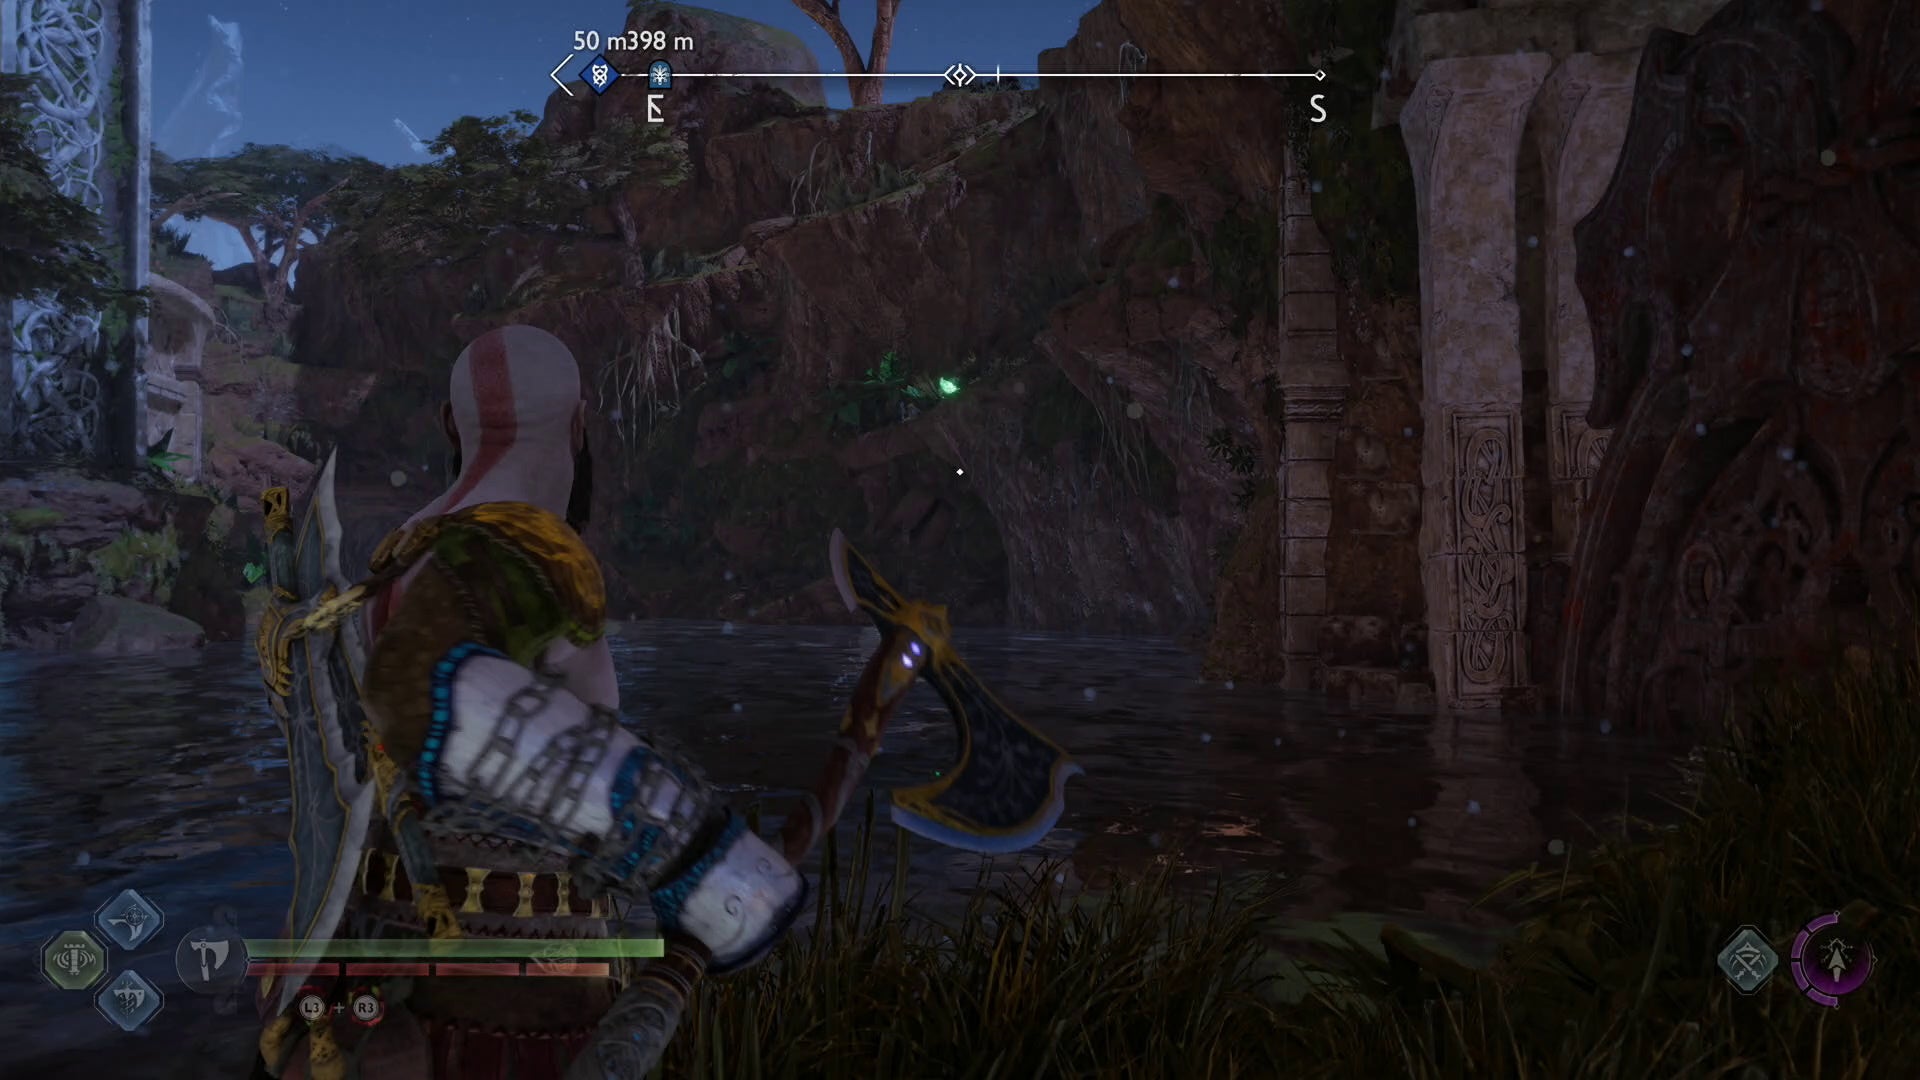
Vanaheim The Sinkholes Raven location in God of War Ragnarök
Once you’ve completed the ‘Return of the River’ Favour picked up in The Jungle area of the crater in Vanaheim, you can take a boat down the path to the left of the Mystic Gate by the Berserker Gravestone in The Sinkholes.
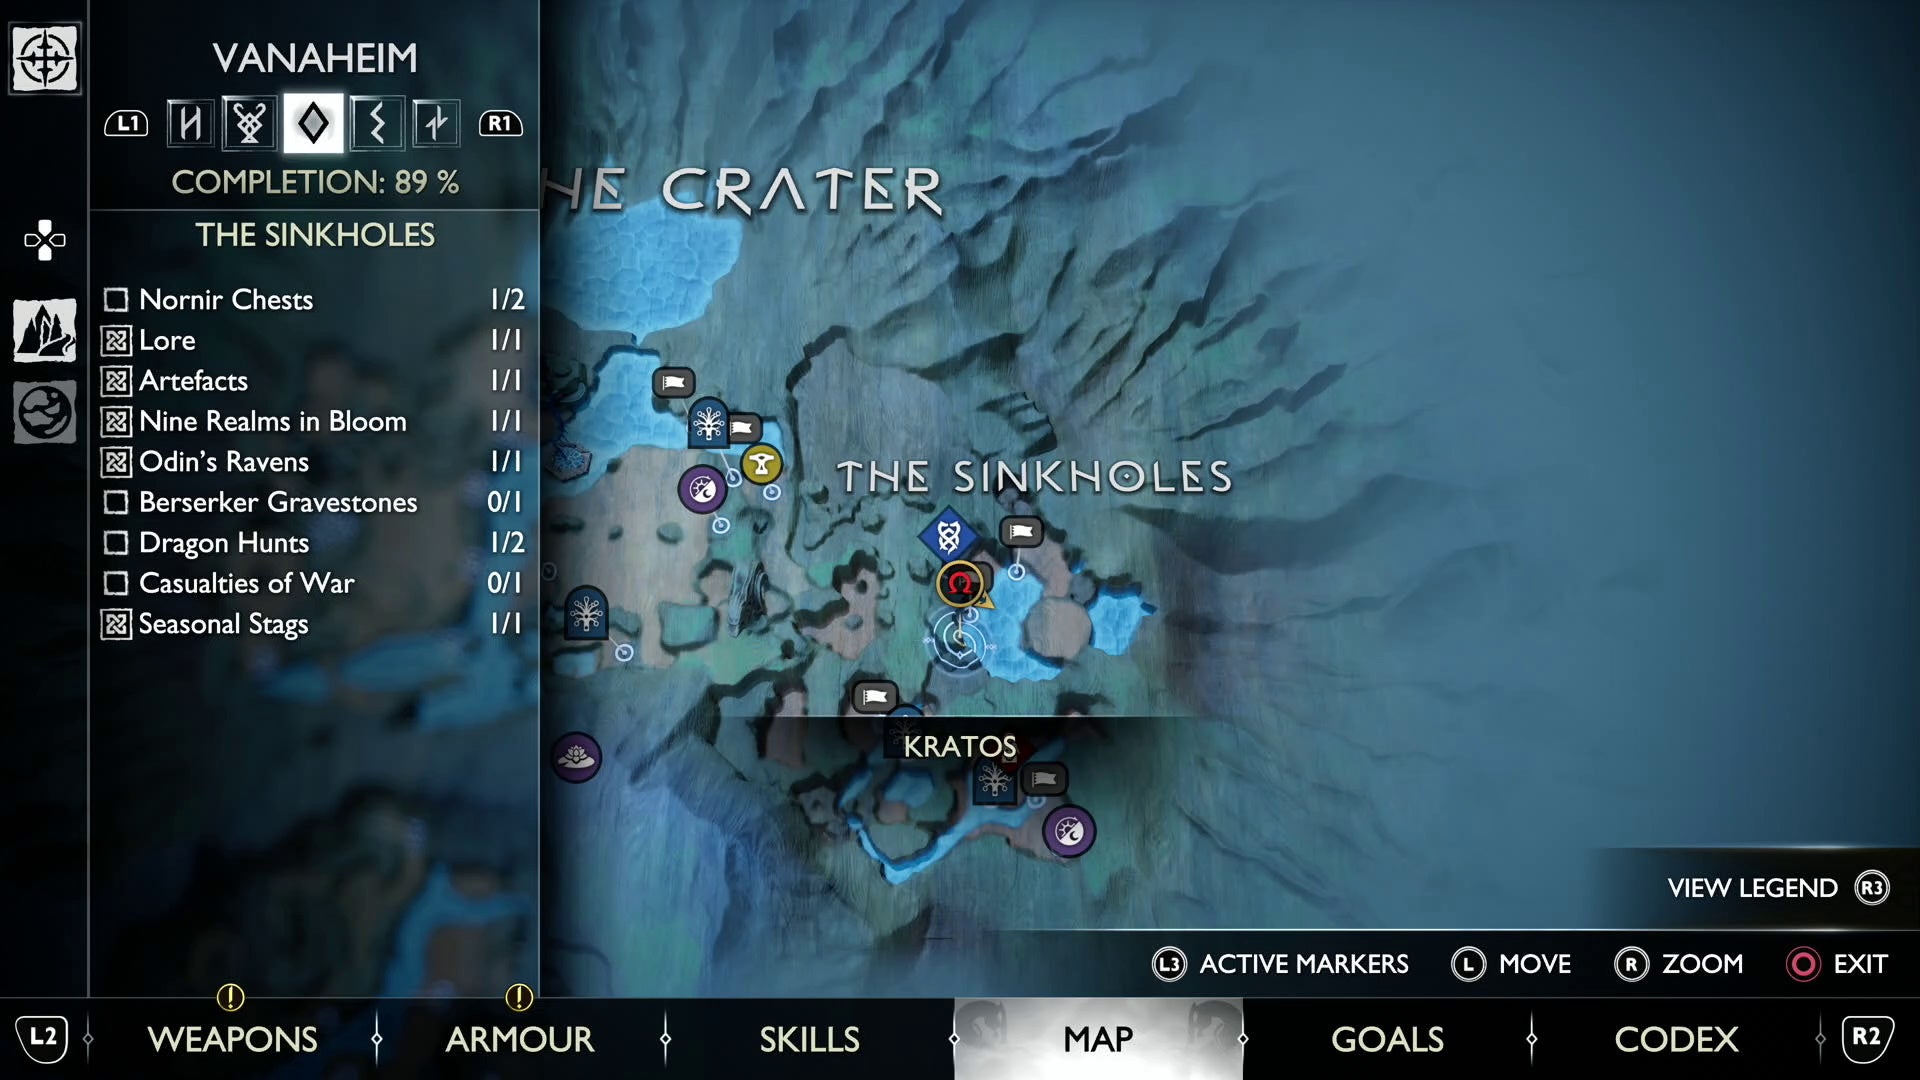
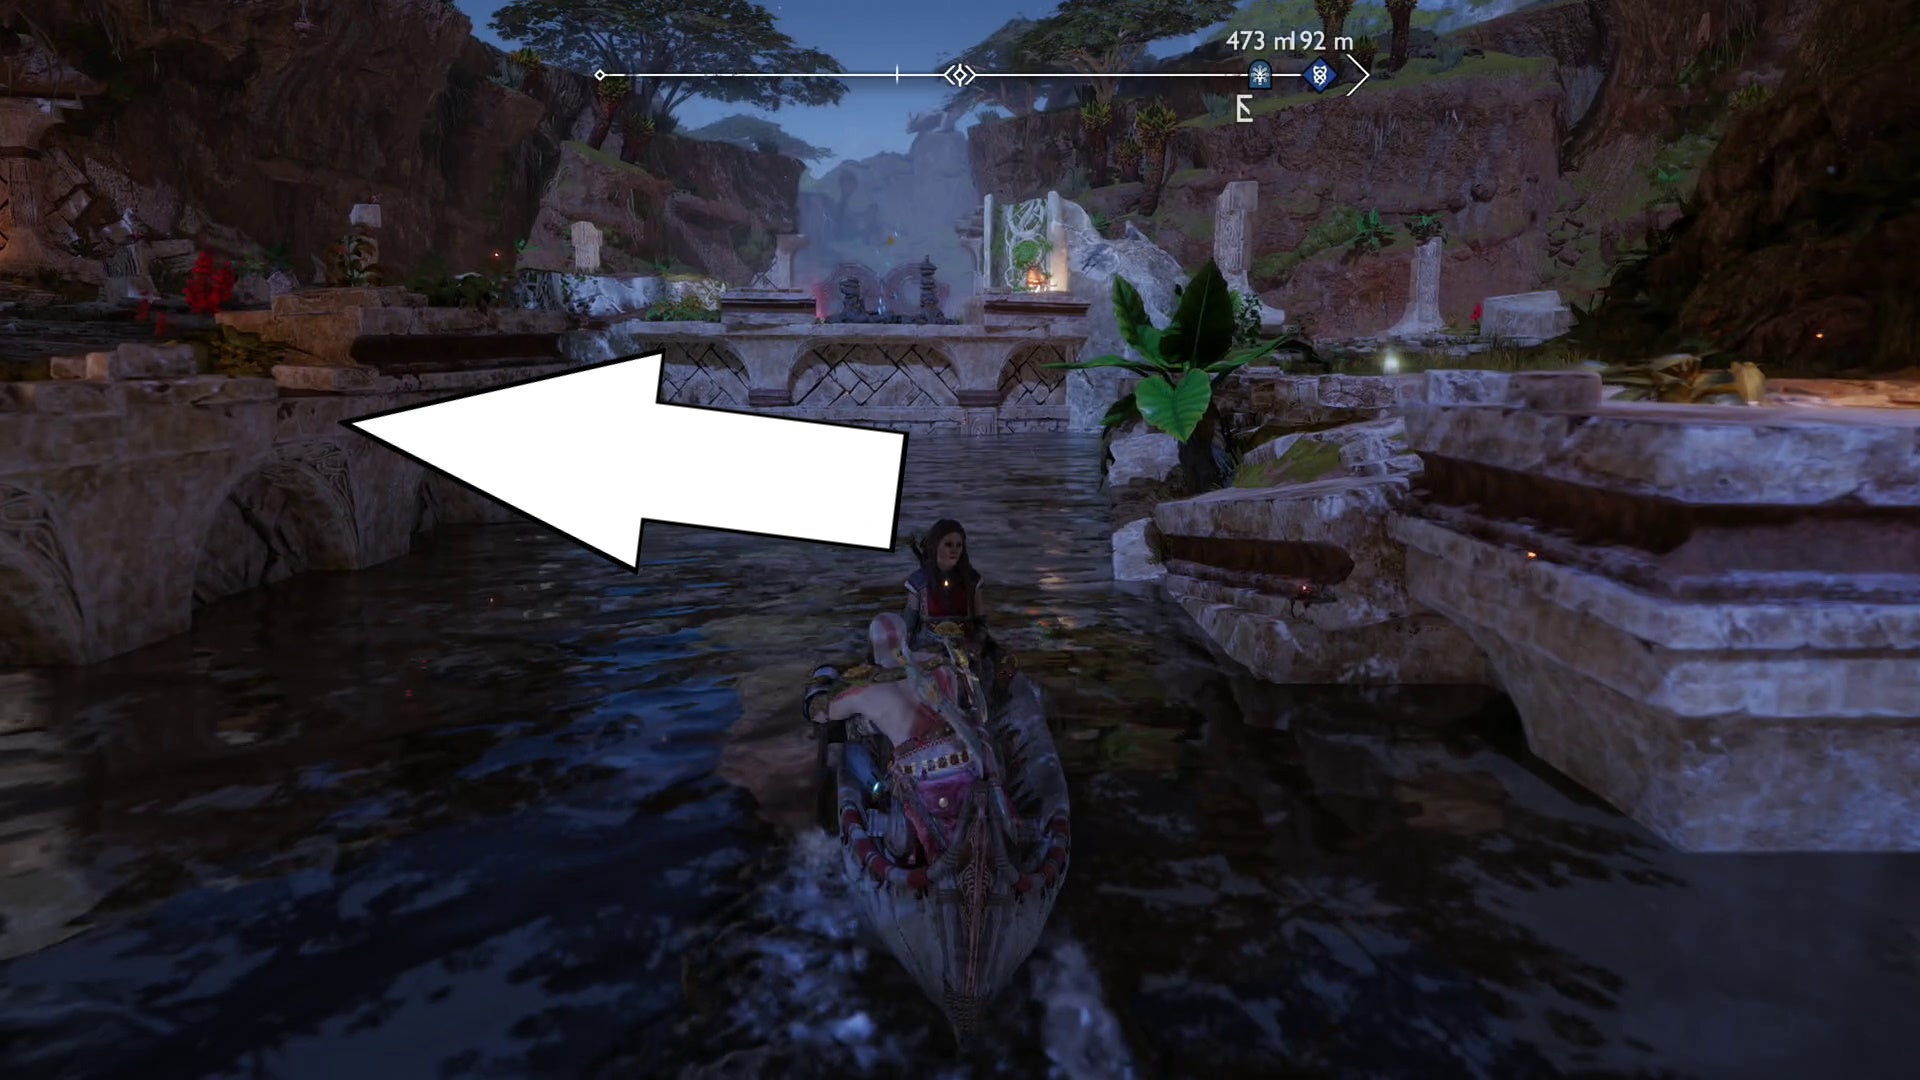
At the end of this river, dock the boat and turn around to see the Raven perched on the cliffside opposite, to the left of the chain that opens up an alternate route out of this area.
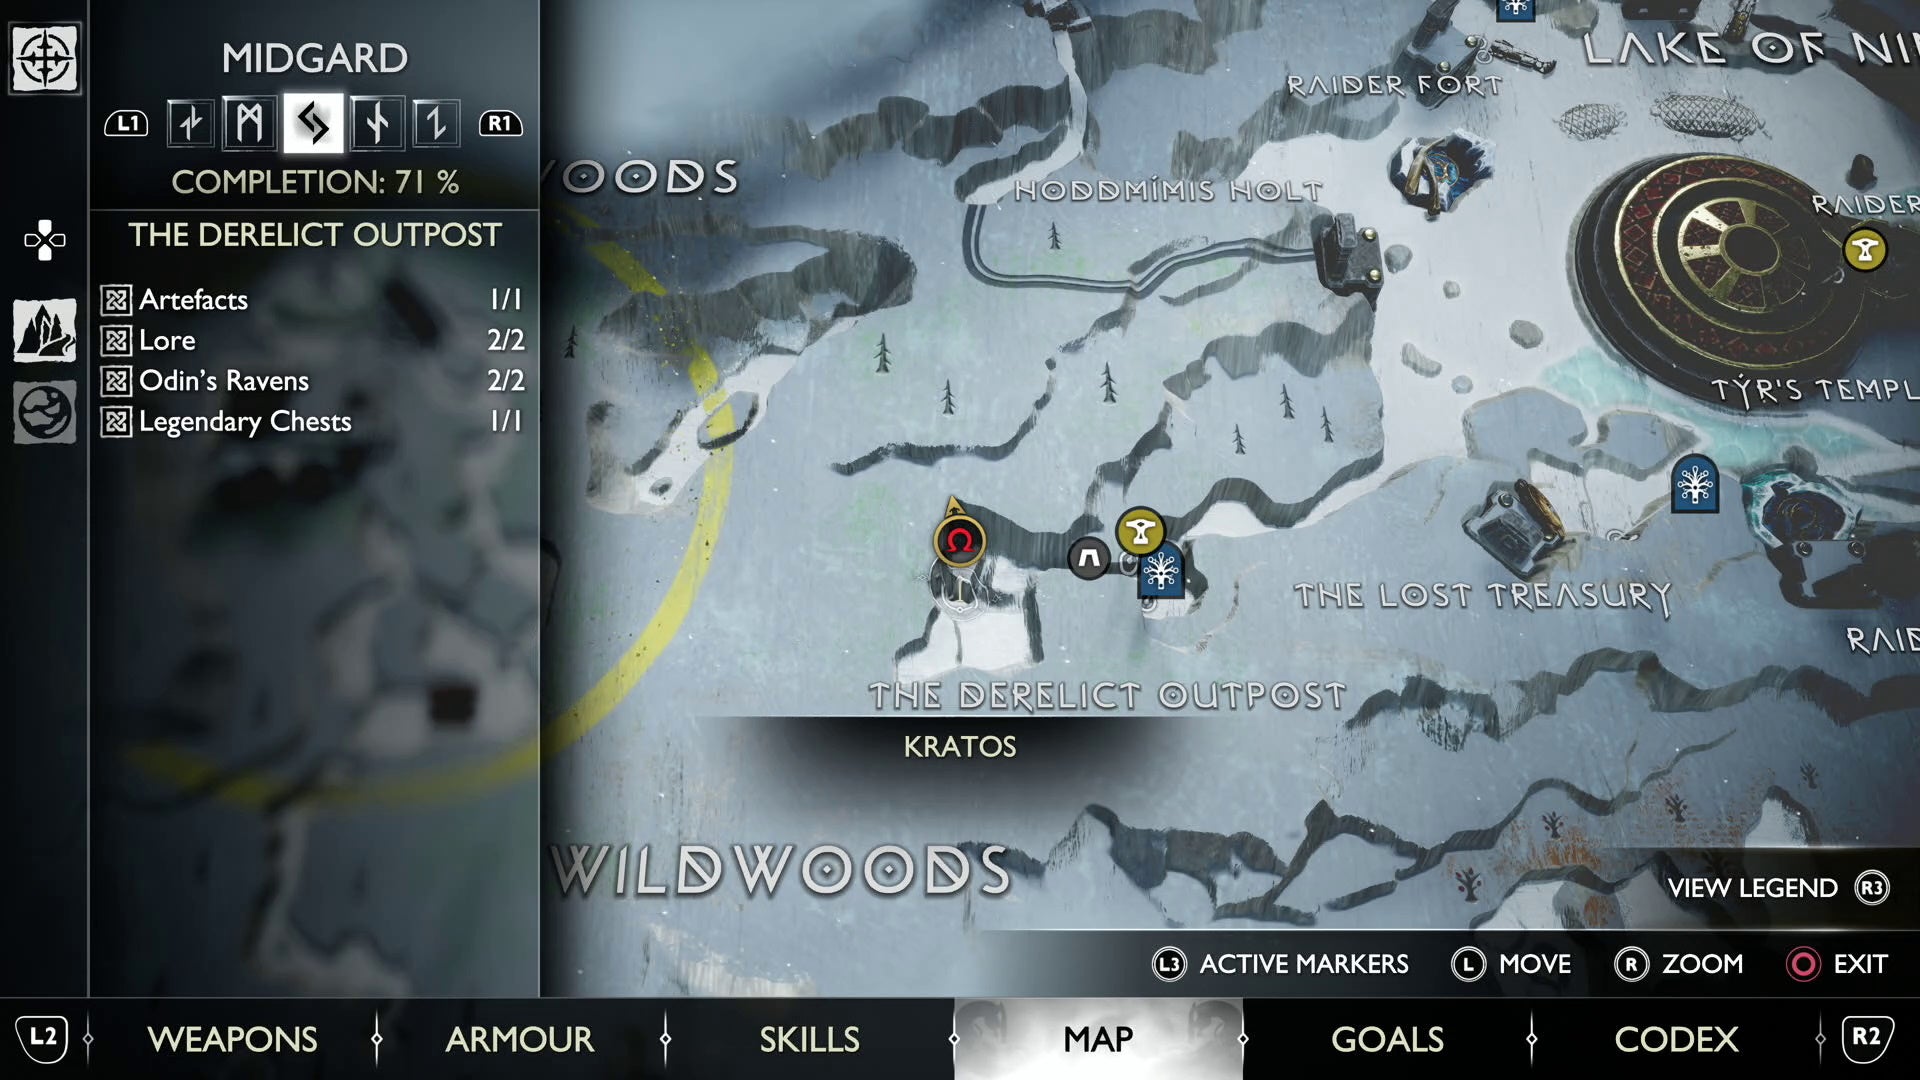
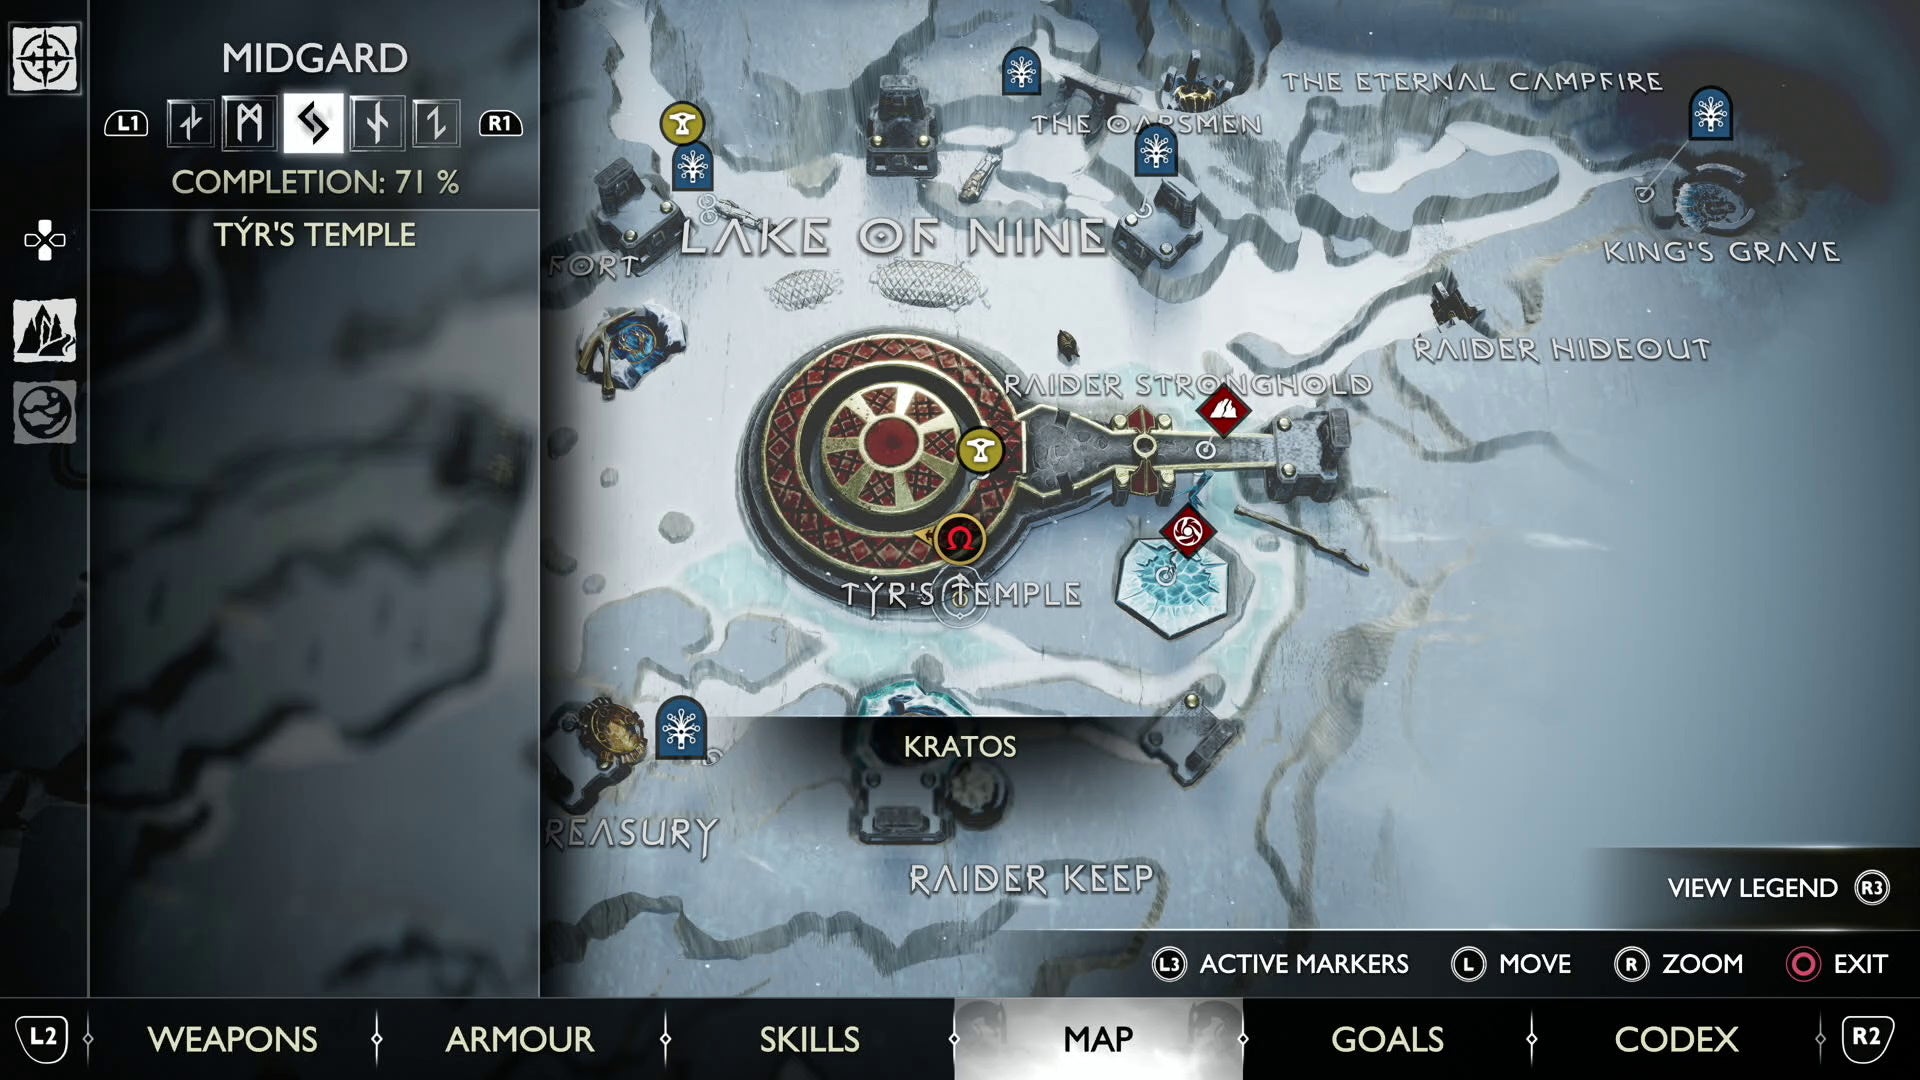
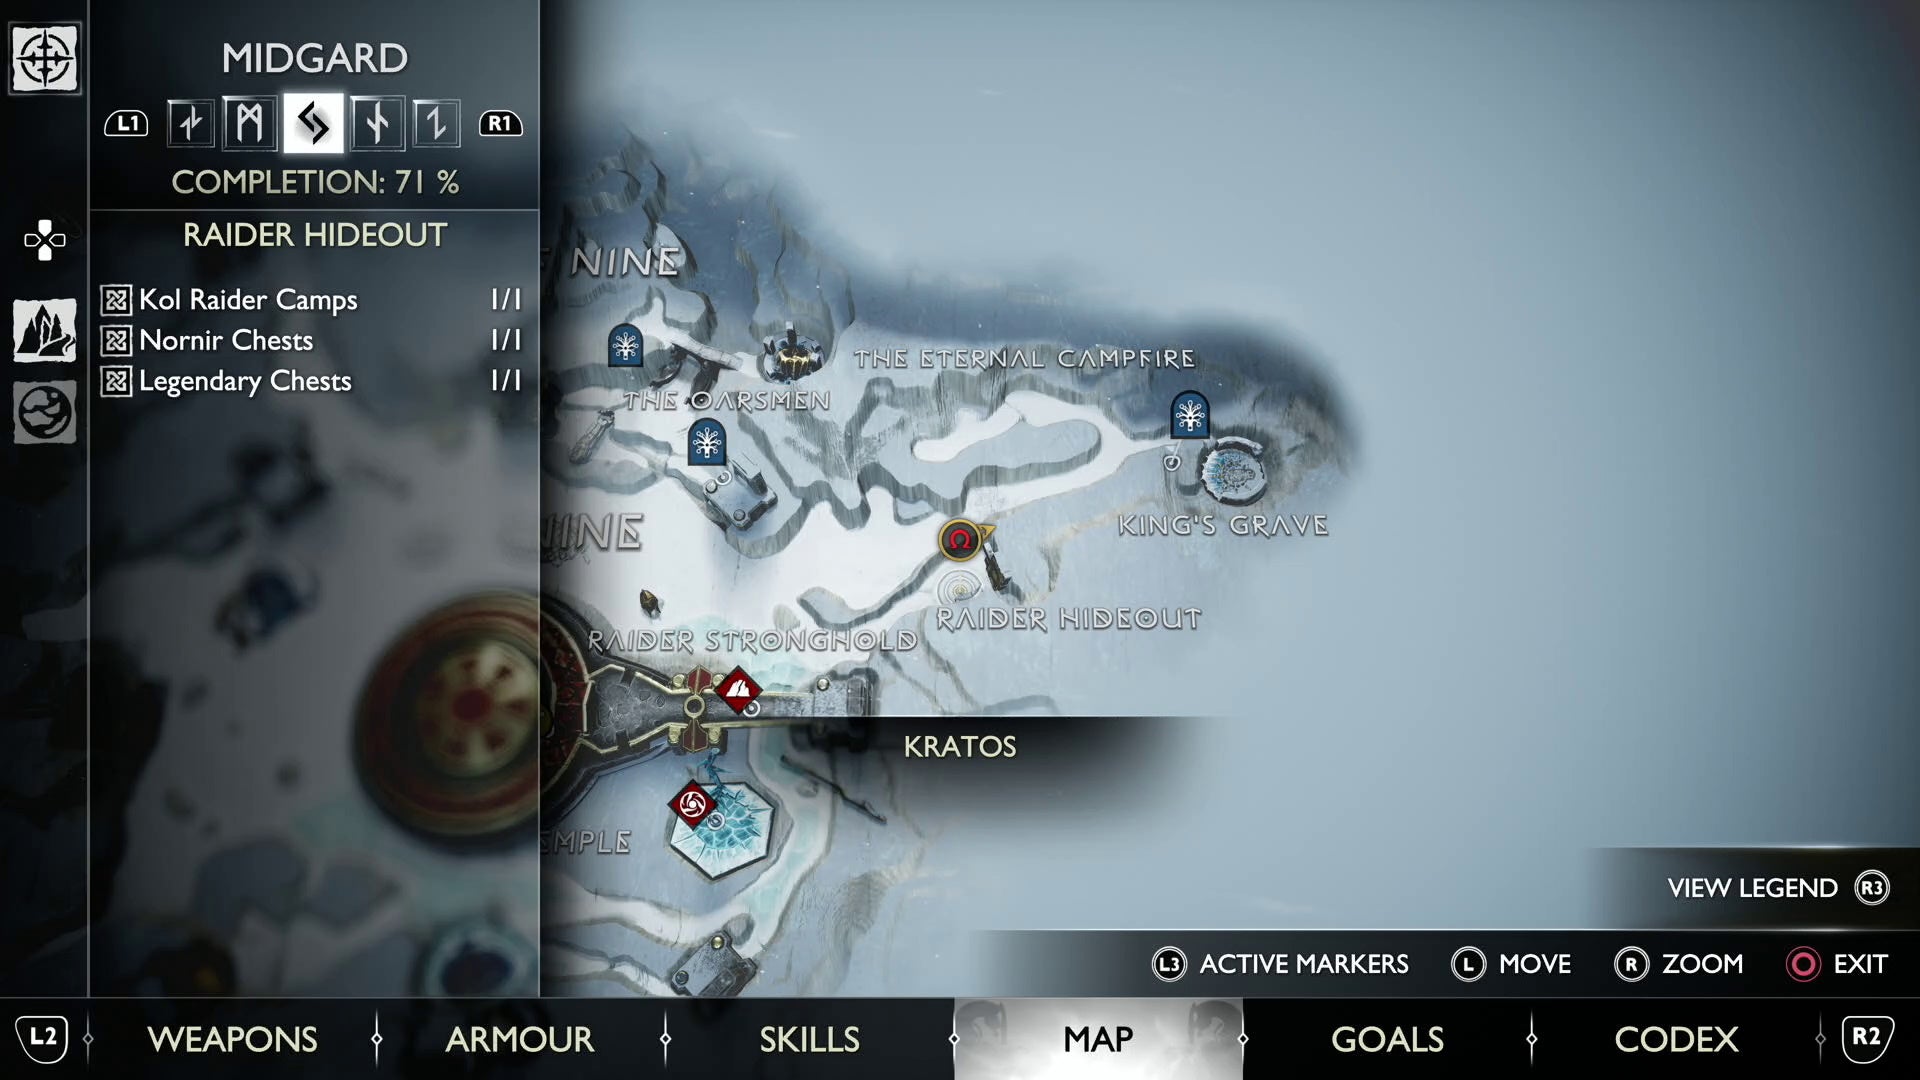
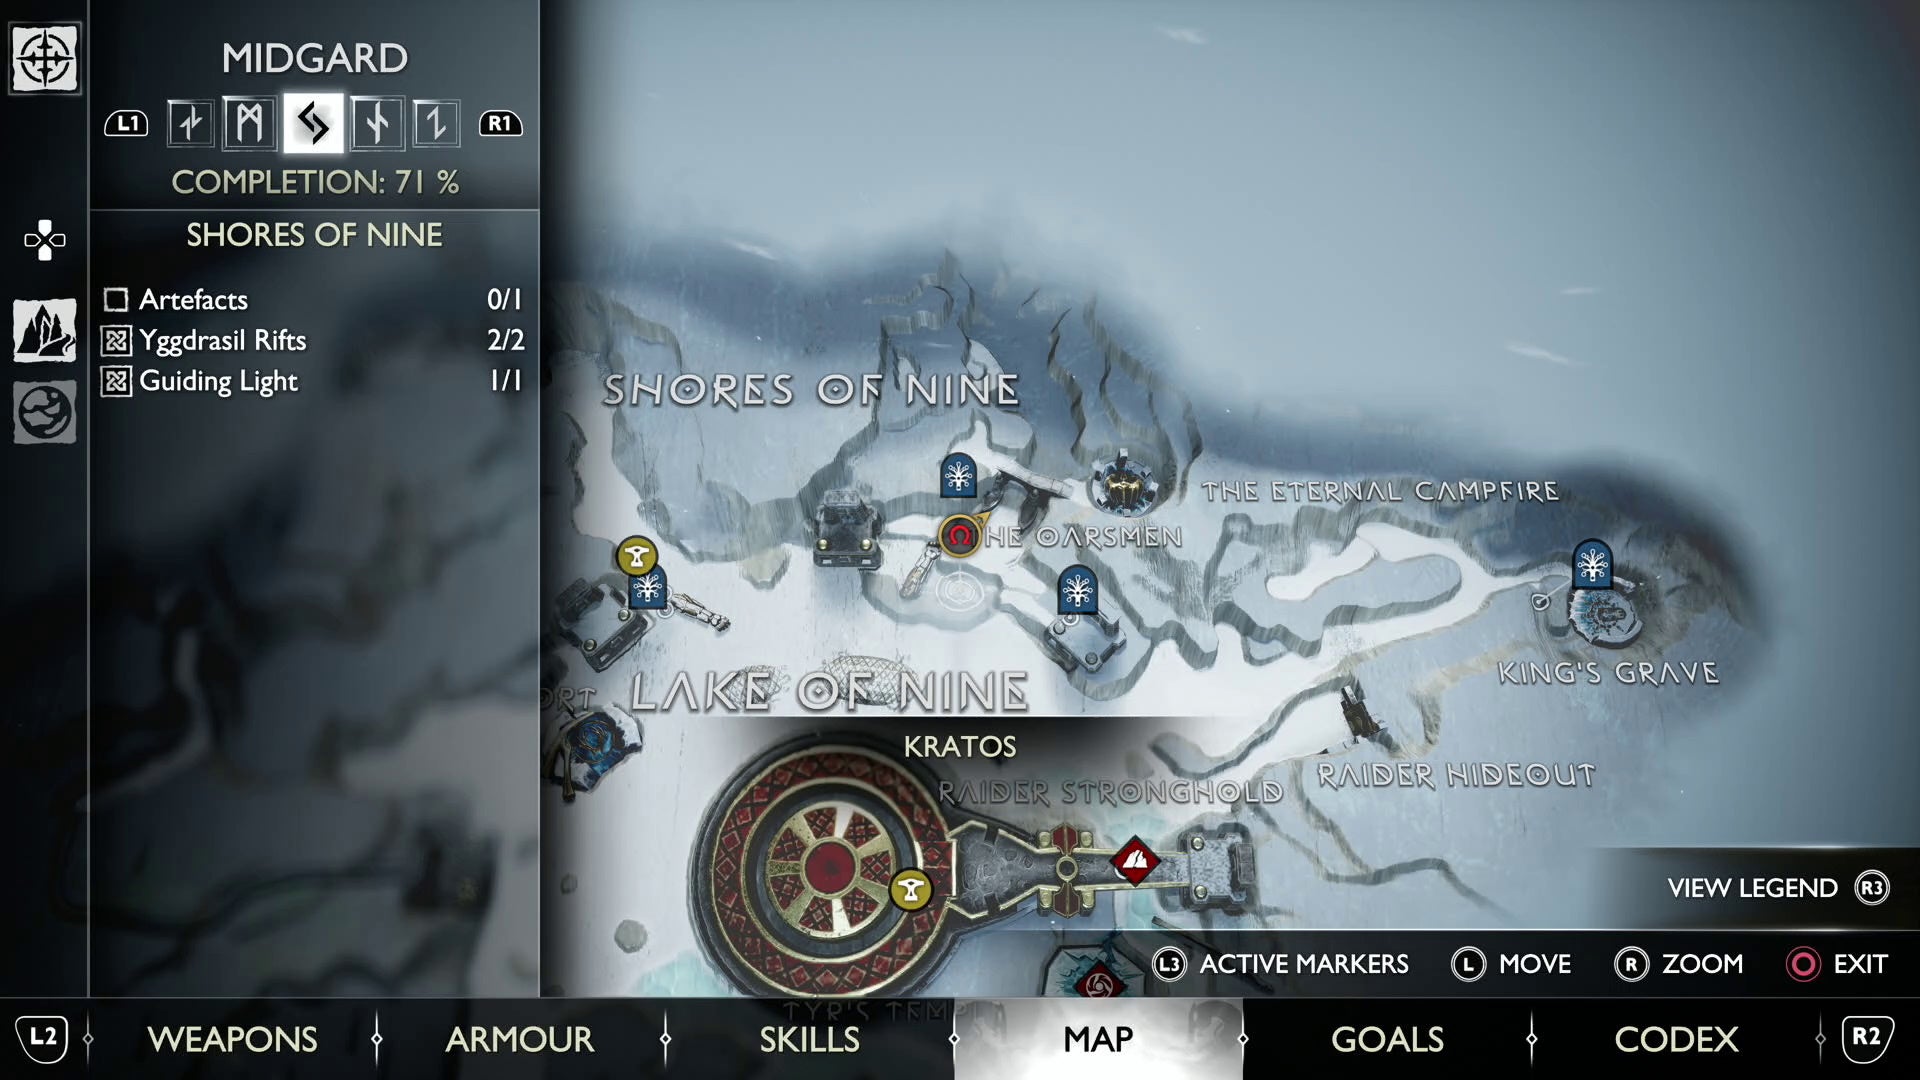
God of War Ragnarök Midgard Odin’s Ravens locations explained
There are six of Odin’s Ravens to find in Midgard, with all six available from the very first time you can explore Midgard as Kratos.
Here’s where to find all six Ravens in Midgard:
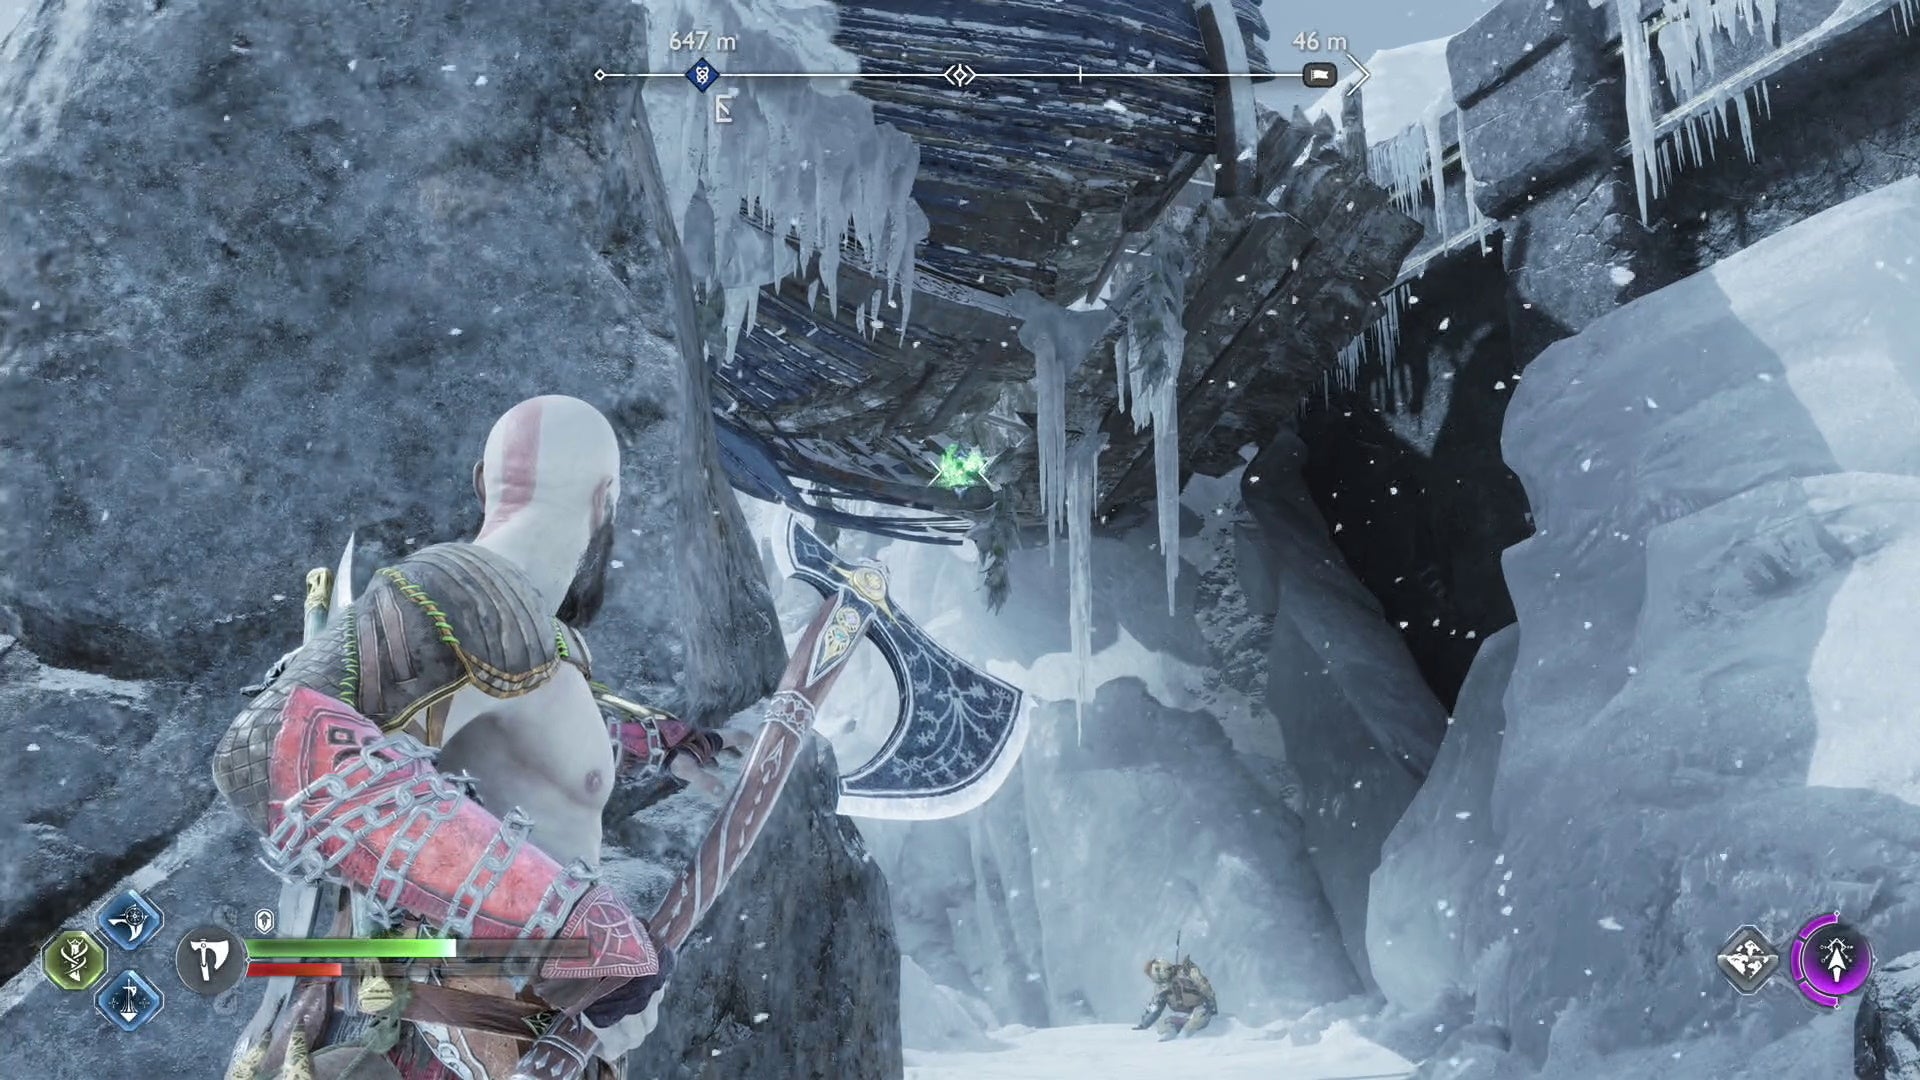
Midgard The Derelict Outpost Raven location 1 in God of War Ragnarök
The first Raven the The Derelict Outpost is perched above a dead body in the nook to your left after entering the area. If you see the golden chain that leads to the shop, you’ve gone too far.
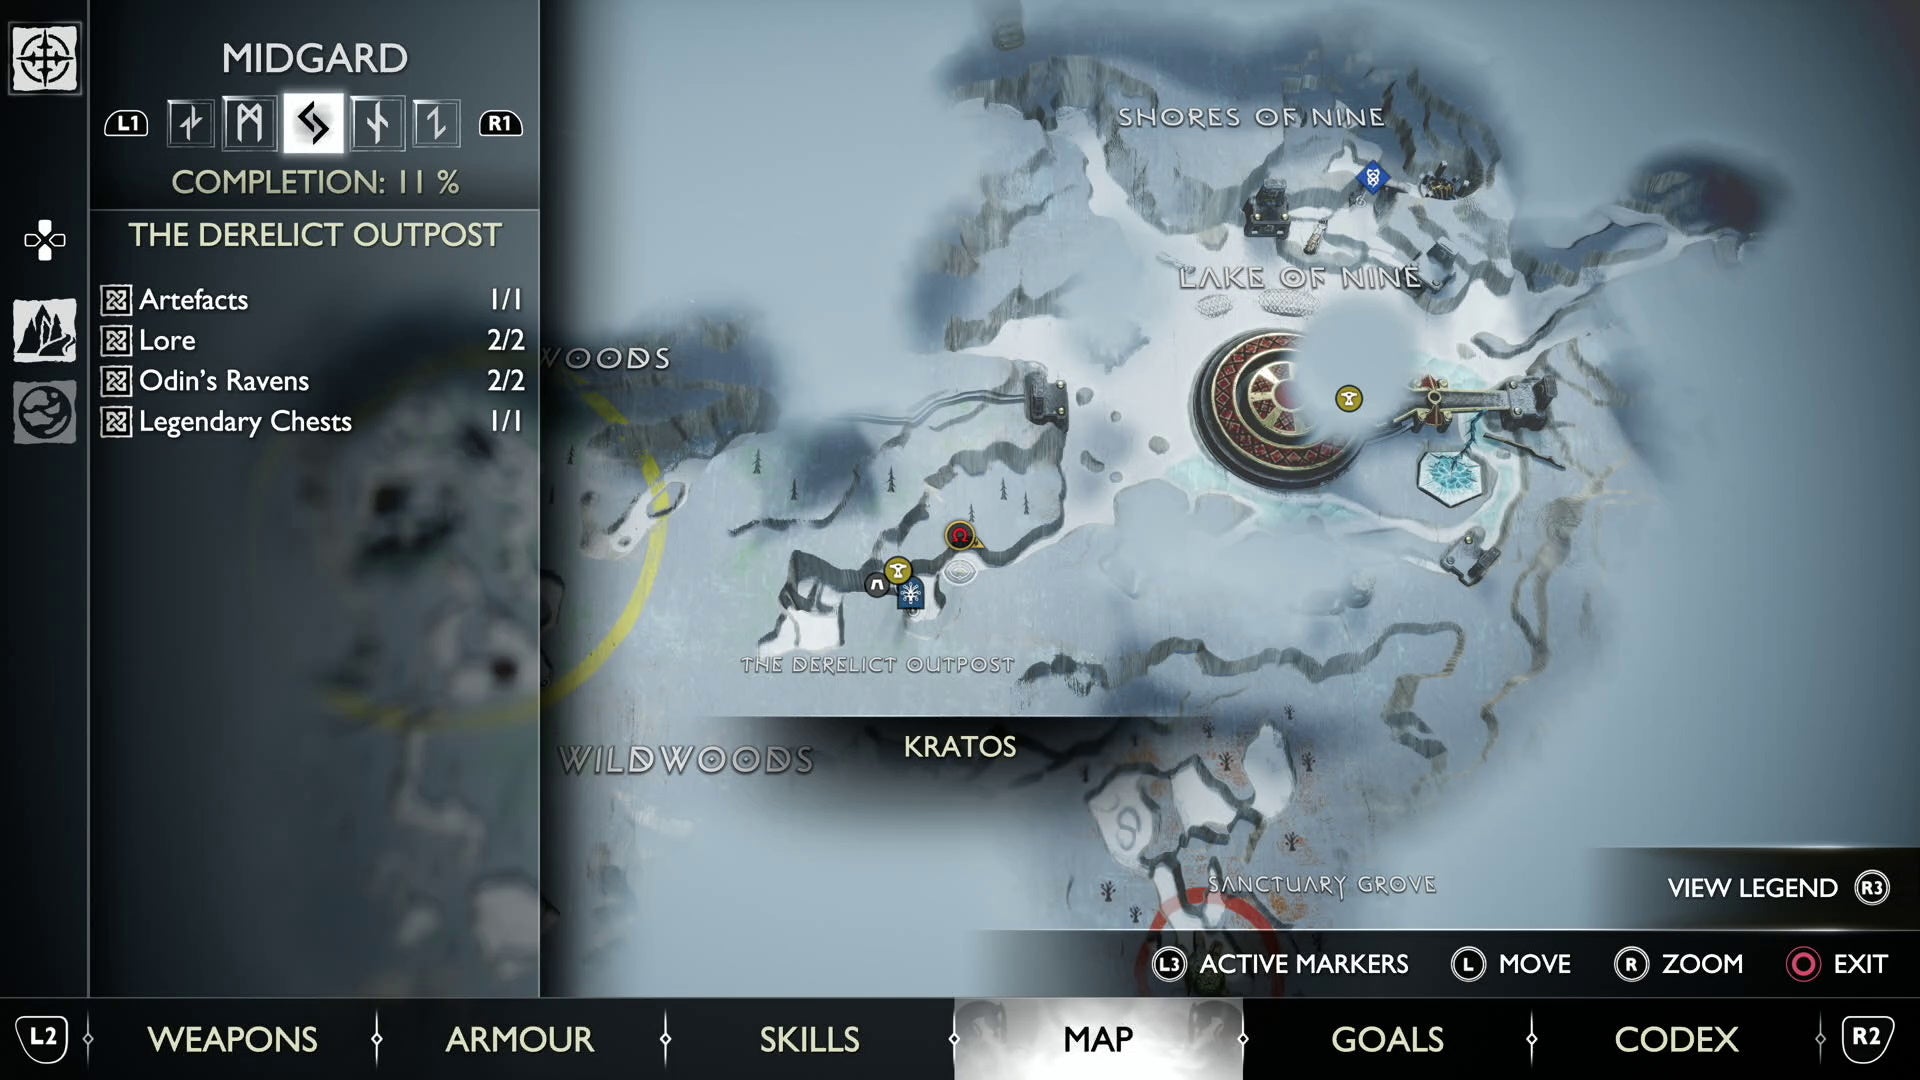
Midgard The Derelict Outpost Raven location 2 in God of War Ragnarök
This Raven at The Derelict Outpost in Midgard is located just past the shop in the area, over the first swinging jump. It’s perched to the right, on a small wooden column with a swinging mechanism below it. You’ll have to throw the axe a good bit above the Raven to hit it.
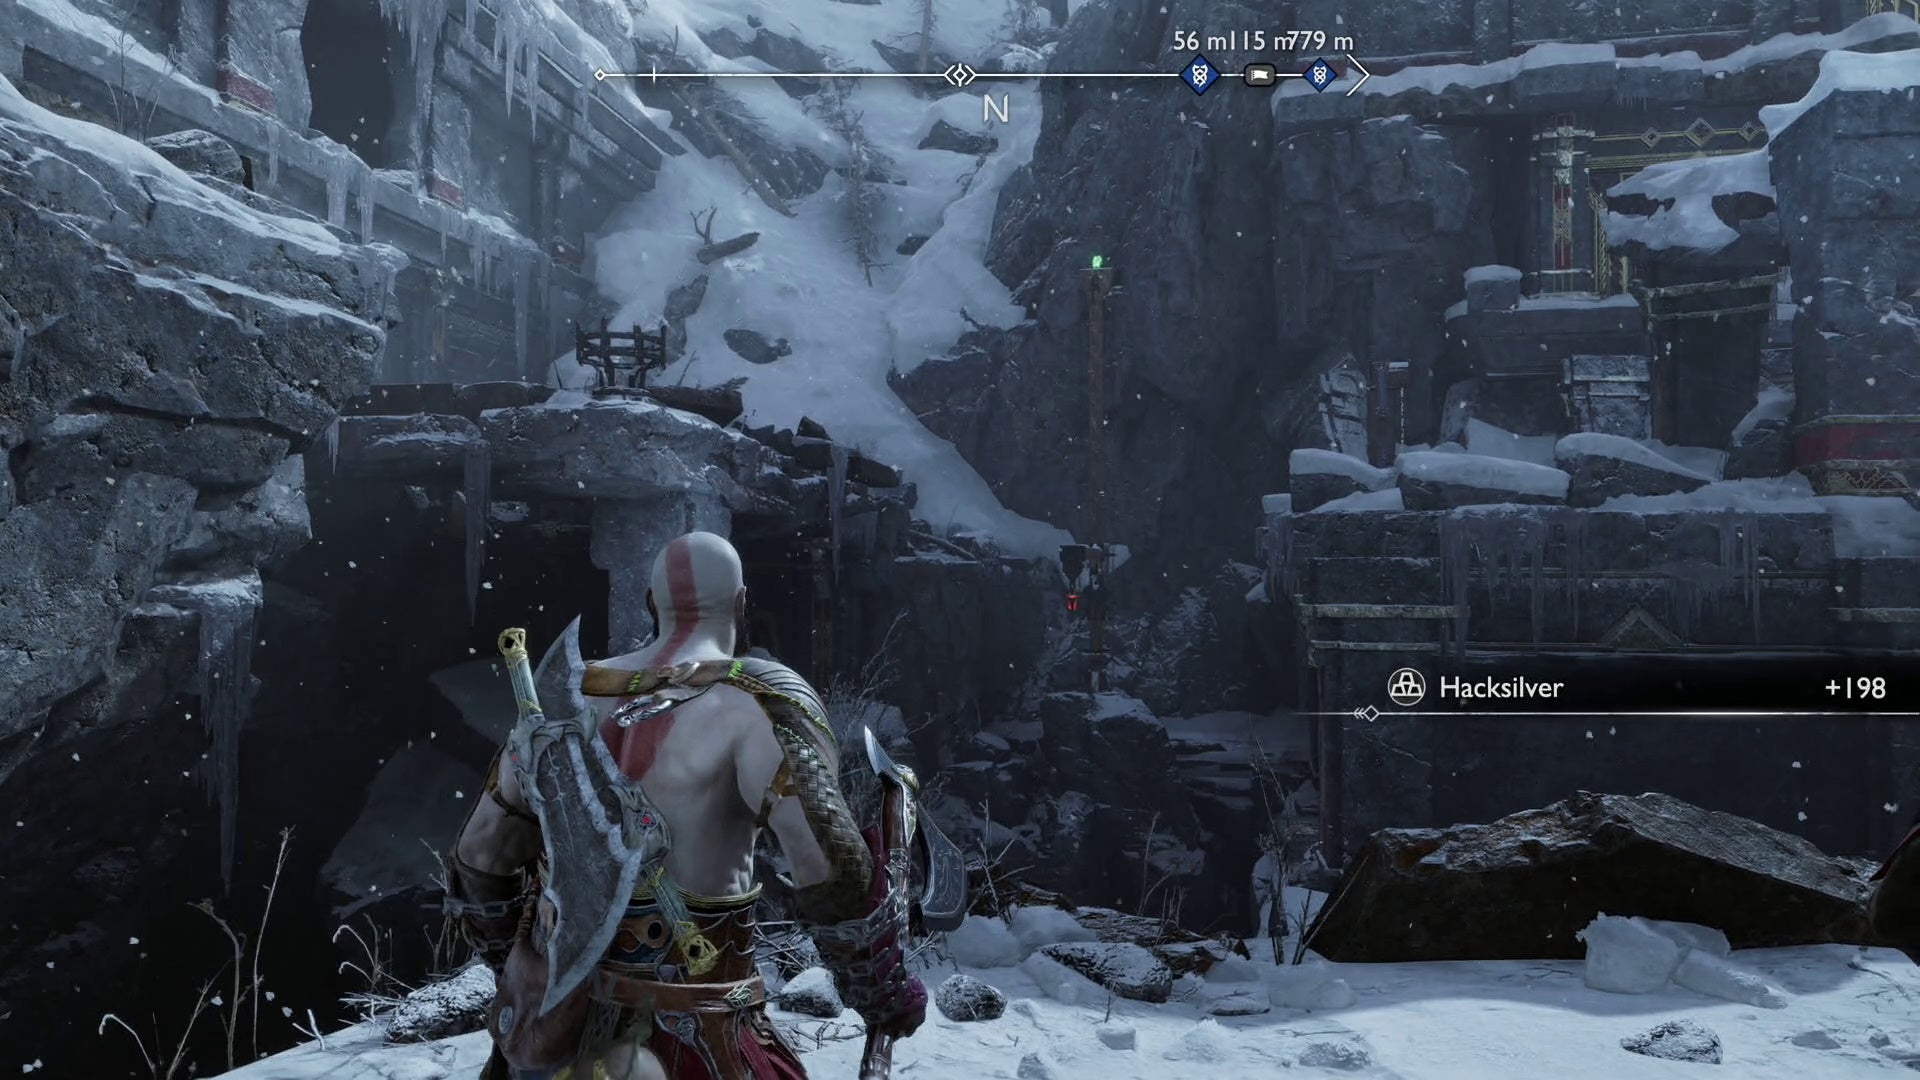
Midgard Lake of Nine Raven location 1 in God of War Ragnarök
This Lake of Nine Raven is inside the small ice cavern hugging the southern side of Tyr’s Temple in the middle.
Midgard Lake of Nine Raven location 2 in God of War Ragnarök
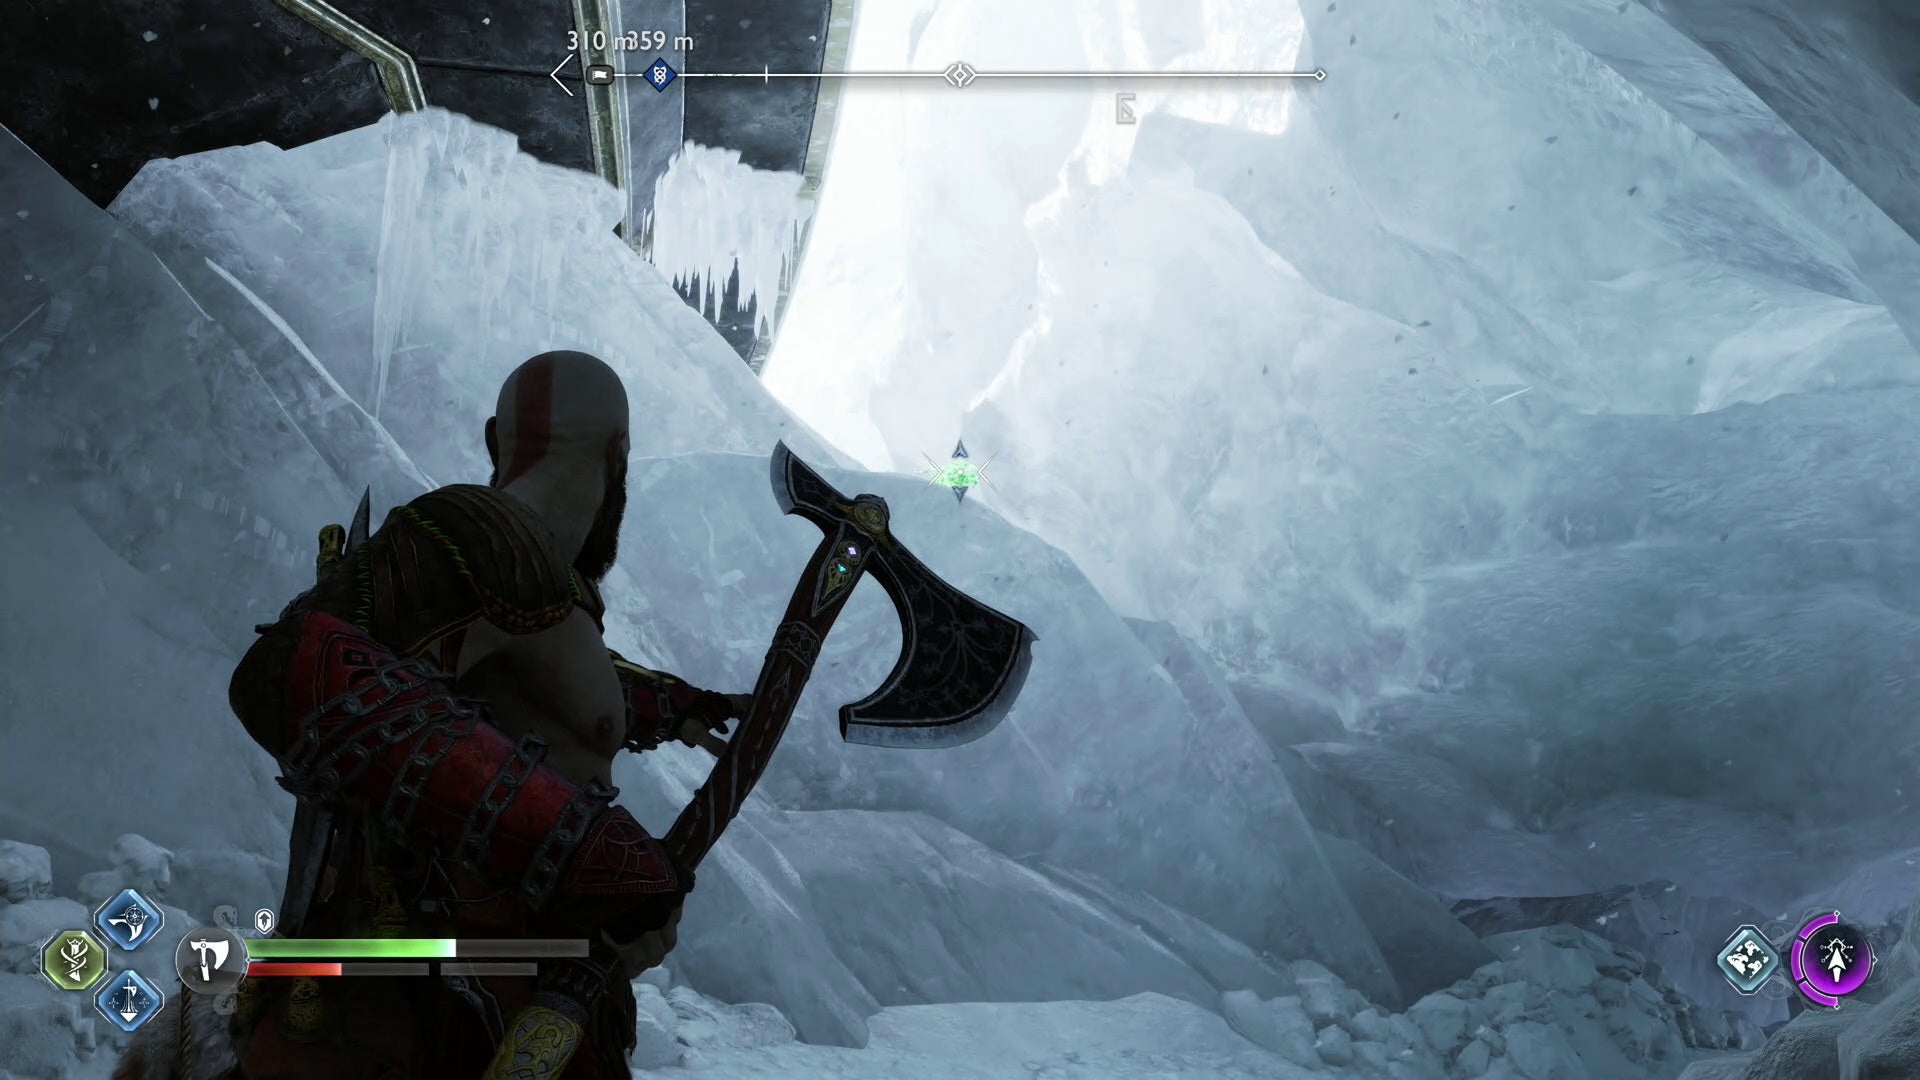
This Raven is perched above the large chain covered in snow just outside the entrance to the Raider Hideout in the eastern area of Midgard.
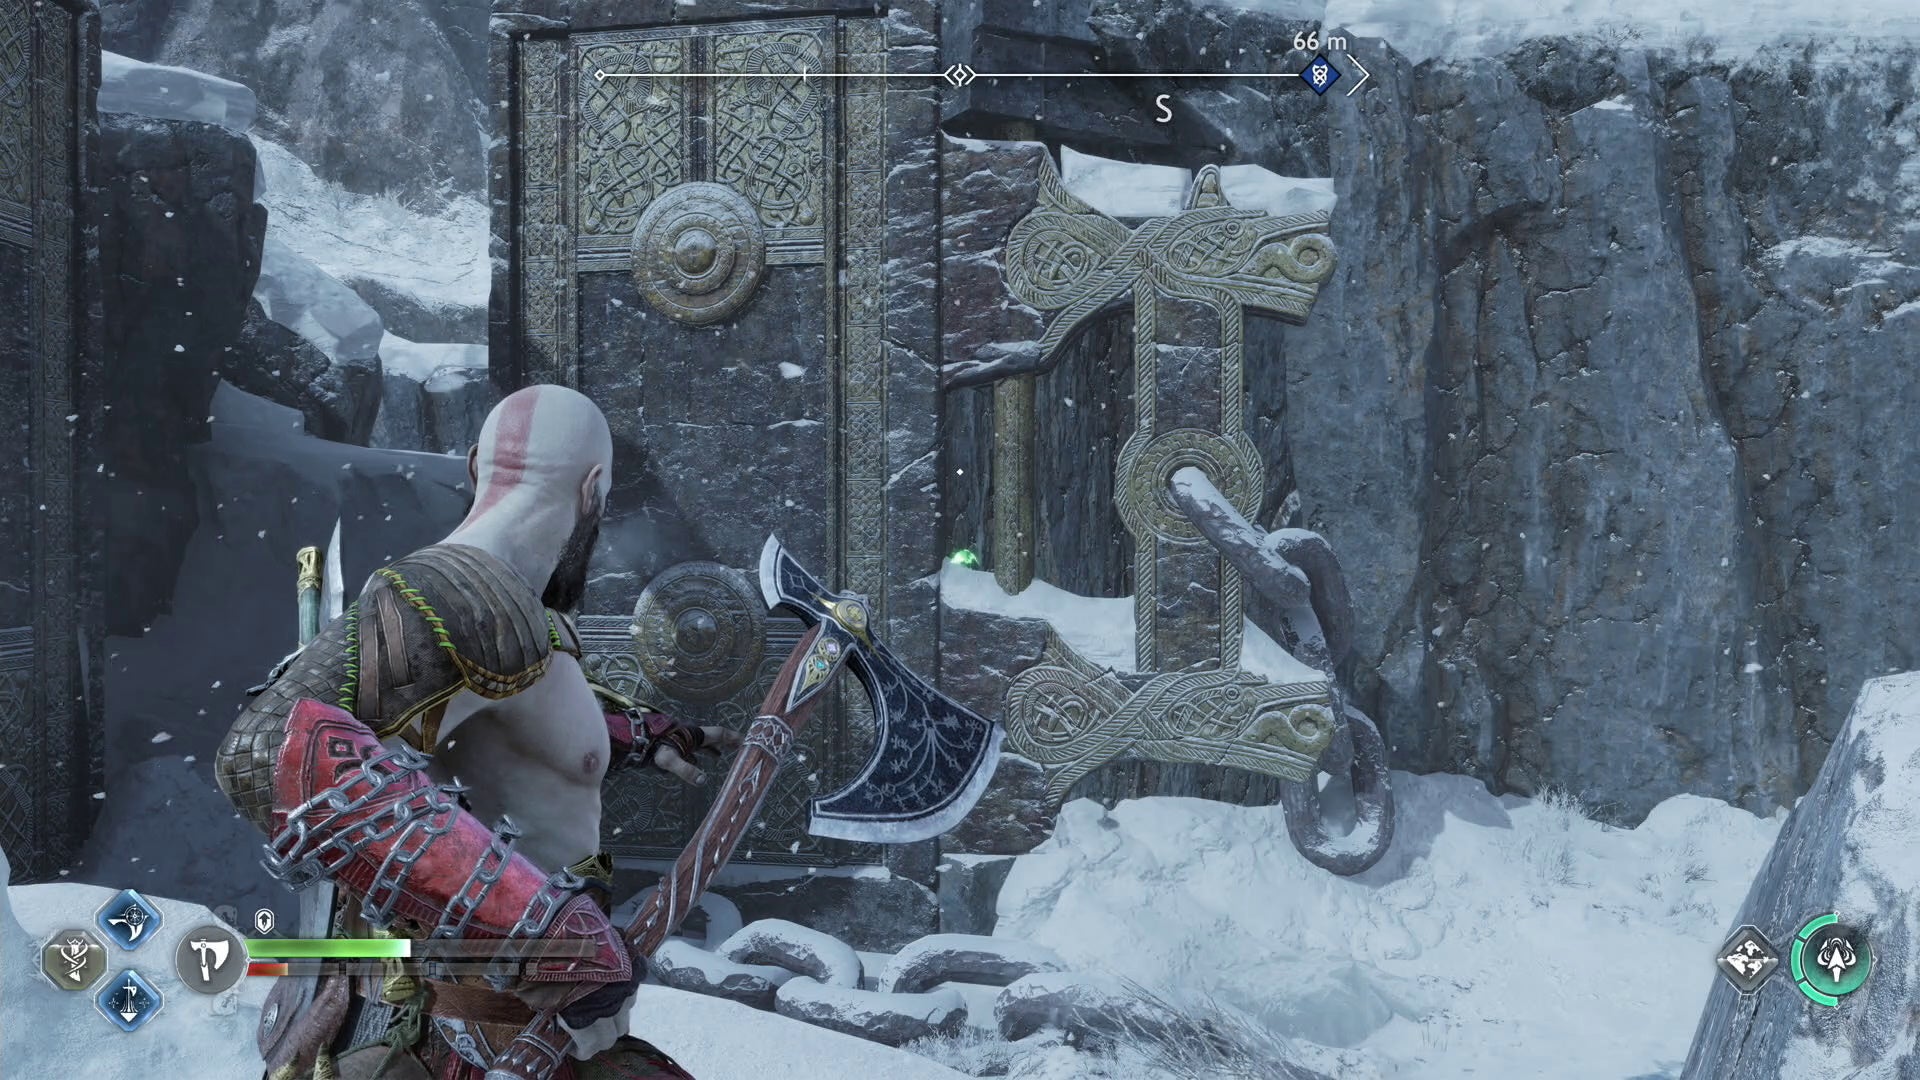
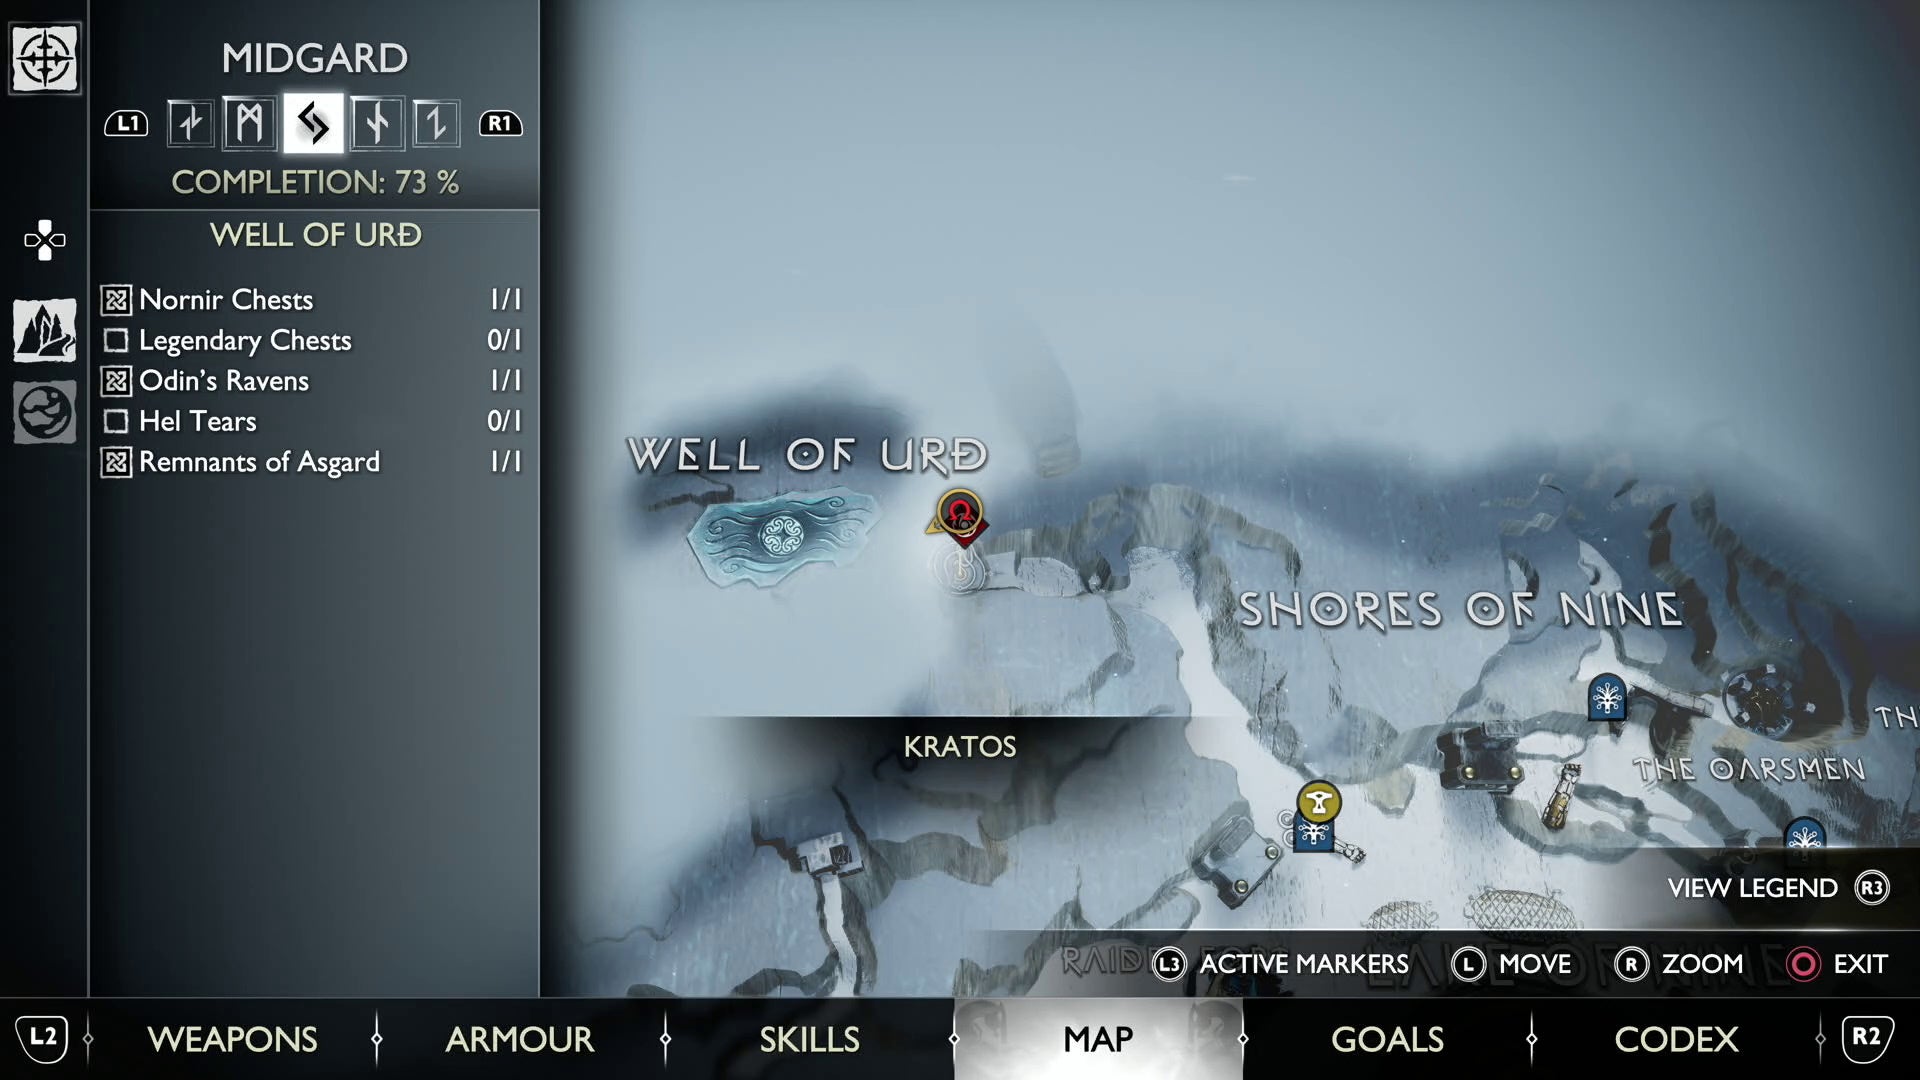
Midgard Well of Urd Raven location in God of War Ragnarök
This Raven is found perched on a pillar across from a campsite. The easiest way to get it is during the story, after visiting the Norns, but you can follow the same path as before through the crack in the cliff wall to get back to the Raven’s location.
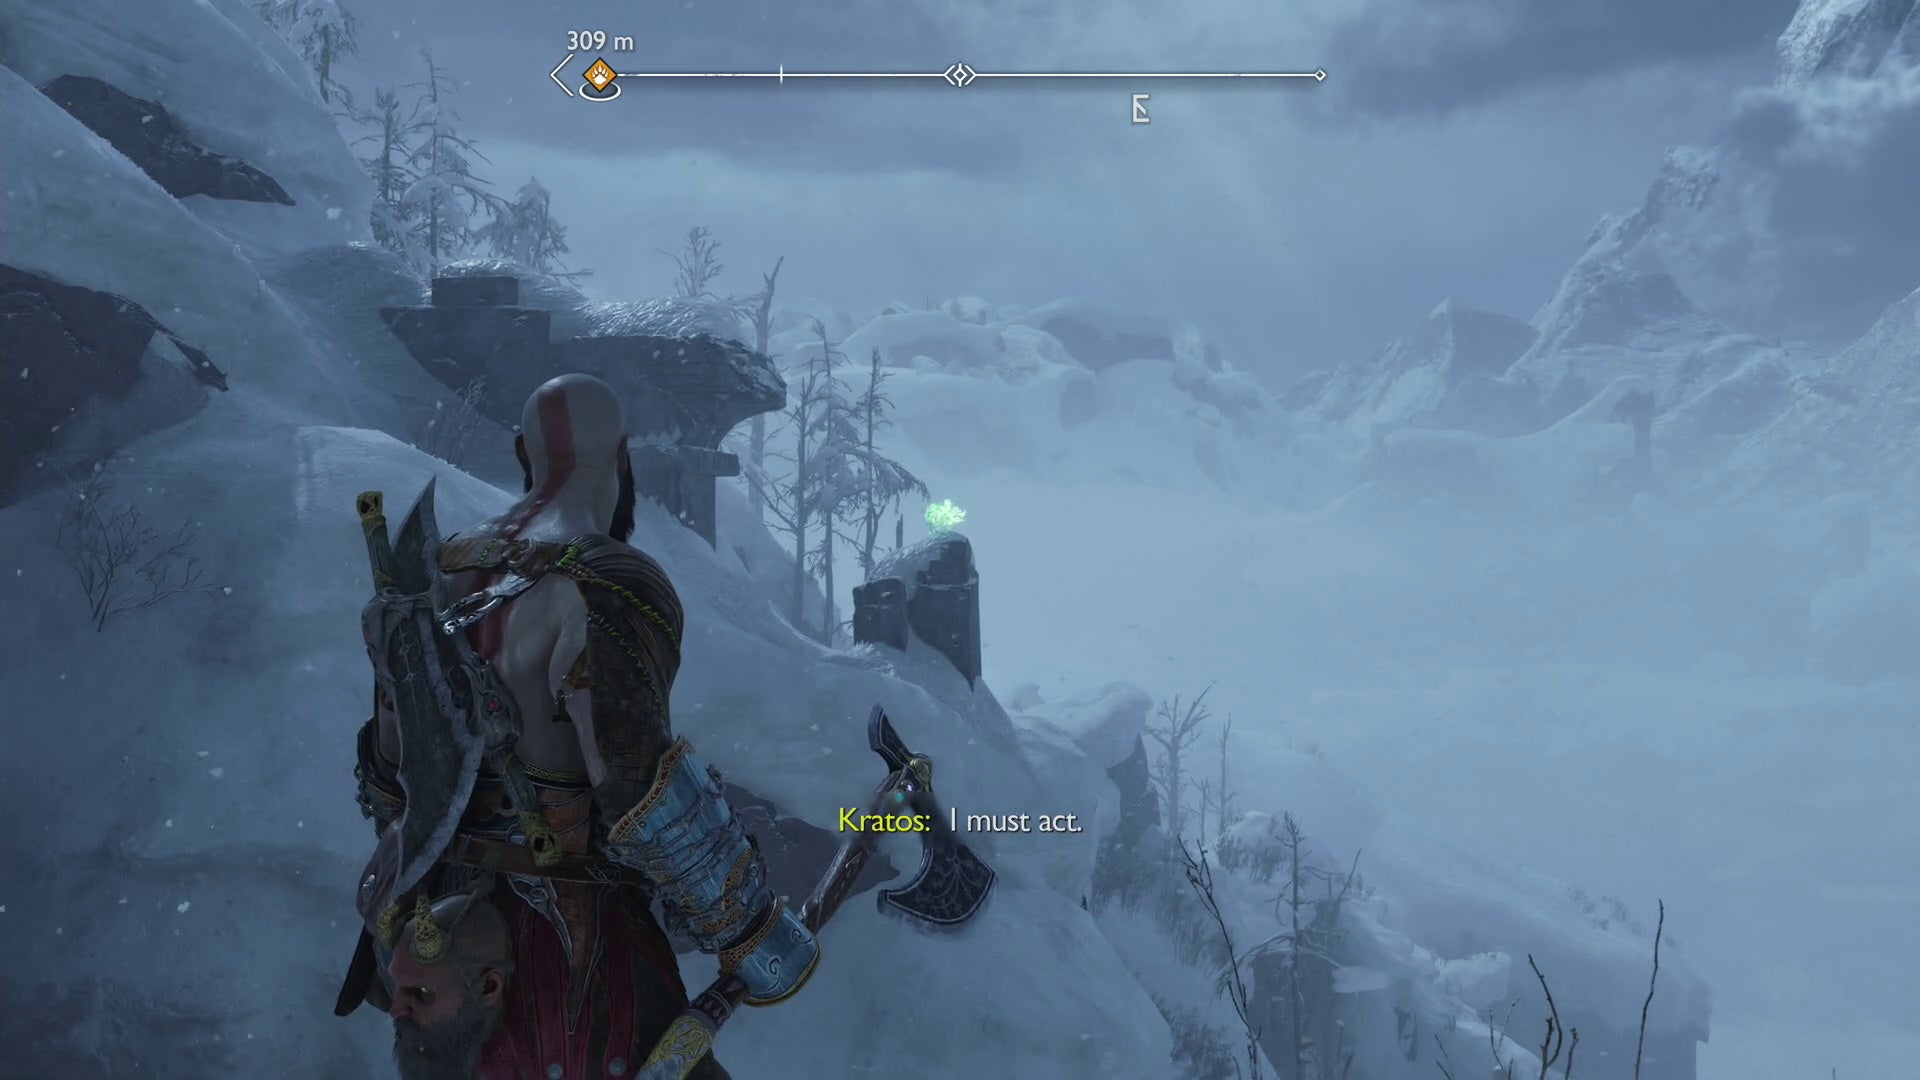
Midgard The Oarsman Raven location in God of War Ragnarök
The Oarsman Raven in Midgard is perched on the cliff to the right of the statue itself.

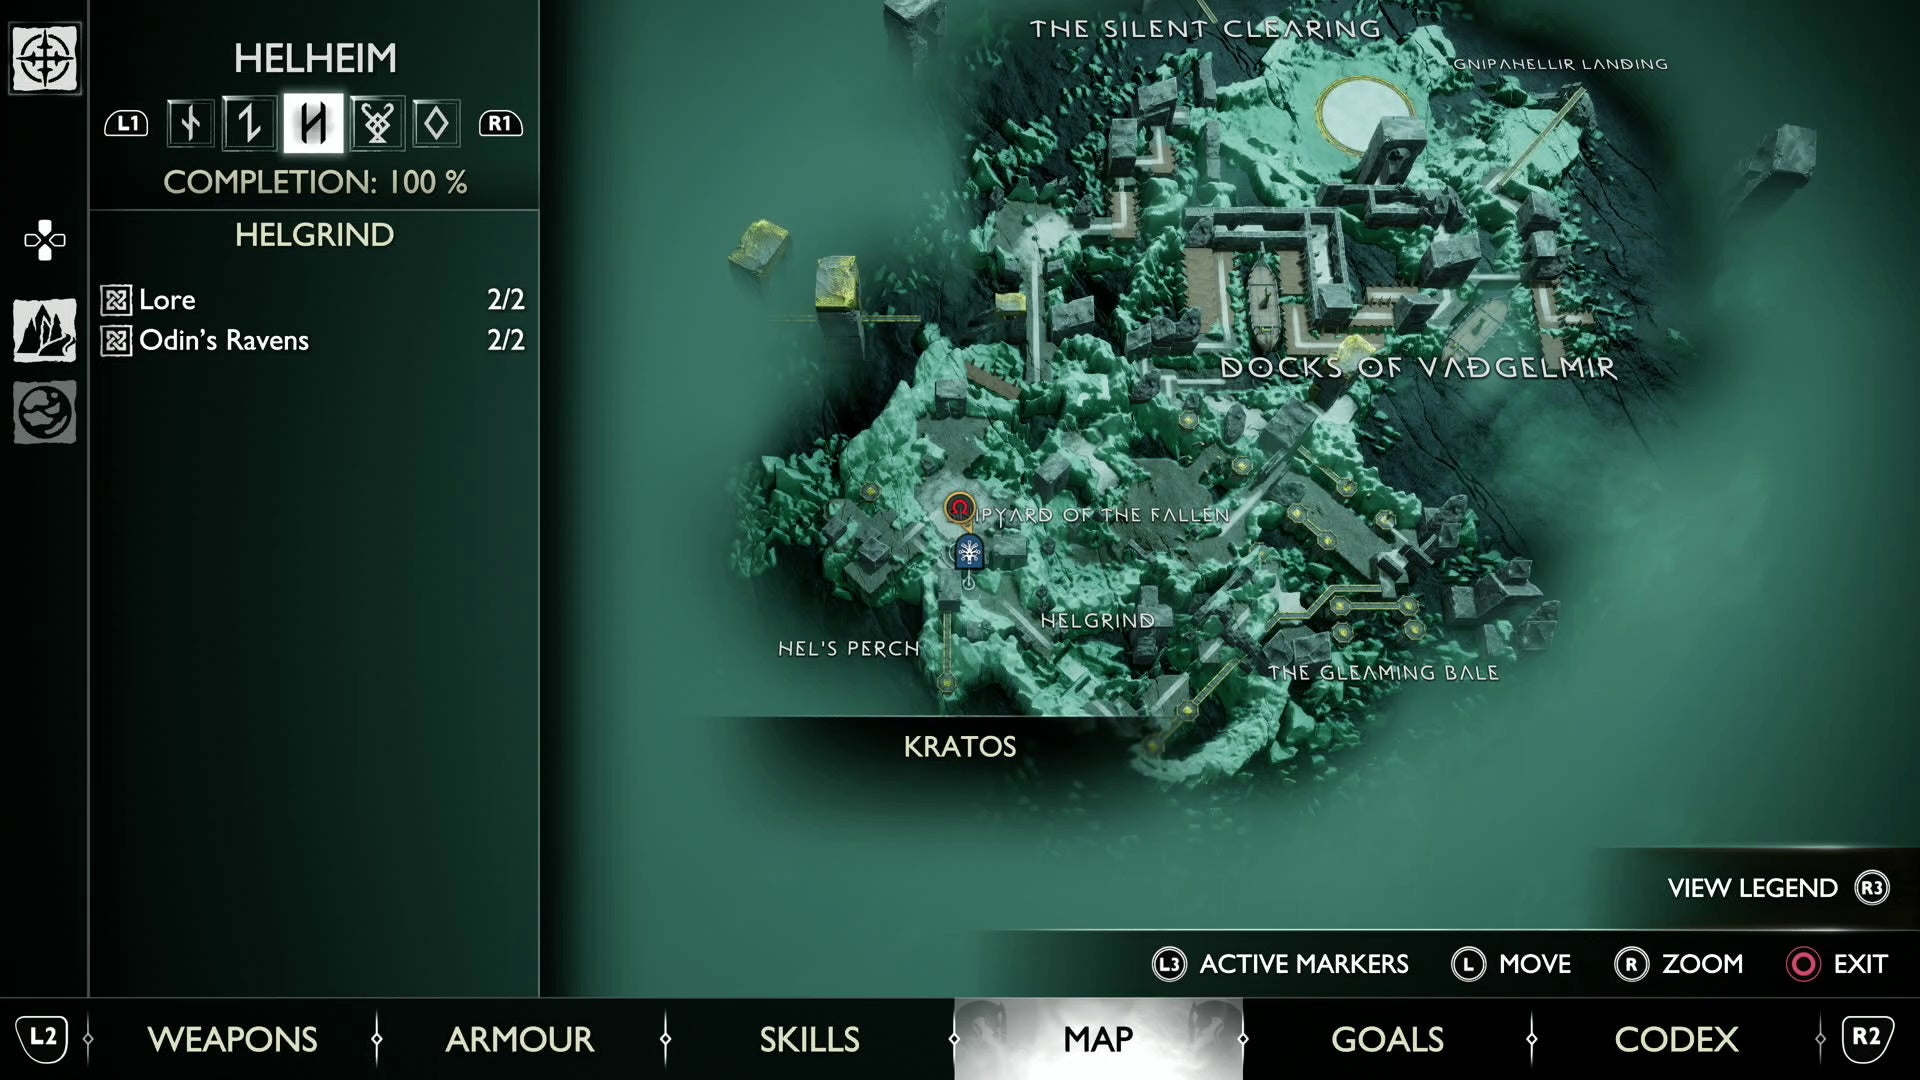
God of War Ragnarök Helheim Odin’s Ravens locations explained
There are two Ravens to find in Helheim, with both available from the first time Kratos explores the Realm.
Here’s where to find both Ravens in Helheim:
Helheim Helgrind Raven location 1 in God of War Ragnarök
The first Raven in Helgrind is found right next to the Mystic Gateway you come through when travelling back to Hel with Atreus as part of the story. It’s flying in circles to the left of the pillar you need to use your spear to destroy.
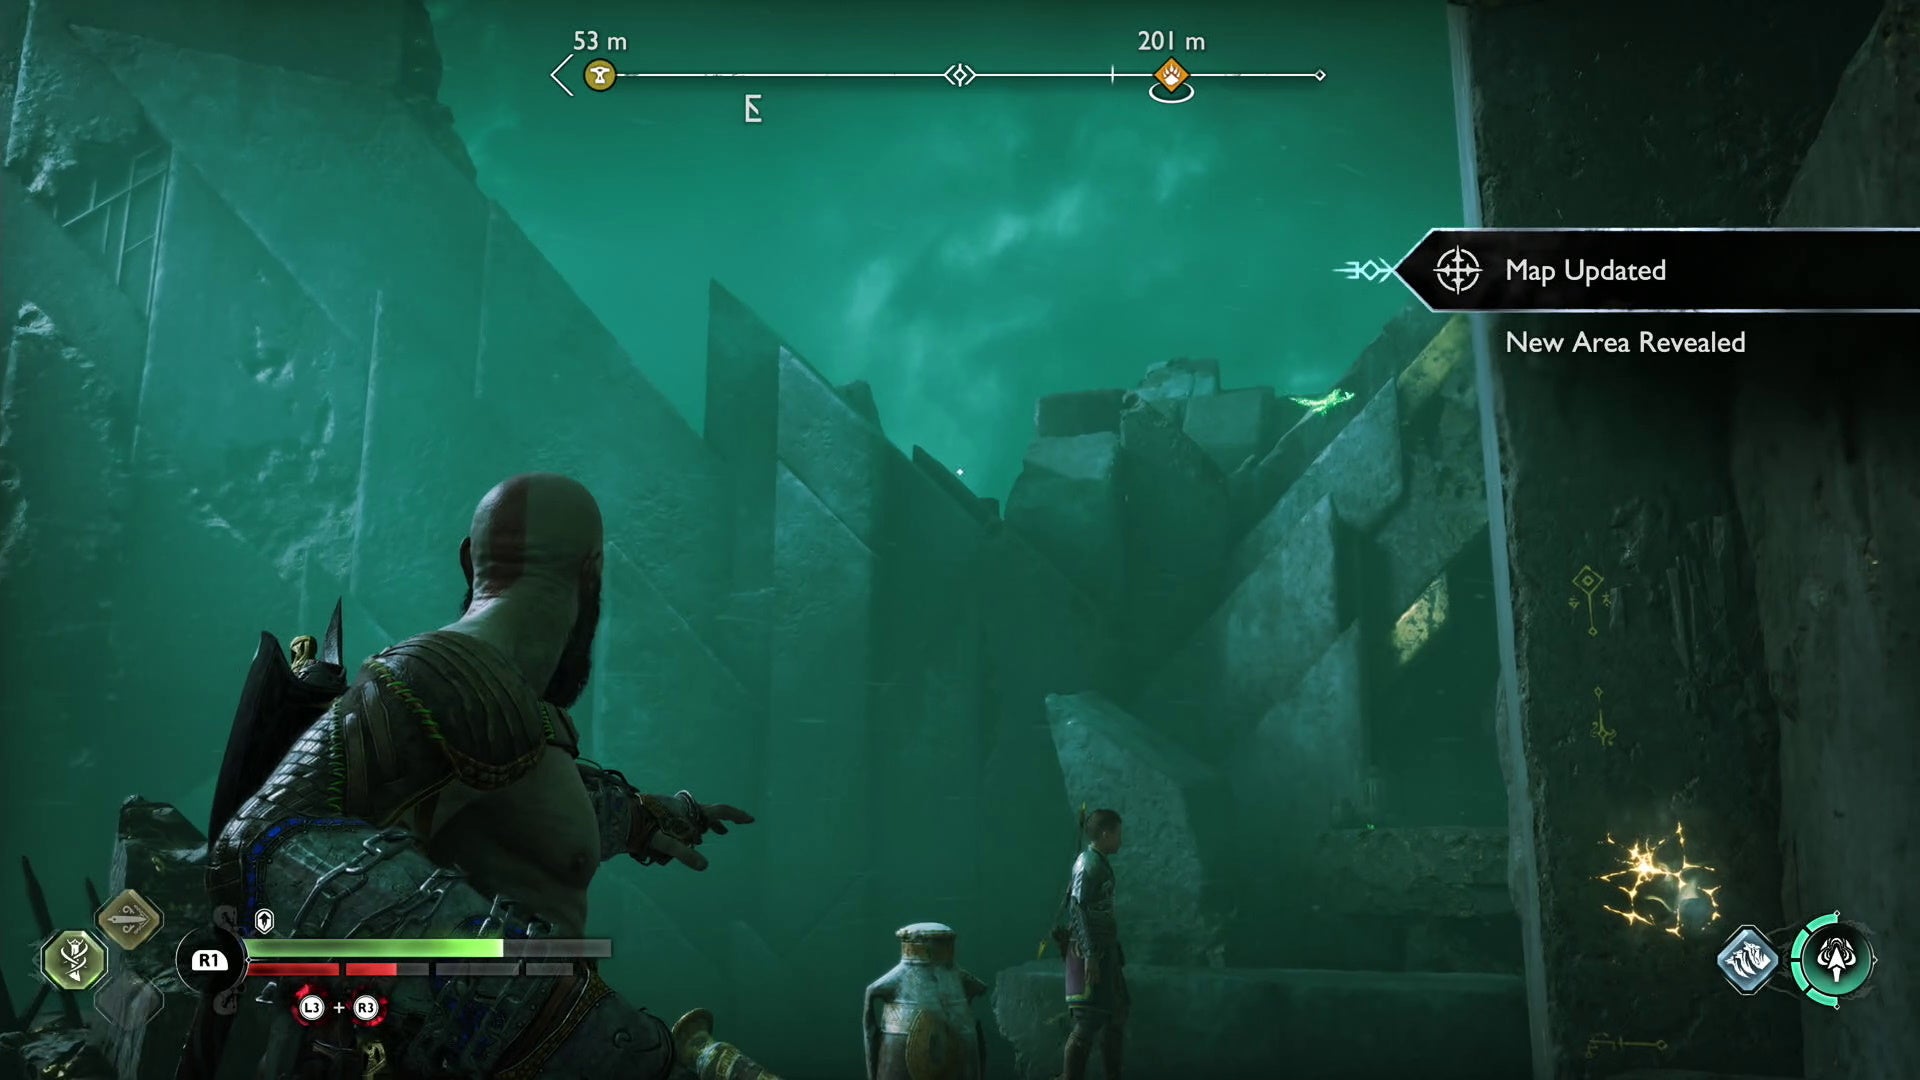
Helheim Helgrind Raven location 2 in God of War Ragnarök
The second Raven in the Helgrind area of Helheim is perched above the lore marker near the Mystic Gateway at the end of the area.
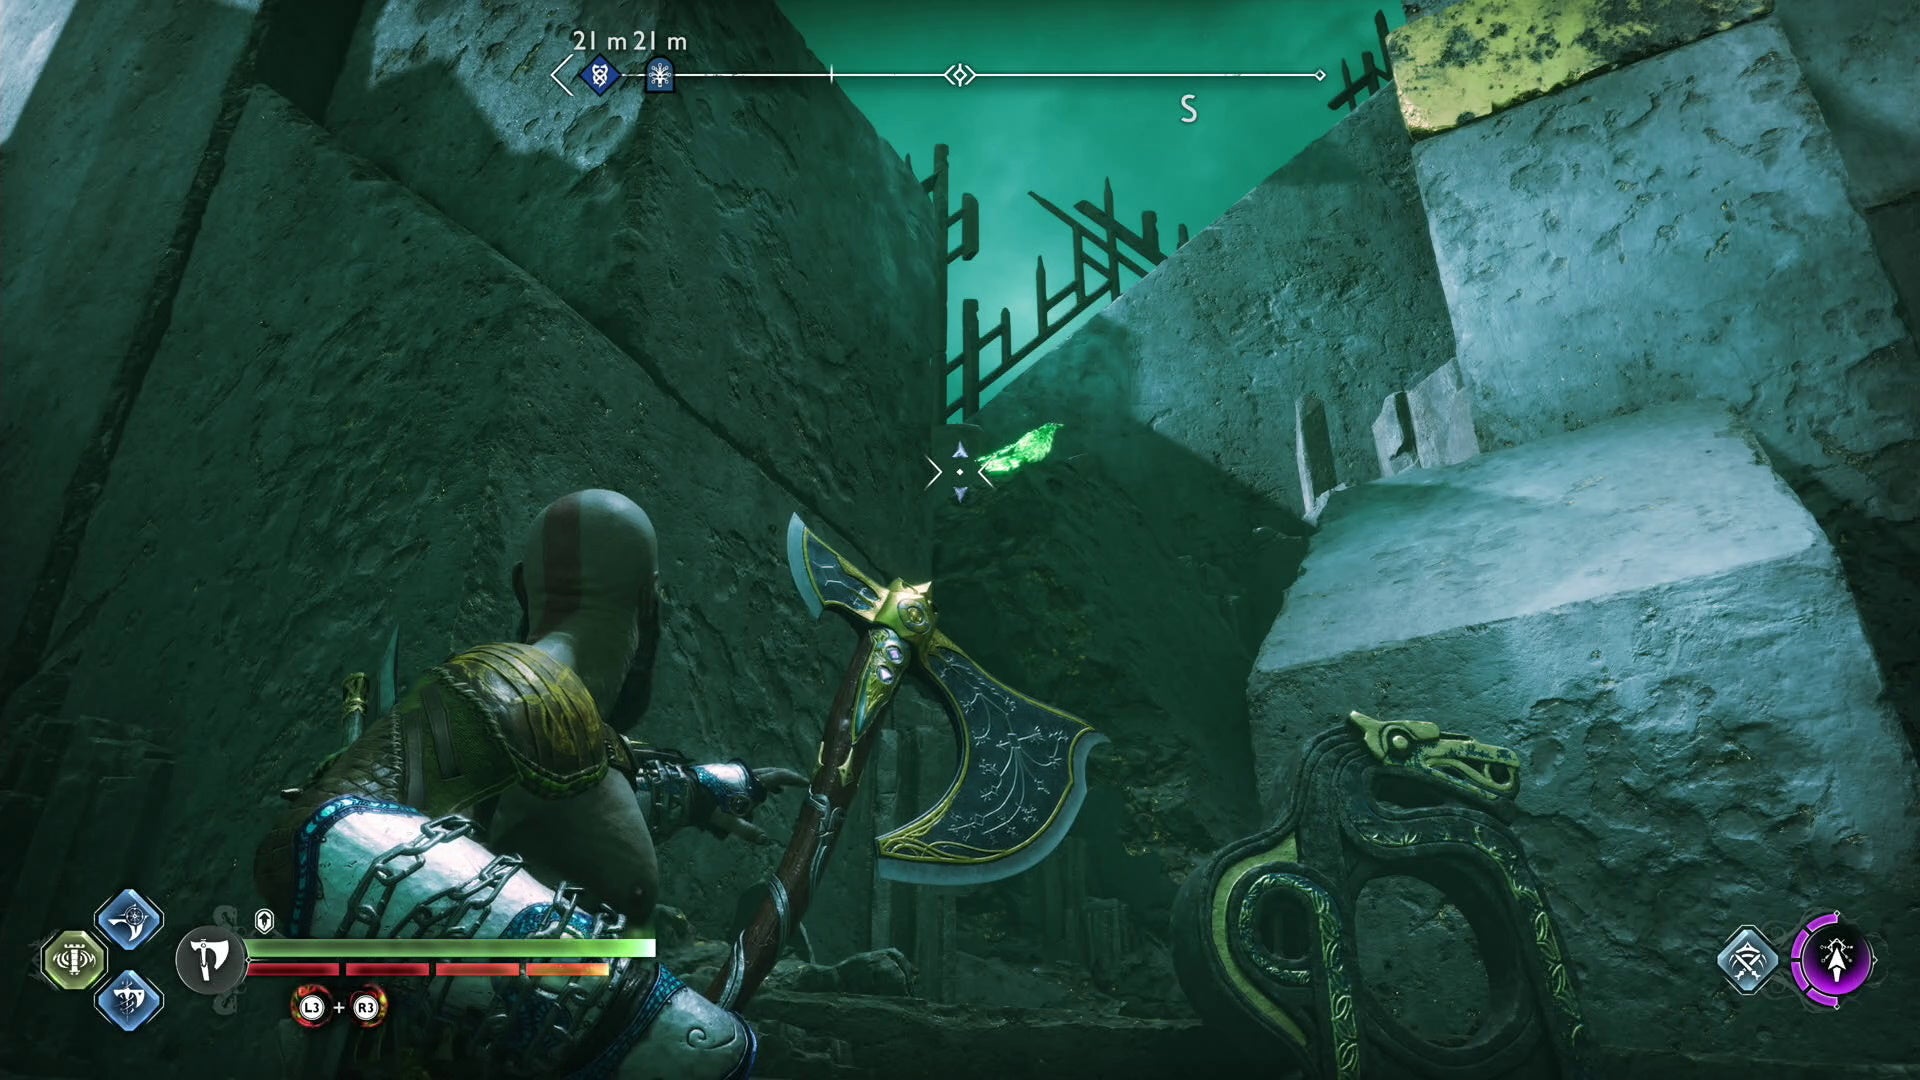
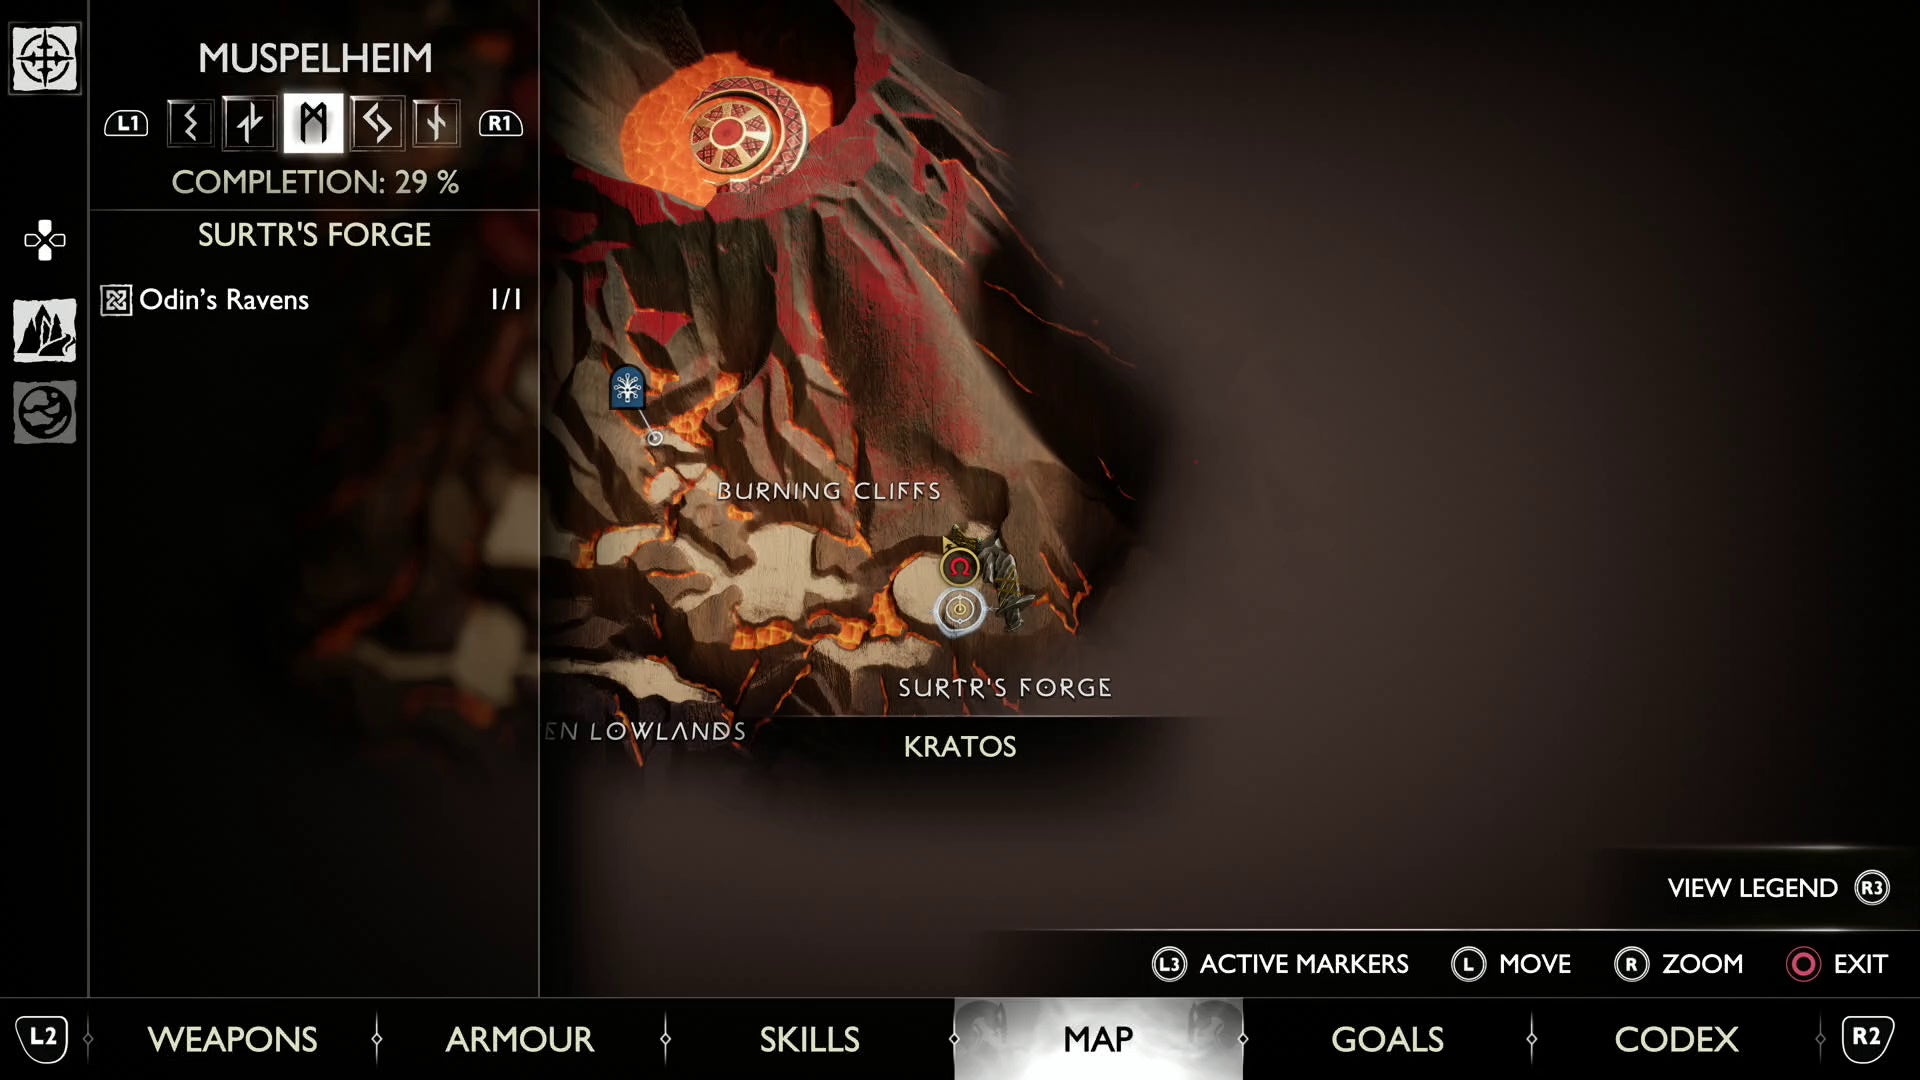
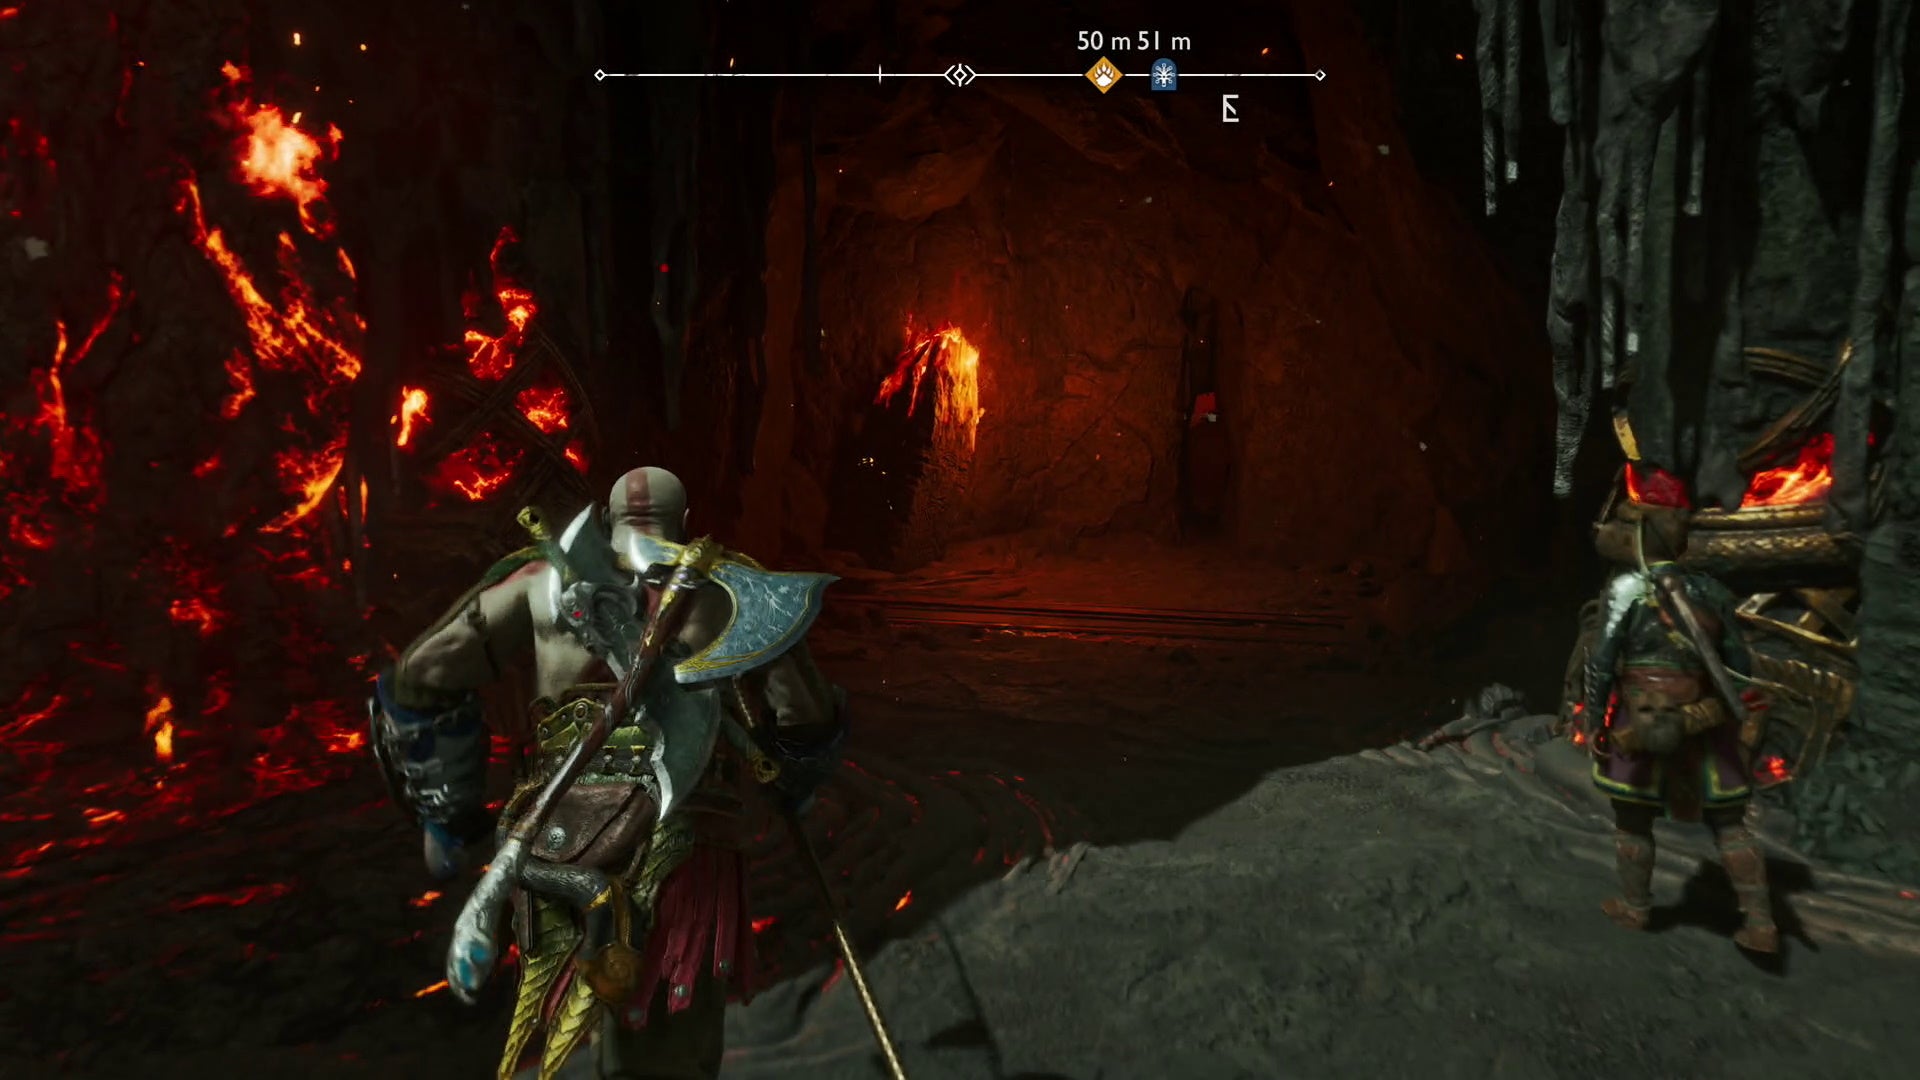
God of War Ragnarök Muspelheim Odin’s Ravens locations explained
There are two of Odin’s Ravens to find in Muspelheim, with both available from the first time Kratos explores the Realm.
Here’s where to find both Ravens in Muspelheim:
Muspelheim Raven Sutr’s Forge location in God of War Ragnarök
This Raven in Sutr’s Forge on Muspelheim is located directly opposite the forge itself, perched inside an archway to the right of a stream of lava coming down the cliff.

Muspelheim Raven Burning Cliffs location in God of War Ragnarök
The second Raven in Muspelheim is located on the way back to the Mystic Gateway, to the right of a Legendary Chest. This area is reached by going through the crack in the wall.
That’s every Raven location in God of War Ragnarök – good luck with collecting all of them!
fbq('init', '560747571485047'); fbq('init', '738979179819818');
fbq('track', 'PageView'); window.facebookPixelsDone = true;
window.dispatchEvent(new Event('BrockmanFacebookPixelsEnabled')); }
window.addEventListener('BrockmanTargetingCookiesAllowed', appendFacebookPixels);
Read original article here
HARVESTELLA details winter locations, jobs, Faerie Orders, FEAR enemies, more
Publisher Square Enix [5,007 articles]” href=”https://www.gematsu.com/companies/square-enix”>Square Enix and developer Live Wire [19 articles]” href=”https://www.gematsu.com/companies/live-wire”>Live Wire have released new information and screenshots for life Simulation [155 articles]” href=”https://www.gematsu.com/genres/simulation”>simulation Action RPG [440 articles]” href=”https://www.gematsu.com/genres/rpg/action-rpg”>action RPG HARVESTELLA [6 articles]” href=”https://www.gematsu.com/games/harvestella”>HARVESTELLA, introducing the game’s winter locations, more jobs, Faerie Orders, “FEAR” enemies, and more.
Get the details below.
■ Winter Seaslight
—The Seaslight during regular seasons.
—The Seaslight during Quietus.
■ Winter Location: Holy Capital Argene
A religious city covered in snow and home base of The Seaslight Order. Priests of the Order come to worship at the Divine CAVE Interactive [53 articles]” href=”https://www.gematsu.com/companies/cave-interactive”>Cave near Argene, where the Winter Seaslight is located.
■ Winter Location: Story of the Holy Capital Argene
The protagonist and Aria visit the Holy Capital Argene to investigate the Winter Seaslight, but they are told that only those who have been given the “Flos-Indulgentia” are allowed entry into the Divine Cave where the Seaslight is located.
A priest of the Order says that since the Seaslight anomaly, he has been receiving oracles. The prophecy of a disaster in the near future has led many of the faithful to seek the Flos-Indulgentia, rumored to mark those who wear them as pure…
—Argene’s underground passage, which no one even in the Order knows about…?
—Divine Seaslight Cave
■ Character from the Holy Capital Argene
Brakka
“Use force appropriate for the objective. That’s what mercenaries do.”
A mercenary in black. He fights with a mysterious weapon that fires flying bullets. He will take on any request as long as he is paid, but the price is rumored to be high…
■ Adventure: Jobs
Jobs have unique weapons and use characteristic skills. By recruiting a character with a certain job, the player-controlled protagonist will also become able to use that same job.
Avenger
A job that excels at physical attacks from a distance. The attribute of normal attacks can be switched between fire and ice depending on skill.
Pilgrim
A job that performs physical and magical attacks with a magic sword. Players learn skills that deal wide-ranged attacks or set up fields that continuously cause damage.
■ Daily Life: Faerie Orders
A “fire faerie” suddenly appears at home. It seems to have something to do with the Seaslight… The faerie, who claims that other types exist other than “fire”, says it will help the protagonist work in the fields.
Faerie Orders
You can check the “Faerie Orders” from the Faerie Book in your home. By reporting the orders that have been completed, you can earn rewards that will help you in various ways.
■ Daily Life: Speeding Up Farming Tasks and Leveling Up Fields
By completing many fairy requests, you can plow large areas of fields at once, or water, sow, and harvest all at once, making farming even easier! Also, by leveling up your fields, you can increase the probability of harvesting high quality crops, which can be shipped at a higher price, or used to make high quality food.
—Charged Watering
—Charged Harvest
The “water biome” and “cave biome” can also be unlocked by helping the fairies linked to each Seaslight.
—Water Biome
—Cave Biome
■ Daily Life: Special Winter Produce
Some produce can be harvested all year round, while some kinds of fruit and vegetables can only be harvested in a particular season! Savour the seasonal work on the farm and cuisine particular to each season.
Winter Crops
—Lumpotato
—Snowcap Mikan
—Argene Cabbage
—Chilly Plant
Food Using Winter Crops
—Nikujaga
—Marmalade (processed product)
—Argene Cabbage Stew
—Ice Cream
And there’s more to winter crops and Cooking [1 article]” href=”https://www.gematsu.com/genres/cooking”>cooking! You can also make processed products using seasonal crops.
■ Interaction: Break Time
Eating a meal during an Adventure [506 articles]” href=”https://www.gematsu.com/genres/adventure”>adventure with your party members will sometimes result in a special storyline, as well as triggering food effects that are better than usual. Depending on the food you eat, you may see an unexpected side to the characters.
■ Adventure: FEAR
In some dungeons, there may be powerful roaming enemies called “FEAR,” that are clearly different from ordinary enemies. They are formidable opponents that you won’t be able to defeat if your party is weak, but if you defeat them, you may be able to obtain powerful accessories.
—Even paths that seemingly require defeating FEAR to proceed can sometimes be avoided by using field effects. Use them to your advantage to move forward.
■ Updates to HARVESTELLA Main Game from Demo Version
Based on feedback from customers who played the Switch [12,301 articles]” href=”https://www.gematsu.com/platforms/nintendo/switch”>Nintendo Switch demo version, we plan to improve the full version (Nintendo Switch / Steam) with the following updates.
- Reduced time lapse speed on the world map and the field.
- Reduced hit time for fishing.
- Reduced cooldown time for job changes.
- Increased the Mage’s normal attack speed.
- Partially reduced loading time.
- Addition of a warning effect when a character’s HP is low.
- Modified UI during save and auto-save.
- Various assorted bug fixes.
(These updates will not be implemented for the demo version.)
HARVESTELLA is due out for Switch and PC [16,040 articles]” href=”https://www.gematsu.com/platforms/pc”>PC via Steam on November 4 worldwide. A demo is available now for Switch. Read more about the game here, here, here, and here.